Ebben a bemutatóban nem csak különlegesen mozgatunk meg egy képet a videónkban, hanem új menüponttal is megismerkedünk. Azt már tudjuk, hogy hogyan fordítsunk el egy képet mind horizontálisan mind vertikálisan. Vagyis tudjuk, hogy az effect menüben hogyan müködik a tilt beállítás. Azt viszont nem tanultuk még, hogy ennek a tilt résznek legördülö menüi is vannak a jobb fül kattintással ahol szintén nagyon sok állítási lehetöség van. Ebböl most egy fajtán belül dolgozunk amellyel a képünket egyszere tudjuk mozgatni horizontálisan is és vertikálisan is.
Ezt az effectet swinging ( hintáztatás ) effectnek hívják. Figyelmesen kell dolgoznod most is.
In this presentation, we will not only move an image in our video in a special way, but also introduce a new menu item. We already know how to flip an image both horizontally and vertically. In other words, we know how the tilt setting works in the effect menu. However, we have not yet learned that this forbidden section also has drop-down menus with the right tab click, where there are also a lot of setting options. From this, we are now working within a type with which we can move our image both horizontally and vertically. This effect is called the swinging effect. You have to work carefully now too.

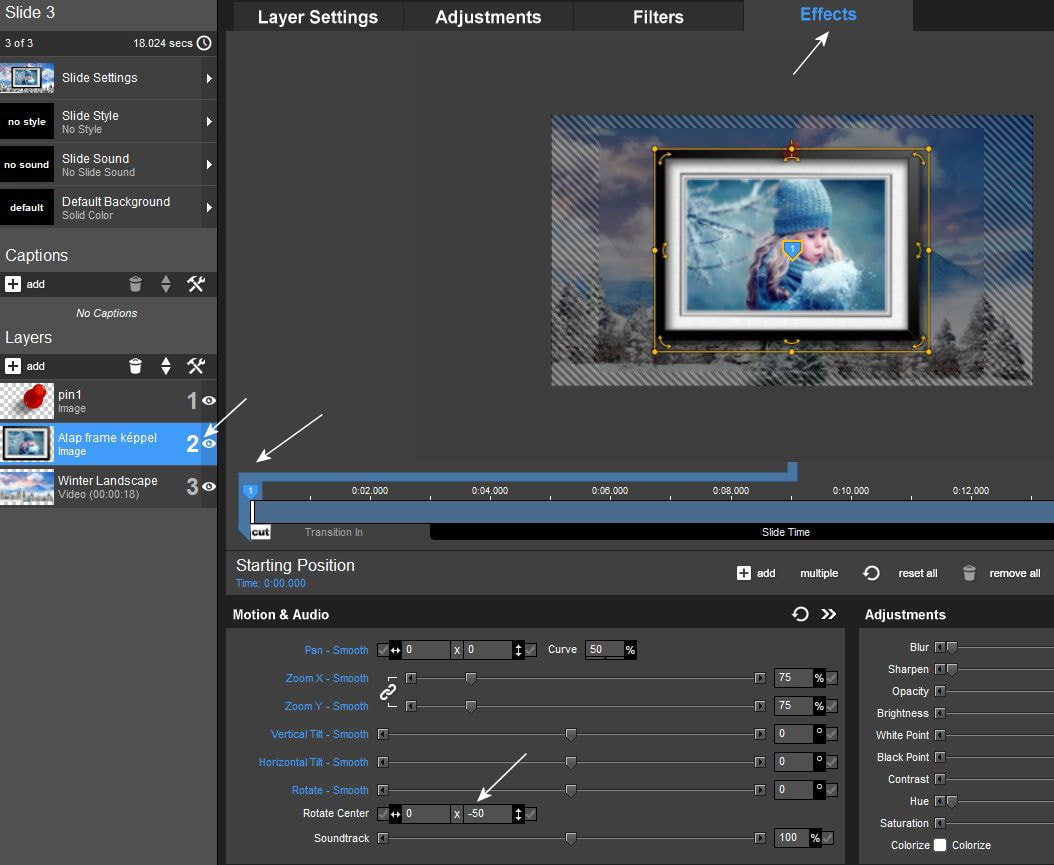
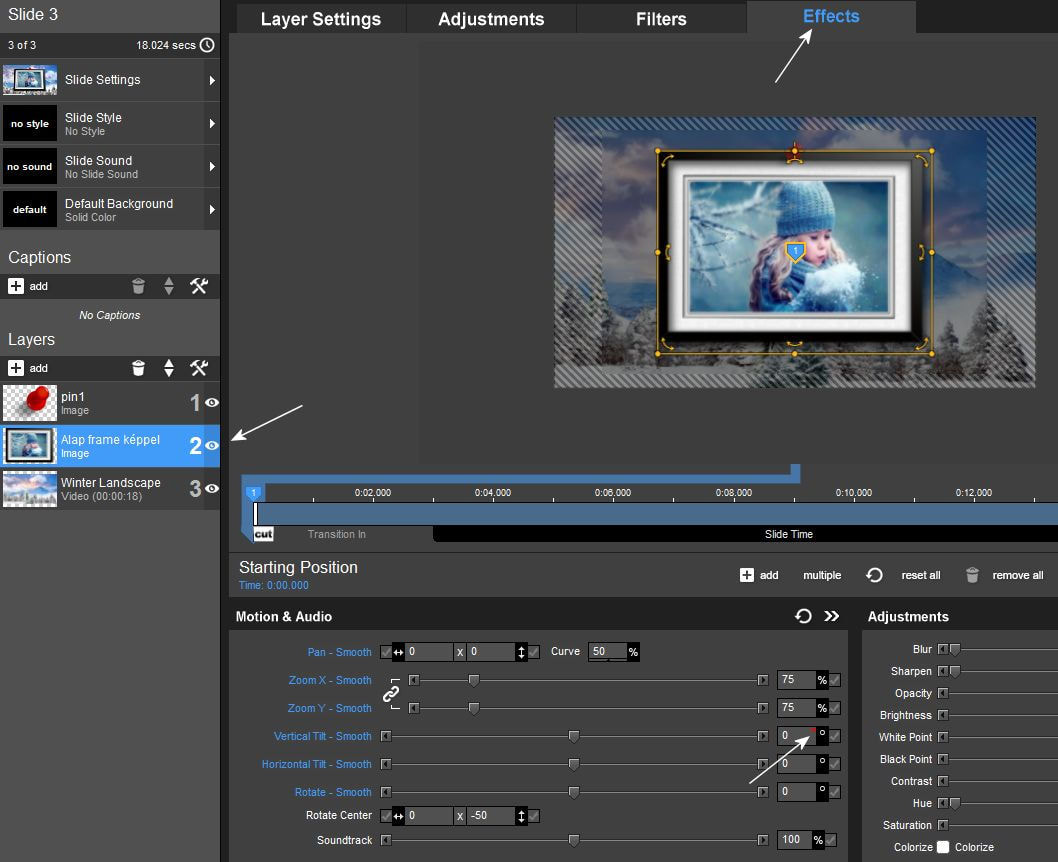
1. Ehhez az effecthez minimum 3 rétegre van szükséged. Az elkészített videó hátteredre a témának megfelelö bekeretezett képeidre az exclusive elkészített kereteddel. és egy kis objektumra amely a képedet tartja a felsö szélén középen fixen. Amikor a keretes képedet beteszed a ProShowba akkor az fixen mindig középpontosan helyezkedik el. Nekünk az effect menüben ezt a pontot most fel kell vinnünk a keret felsö szélére középre. Ezért az 1-es keyframe pontra állva a Rotate Center menüben ezt mínusz 50-re kell állítanod.
You need at least 3 layers for this effect. For your prepared video background, for your framed pictures that match the theme with your exclusive prepared frame. and a small object that keeps your image fixed in the middle of the upper edge. When you insert your framed picture into ProShow, it is always centered. In the effect menu, we now have to move this point to the center of the upper edge of the frame. Therefore, standing at keyframe point 1, you must set this to minus 50 in the Rotate Center menu.
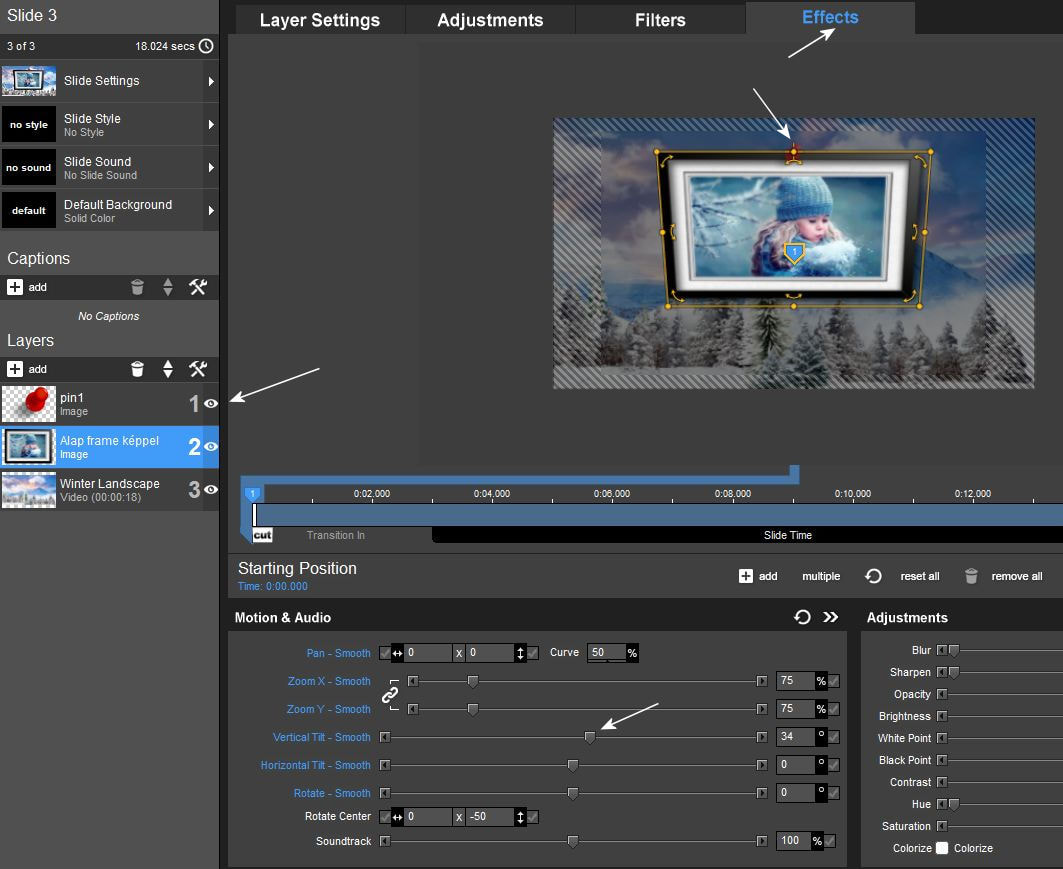
2. Ha most elkezded húzogatni a vertikális és horizontális csúszkákat azt kell látnod, hogy a kereted felsö széle fixen marad és úgy hintázik mindegyik irányban. Vagyis oda lett "szögelve". Ügyelj arra, hogy a húzogatás után mindegyik érték pontosan a 0-án legyen.
If you now start dragging the vertical and horizontal sliders, you should see that the upper edge of your frame remains fixed and swings in all directions. In other words, it was "nailed" there. Make sure that each value is exactly at 0 after dragging.
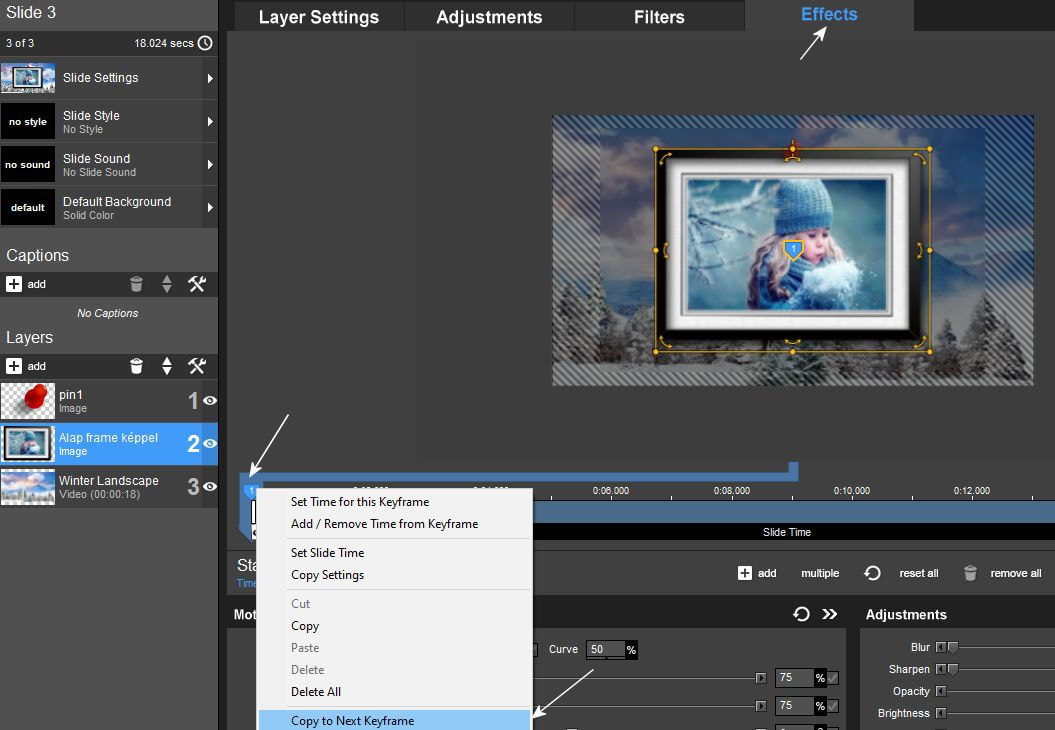
3. Ezt a beállítást át kell másolnod a 2-es keyframe pontra. Katt a jobb füllel az 1-es keyframe pontra és Copy To Next Keyframe.
You have to copy this setting to keyframe point 2. Click with the right ear on keyframe point 1 and Copy To Next Keyframe.
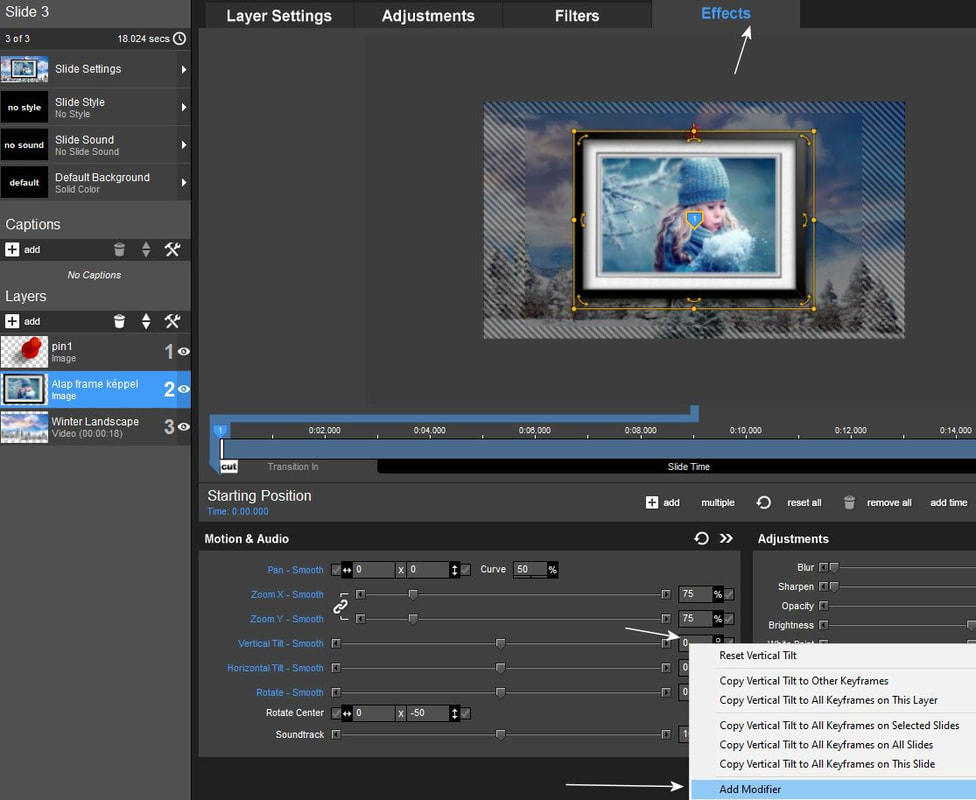
4. Innentöl figyelmesen dolgozz új menüponttal ismerkedünk meg.
Maradj az 1-es keyframe ponton.
A szó is új Modifier, tehát itt tudunk mozgásokat modifikálni !!!!
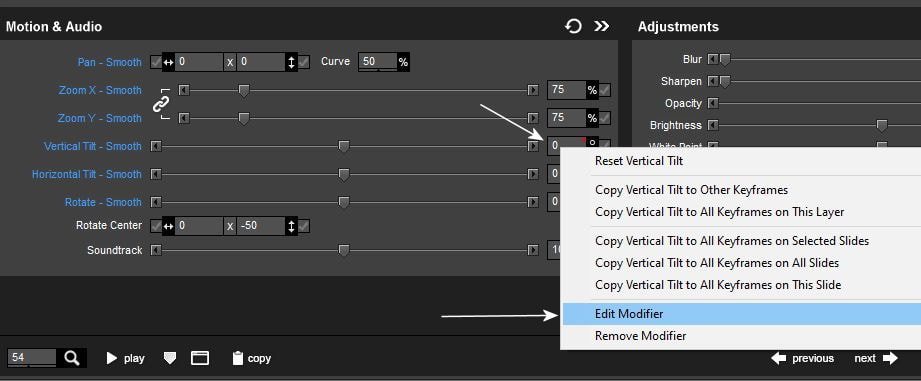
Katt a jobb füllel a Vertical Tilt 0 értékre és a lenyíló ablakban válaszd az
Add Modifier menüpontot.
From now on, we will introduce you to the new menu item, work carefully. Stay at keyframe 1. The word Modifier is also new, so we can modify movements here!!!! Right-click on the Vertical Tilt 0 value and select the Add Modifier menu item in the drop-down window.
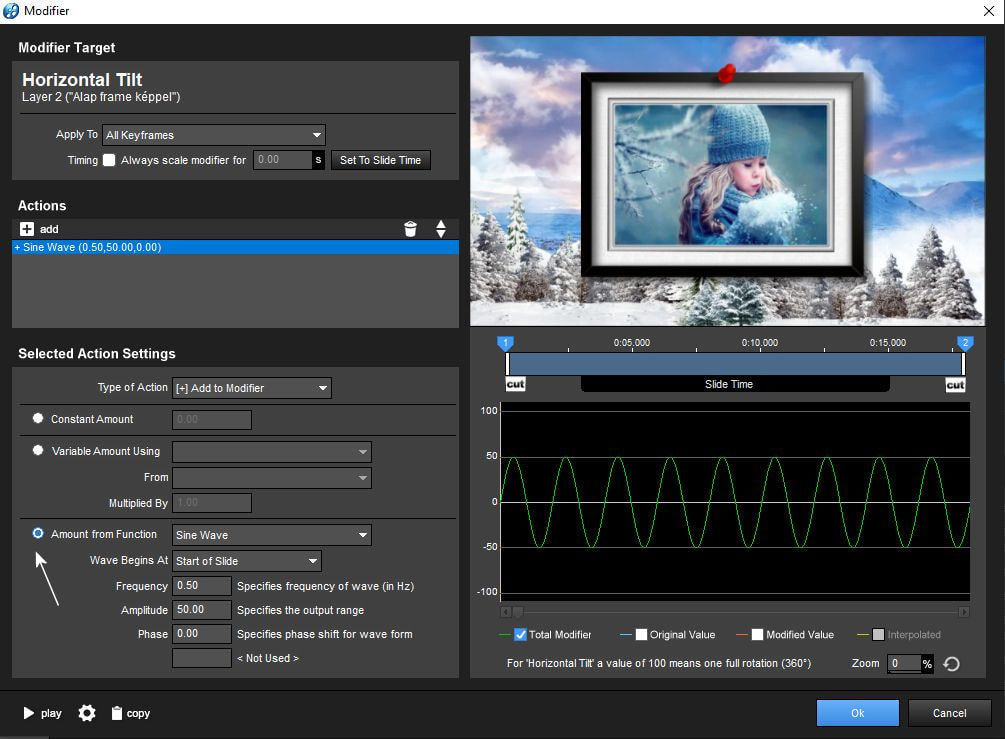
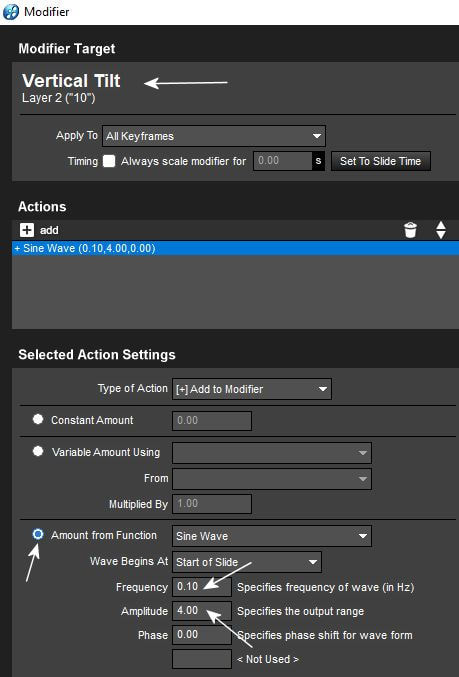
5. Amikor az ablak kinyílik akkor kattints az Amount From Function gombra, hogy aktív legyen a beállíthatóság. Fent látod, hogy most a vertikális mozgáson vagyunk.
Alapon nagy mozgásra van a program állítva mielött értékeket cserélsz megnézheted hogyan mozog a képed ha a bal alsó sarokban lévö play gombra kattintasz. Elöször az Amplitudót kell belönöd én azt az elsö körben 5-re állítottam.
Figyelem: Ezek az értékek szintén változhatnak a gépeken és a progikban. A szemedre kell hagyatkoznod , hogy a mozgás se túl lassú se túl gyors legyen. Lehet, hogy majd többször is kell állítanod.!!!
When the window opens, click the Amount From Function button to activate the adjustability. You can see above that we are now on vertical movement. By default, the program is set to high movement, before you change values, you can see how your image moves by clicking the play button in the lower left corner. First you need to enter the Amplitude, I set it to 5 in the first round. Attention: These values can also change on machines and programs. You have to rely on your eyes so that the movement is neither too slow nor too fast. You may have to set it up several times.!!!
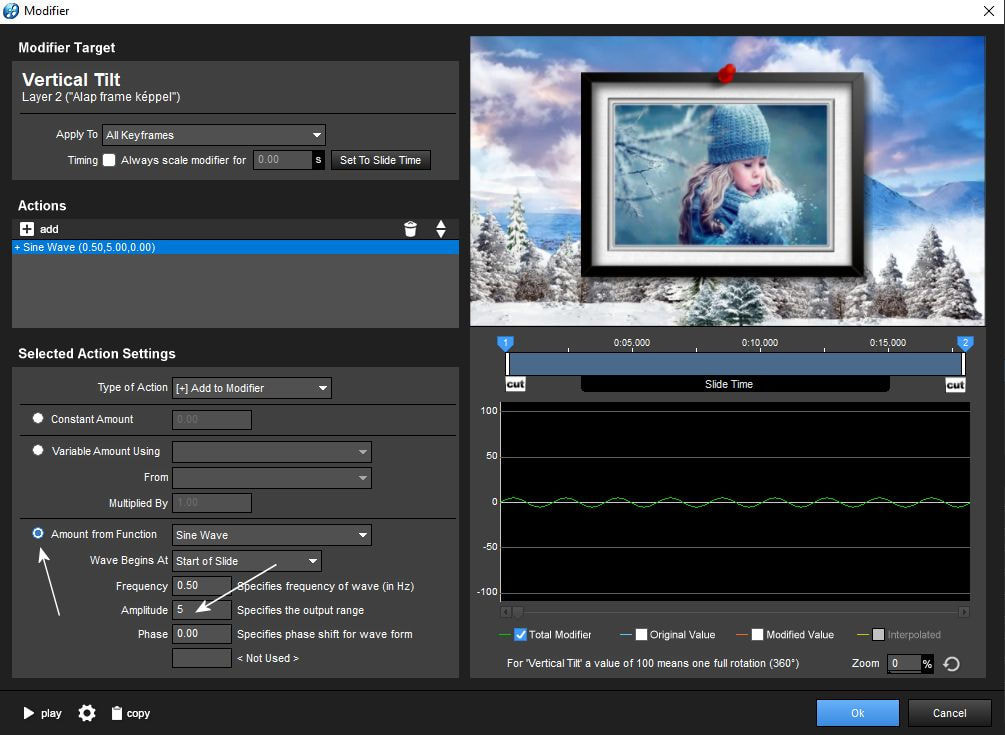
6. Állítsd be a frekvenciát is.
Also set the frequency.

7. Ha visszamész az effectbe akkor most a vertikális menüpont nulla értéke mellett egy kis piros jelet kell látnod az jelzi azt, hogy modifáltuk a mozgást.
If you go back to the effect, you should now see a small red mark next to the zero value of the vertical menu item, which indicates that the movement has been modified.
8. Most folytasd a Modifikálást a horizontális tiltnél. Katt a jobb füllel a 0-ra.
Now continue Modifying the horizontal tile. Click on 0 with your mouse on right
ear.
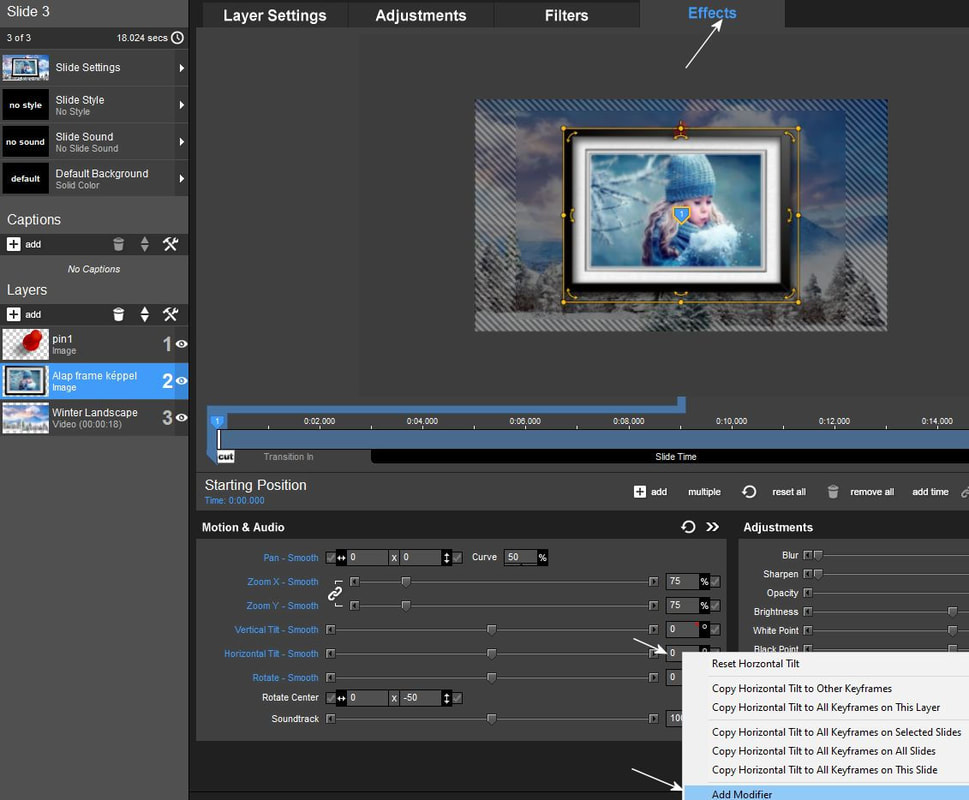
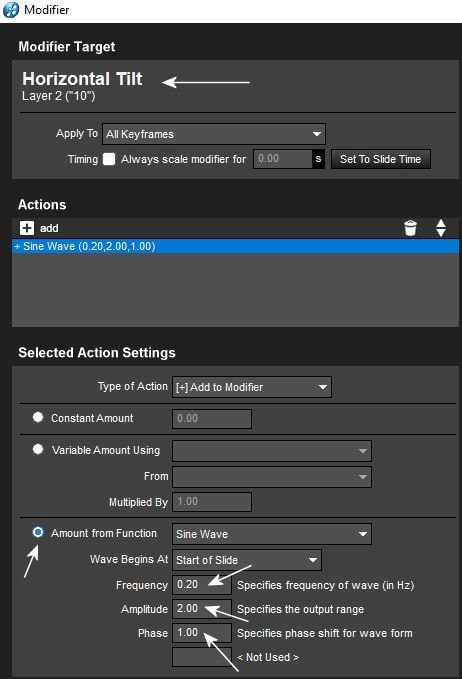
9. Itt is be kell kapcsolnod az Amount From Function gombot.
Here, too, the Amount From Function button must be turned on.
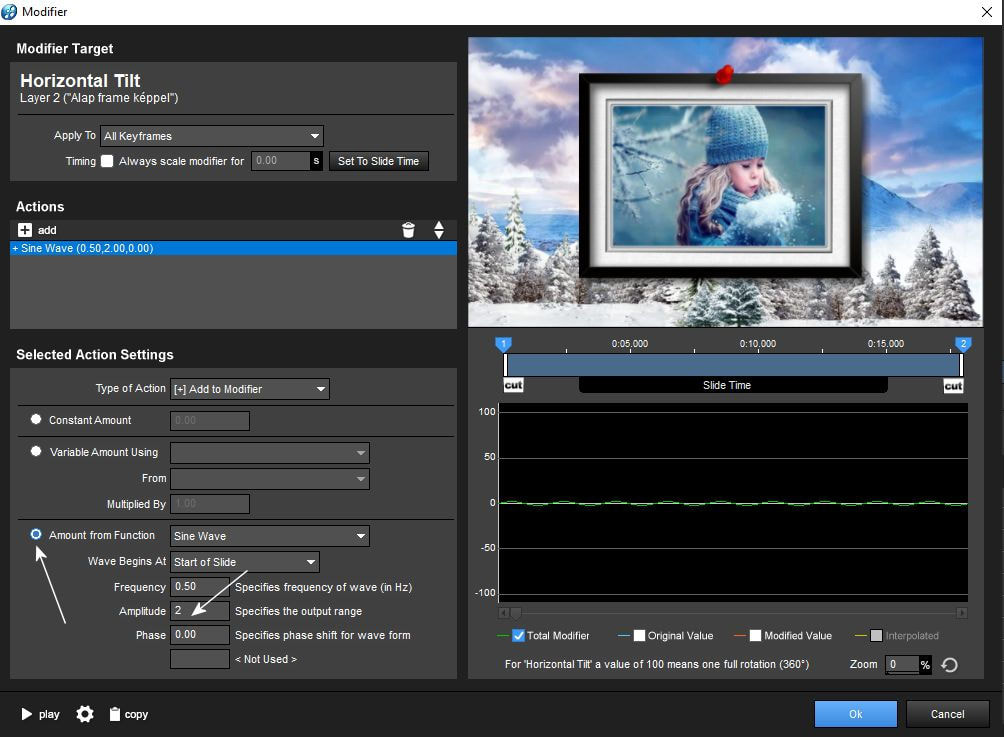
10. Állíts az amplitudón. Itt is érvényes, hogy bármi lehet amit úgy érzel ahogy neked jó. Csak kezd azzal amit itt látsz. Késöbb variálhatsz rajta.
Adjust the amplitude. It also applies here that anything you feel is good for you. Just start with what you see here. You can change it later.
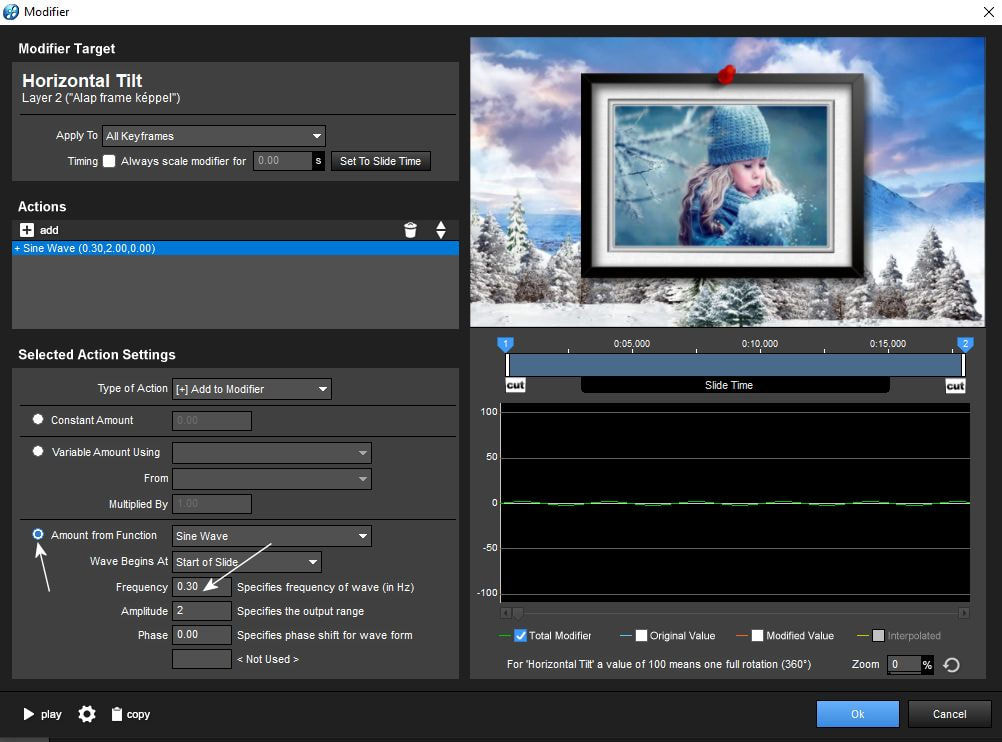
11. Majd a frekvencián is állíts.
Then set the frequency as well.
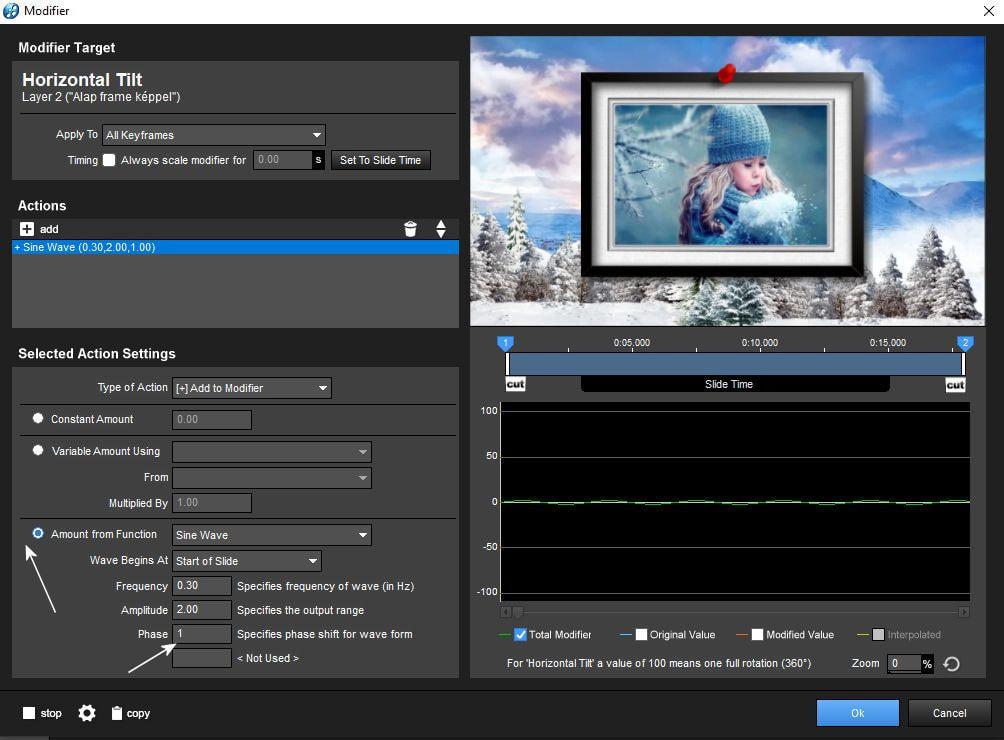
12. Itt kell meghatároznod a fázisokat is, hogy milyen gyakran legyen billegés. Nekem az mindig 1.
Here you also have to define the phases, how often to wobble. It's always 1 for me.
13. Mostmár az Effectben mindkét helyen kis piros pontot kell látnod.
You should now see a small red dot in both places in the Effect.

14. Ha a lejátszásban nem tetszik az alapmozgás amit beállítottal akkor mindig visszamehetsz el lehet játszadozni az értékekkel. Csak katt a jobb füllel a 0-ra és mostmár a menü úgy jön fel, hogy edit Modifier. Figyelj arra, hogy a 0 érték még véletlenül se változzon meg itt az effectben.
If you don't like the basic movement you set during playback, you can always go back and set up with the another values. Just click on 0 with the right ear and now the menu will appear as edit Modifier. Make sure that the value 0 does not accidentally change here in the effect.
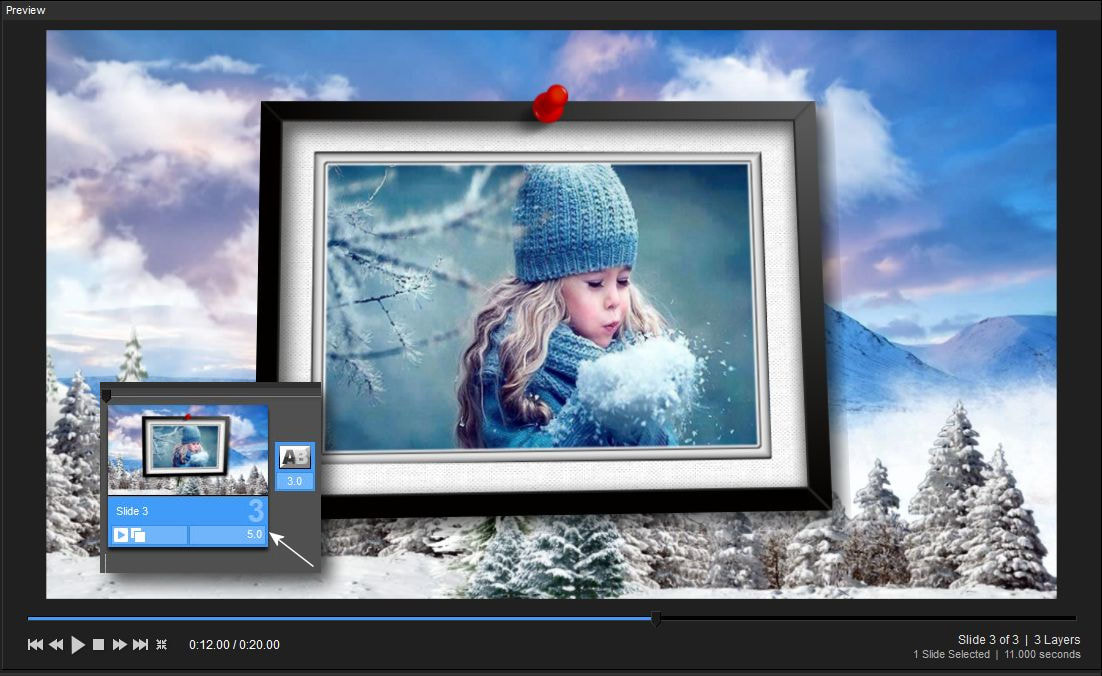
15. Állítsd a csempéidet 5 és 3 másodpercre. Ez alatt kell a képednek szépen swinging-elnie vagyis hintáznia.
Set your tiles to 5 and 3 seconds. Below this, your image should swing nicely.
Nálam ezek maradtak a végleges adatok az 5 mp-hez. a Vertical tiltben.
I have the final data for the 5 sec. in Vertical tilt.
Valamint a Horizontal tiltben.
Also in Horizontal tilt.
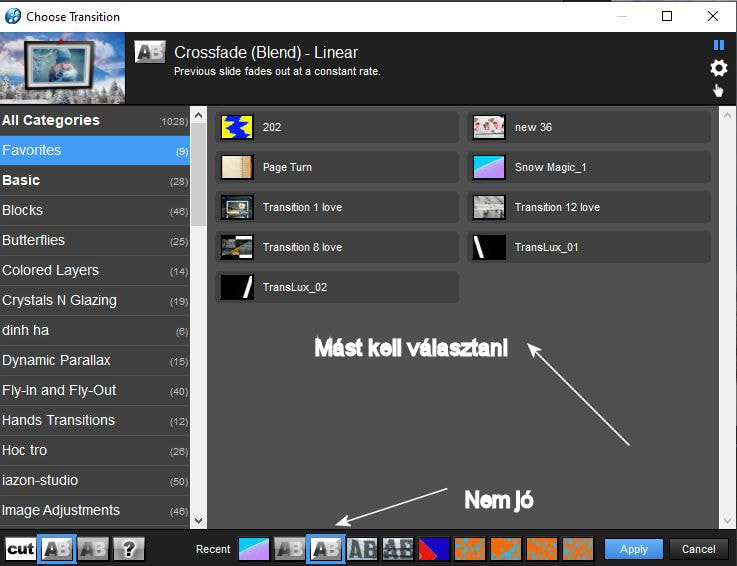
A legfontosabb informácio ennél az effectnél, hogy az áttünést is nagyon jól kell megválasztani. Nem használhatod az Ab funkciót most mert azzal sajnos soha nem abban az idöpontban fog a csempe áttünni a másira, hogy a hintázó keretedet ugyanabban a pozícióban találja. Emiatt aztán a " szellemképességre" nagyon nagy az esély.Tehát még itt kell játszadozni ezzel, hogy az pontosan váltson. Ezt majd meg kell figyelnetek az én mintavideómban is, hogy mindig ugyanaz a pozícióban van a keretem amikor a kép vált. Ez egy kritikus pont ennél az effectnél!!!!
The most important information about this effect is that the transition must be chosen very well. You can't use the Ab function now, because with it, unfortunately, the tile will never slide to the next one at the time that it finds your swing frame in the same position. Because of this, the chance of "ghost image transition" is very high. You will have to observe this in my sample video as well, that my frame is always in the same position when the image changes. This is a critical point for this effect!!!!