
Nagyon sok kreatív ötlet egy videóban a maszkolás segítségével tud létrejönni. Ilyen például ez az ötlet is, hiszen minden a hozzávaló mask elkészítésén múlik. Ebben a bemutatóban egy igazi csemegét láttok amelyböl a mozaik effect készül. Mint mindig ehhez a vidihez is meg kell dolgozni elöbb a Corel programban hiszen maszkokat kell ott készíteni ehhez a stílushoz.
Many creative ideas can be created in a video with the help of masking. Such is the case with this idea, as everything depends on the preparation of the mask. In this presentation, you can see a real treat from which the mosaic effect is made. As always, this video needs to be worked on first in Corel or another Photoshop program, as masks must be created there for this style.

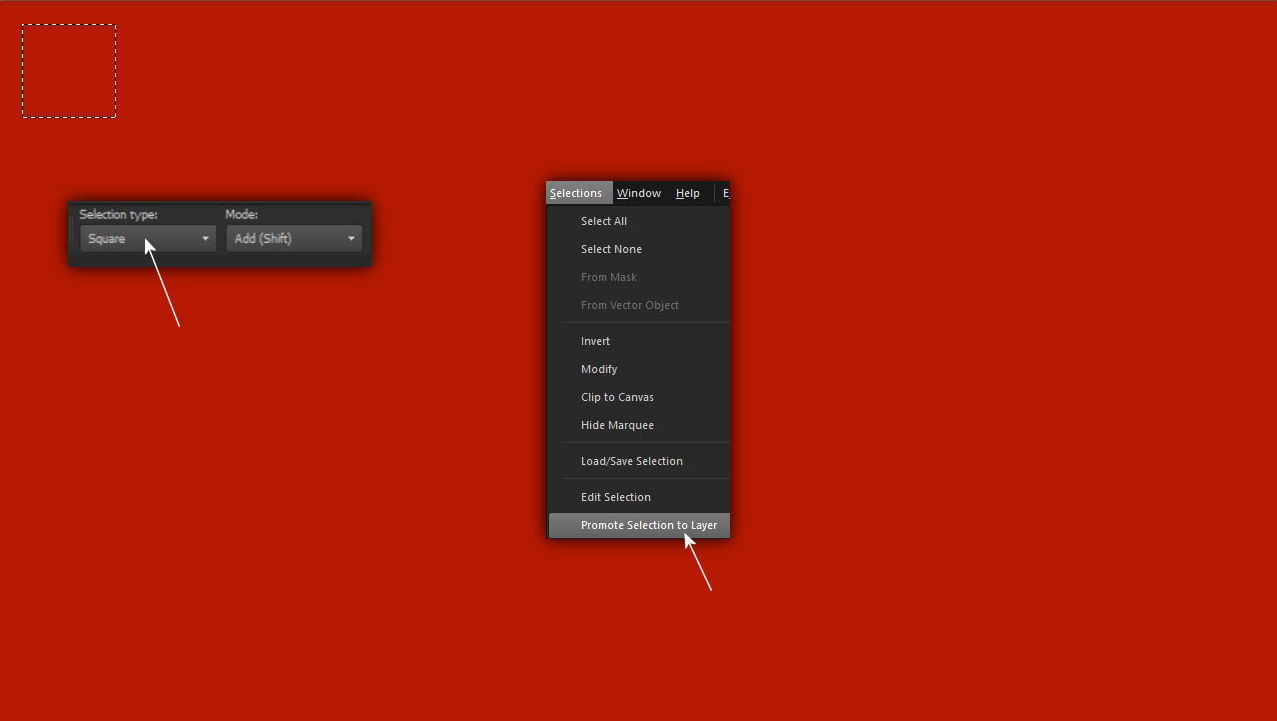
1. Önts ki egy alapot piros színnel. és a kijelölö eszközödet állítsd a square formára majd jelölj ki egy kis négyzetet a lapból majd promótáld azt.
Fill up a base with red color. and set your selection tool to the square shape, then select a small square from the page and promote it.
2. Innentöl kezdve nagyon pontos munkára van szükség, különben a ProShowban használhatatlan lesz a maszkod.!!!
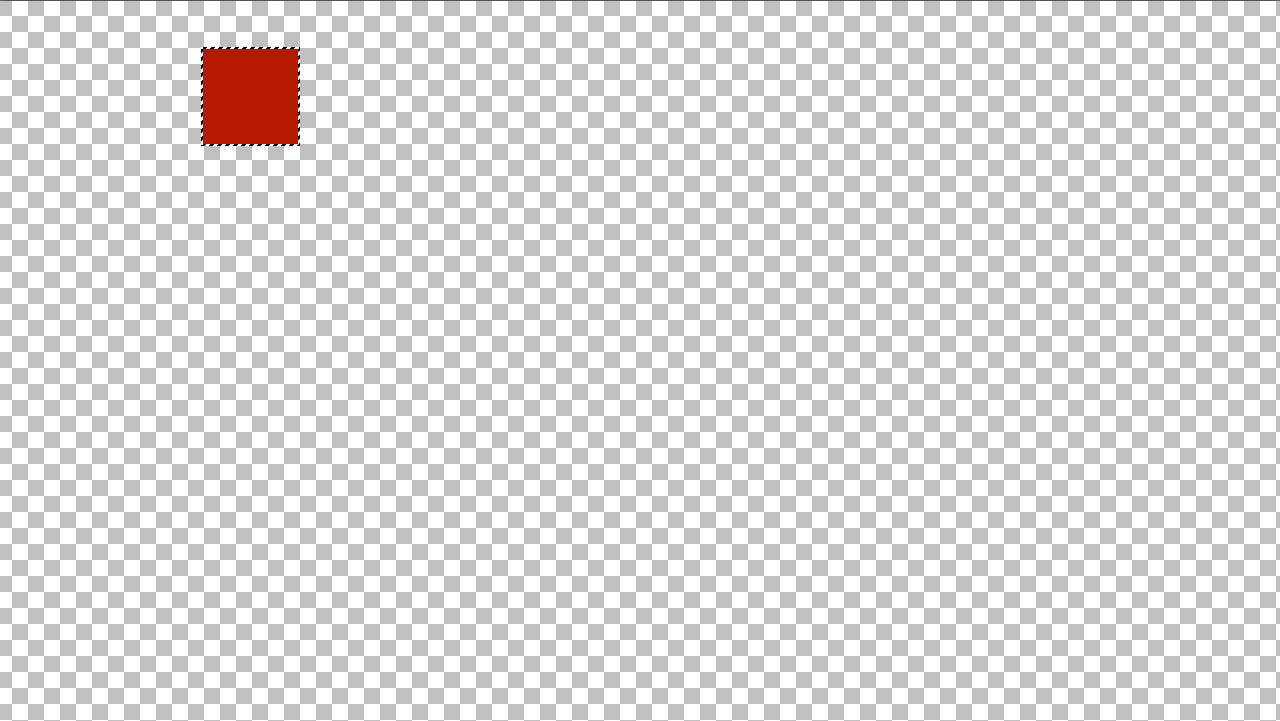
A promótált kis négyzetedet nagyon pontosan a szélén jelöld körbe!!!
From here on, very precise work is required, otherwise your mask will be unusable in ProShow.!!! Circle your promoted small square very precisely on the edge!!!
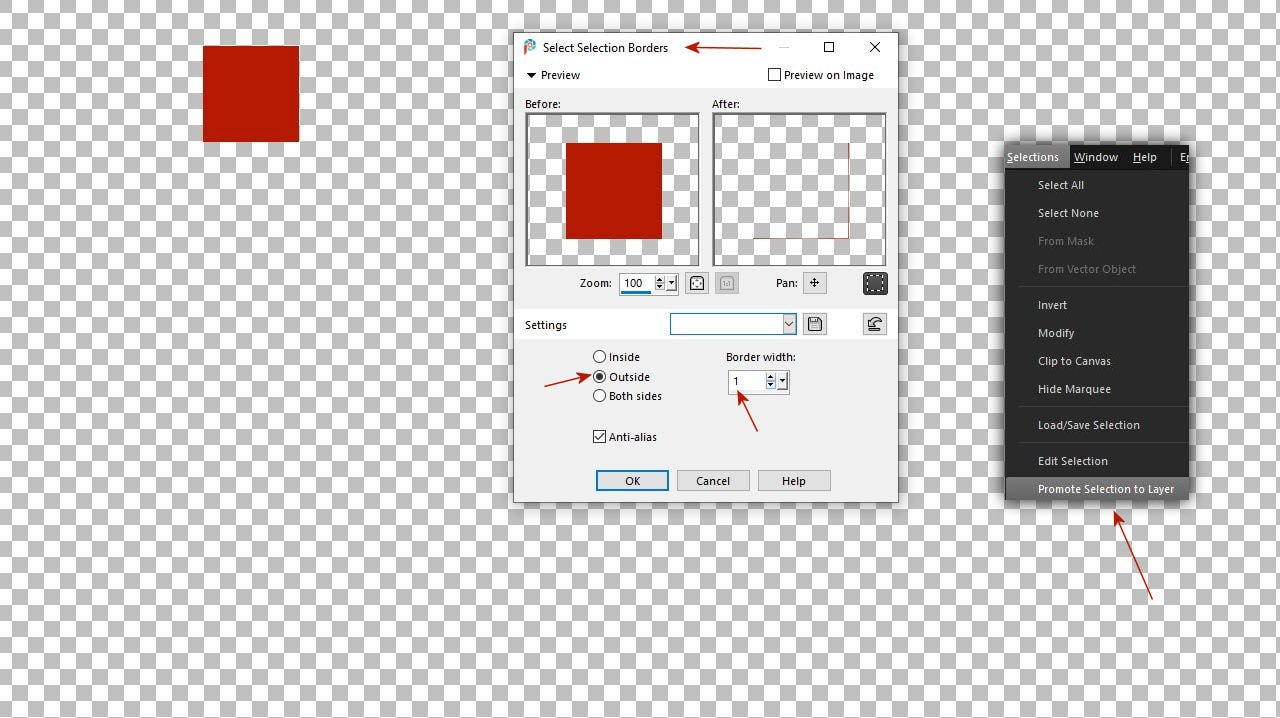
3. Majd menj a következö menüpontra.
Selection - Modify - Select Selection Borders
Ott végezd el ezt a beállítást Ok és promótáld ezt a kijelölést új rétegként.
Then go to the next menu item. Selection - Modify - Select Selection Borders There, do this setting Ok and promote this selection as a new layer.
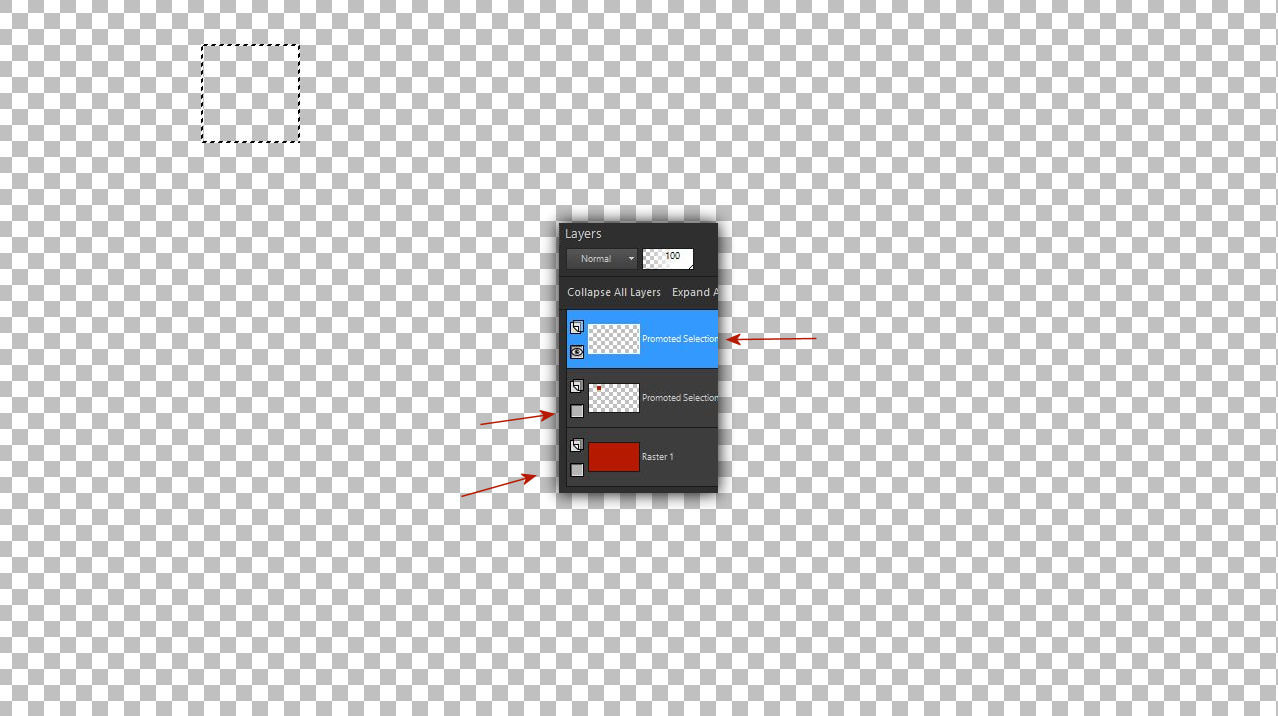
4. Csukd be az alsó két rétegszemet és a promótált kijelölést öntsd ki fehér színnel.
Ha ez a müvelet nem sikerült úgy, hogy pontosan a piros négyzeted külsö szélén van
akkor ezt a müveletet ismételd meg addig amíg ez nem teljesen pontos.!!!!
Close the bottom two layer eyes and fill the promoted selection with white color. If this operation did not succeed so that it is exactly on the outer edge of your red square, then repeat this operation until it is completely accurate.!!!!
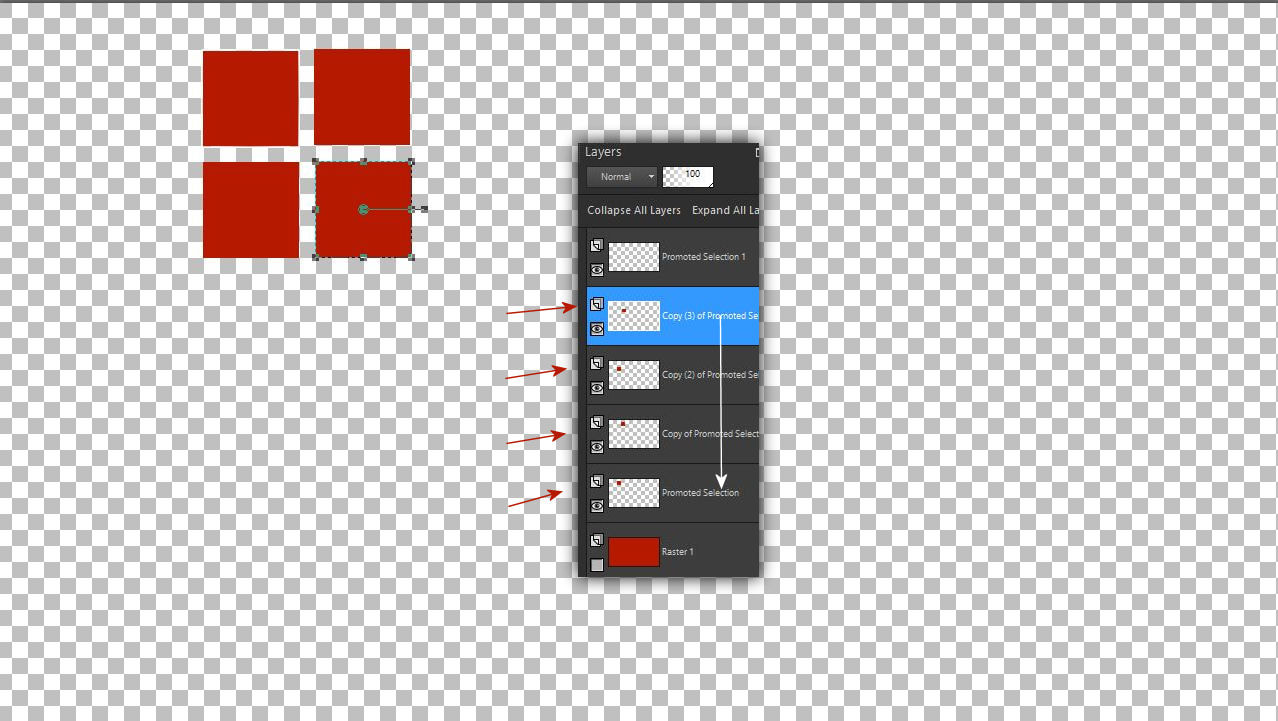
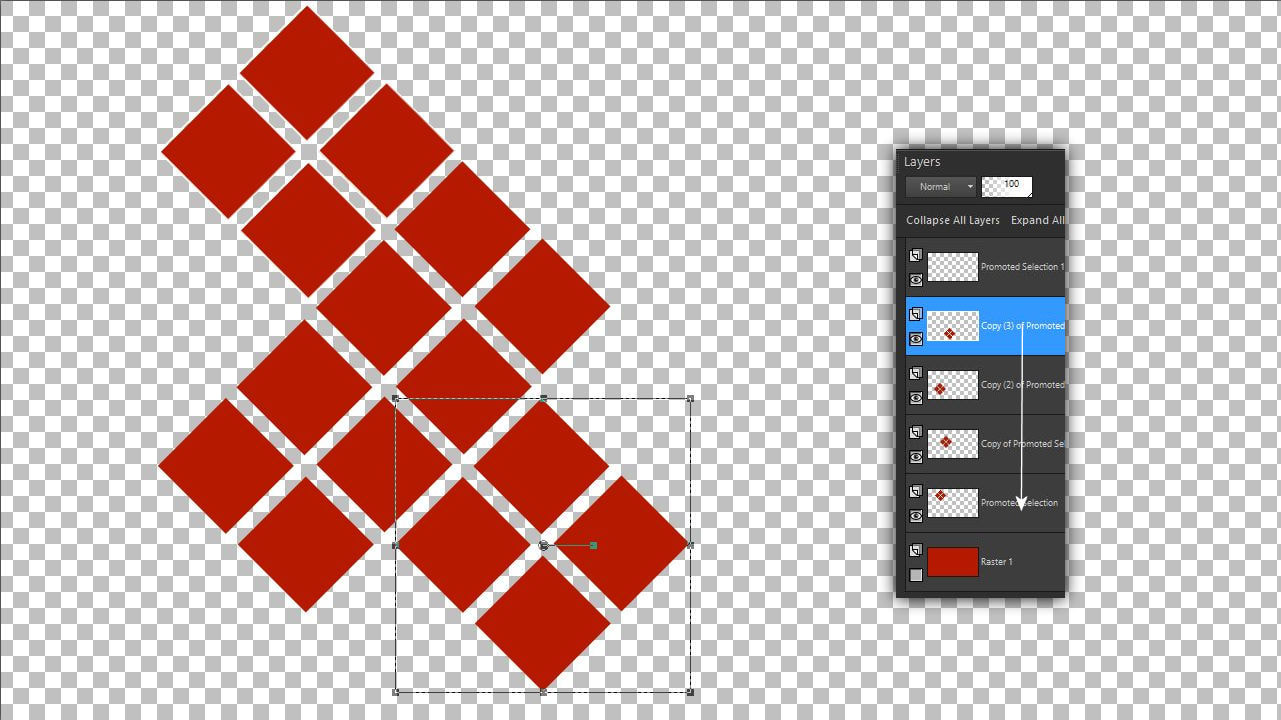
5. Most a kis négyzeteket duplázd meg 3x és helyezd nagyon pontosan egymás mellé, ógy ahogy azt itt a képen látod. A rések nagyon pontosan egyformák legyenek egymáshoz képest !!!! Most van 5 aktív réteged legfelül a kiöntött kereted rétege van.
Add össze a piros kis négyzetek rétegeit.!!!
Now double the small squares 3x and place them exactly next to each other, as you can see in the picture. The gaps should be exactly the same compared to each other!!!! Now you have 5 active layers, the layer of your cast frame is at the top. Add the layers of red small squares.!!!
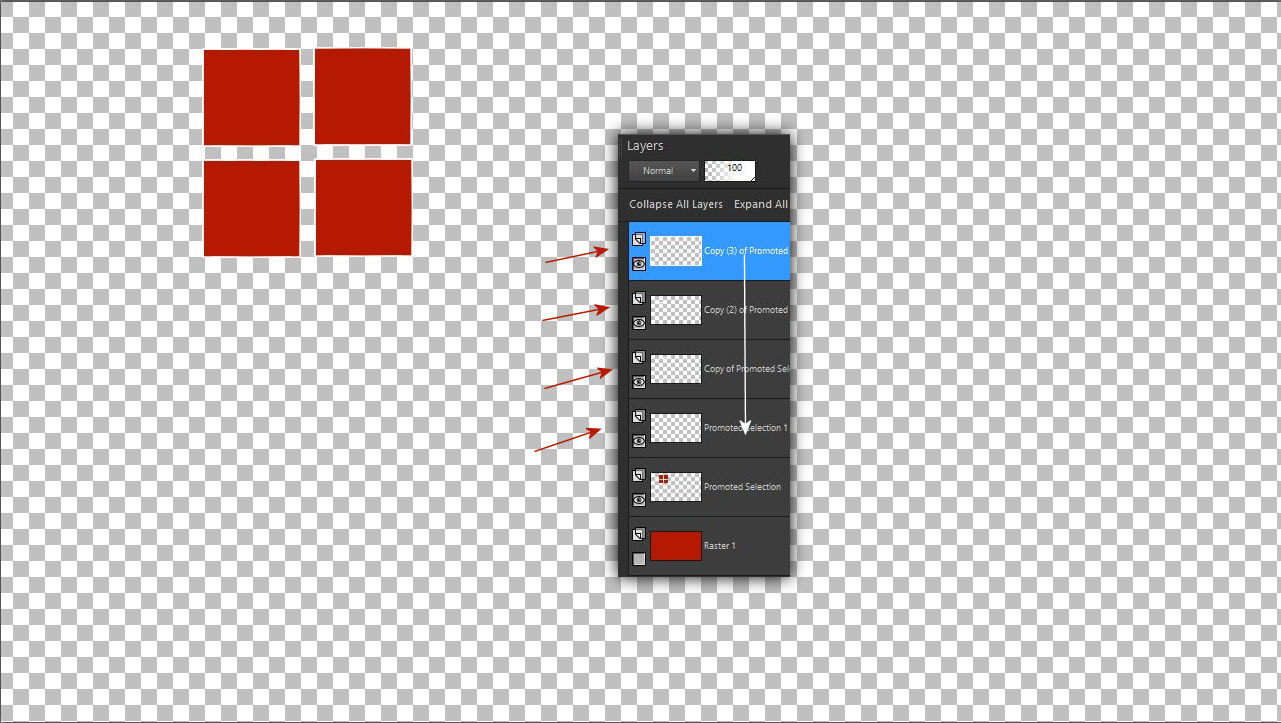
6. Majd duplázd meg 3x a kis fehérrel kiöntött keretrétegedet.
Nagyon pontosan illeszd minden piros négyzetre a fehér kereteket!!!!!
Amikor készen van akkor add össze most ezt a 4db keret réteget.
Then double your frame layer filled with little white 3x. Match the white frames to each red square very exactly!!!!! When it's ready, add these 4 frame layers together.
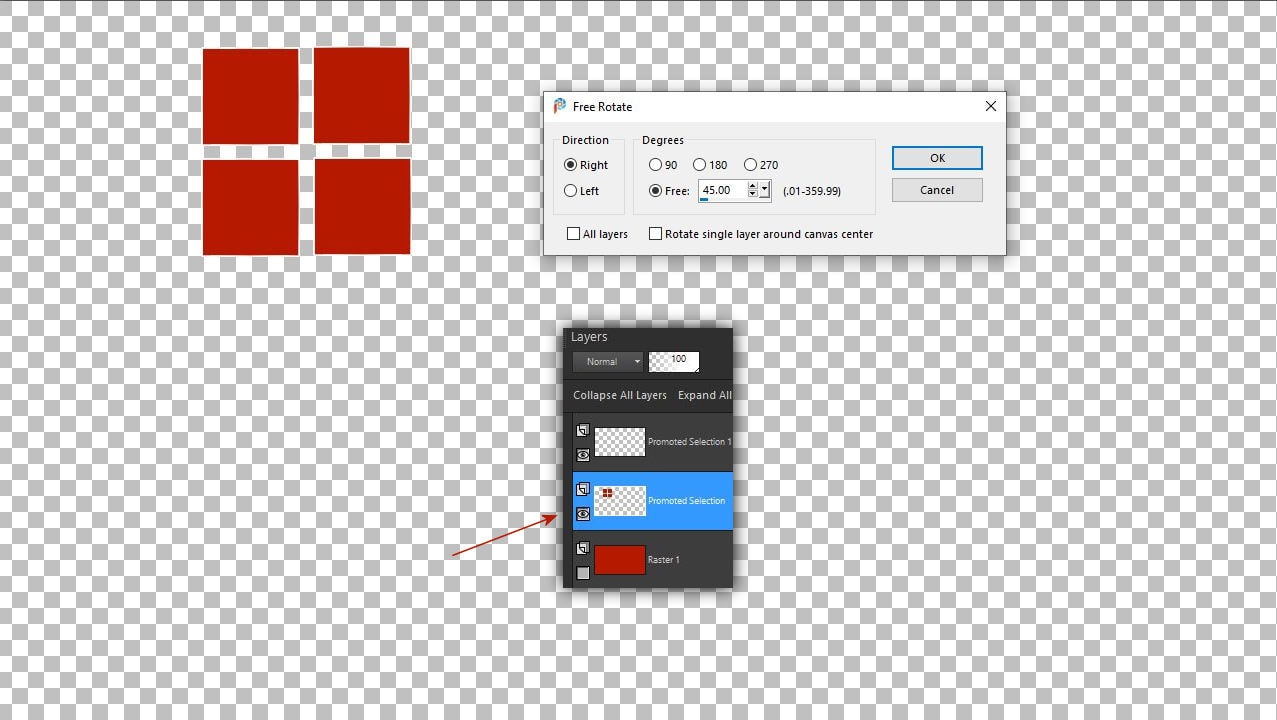
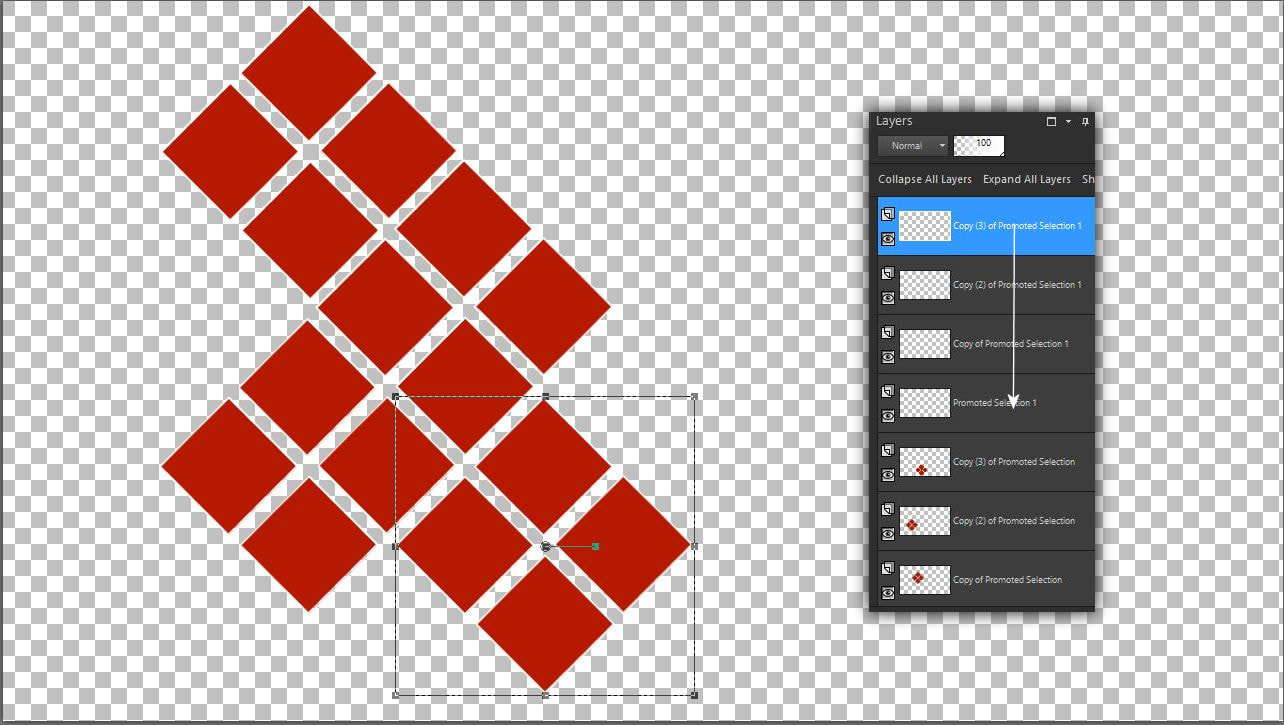
7. Ha jól dolgoztál akkor most 3 db rétegednek kell lennie. Az alsö szem mindig csukva marad. Állj a középsö rétegedre és az Image -Free Rotate menüben fordítsd át a négy kis piros mozaikot 45 fokkal.
If you worked well, you should now have 3 layers. The lower eye always remains closed. Stand on your middle layer and in the Image - Free Rotate menu, turn the four small red mosaics by 45 degrees.
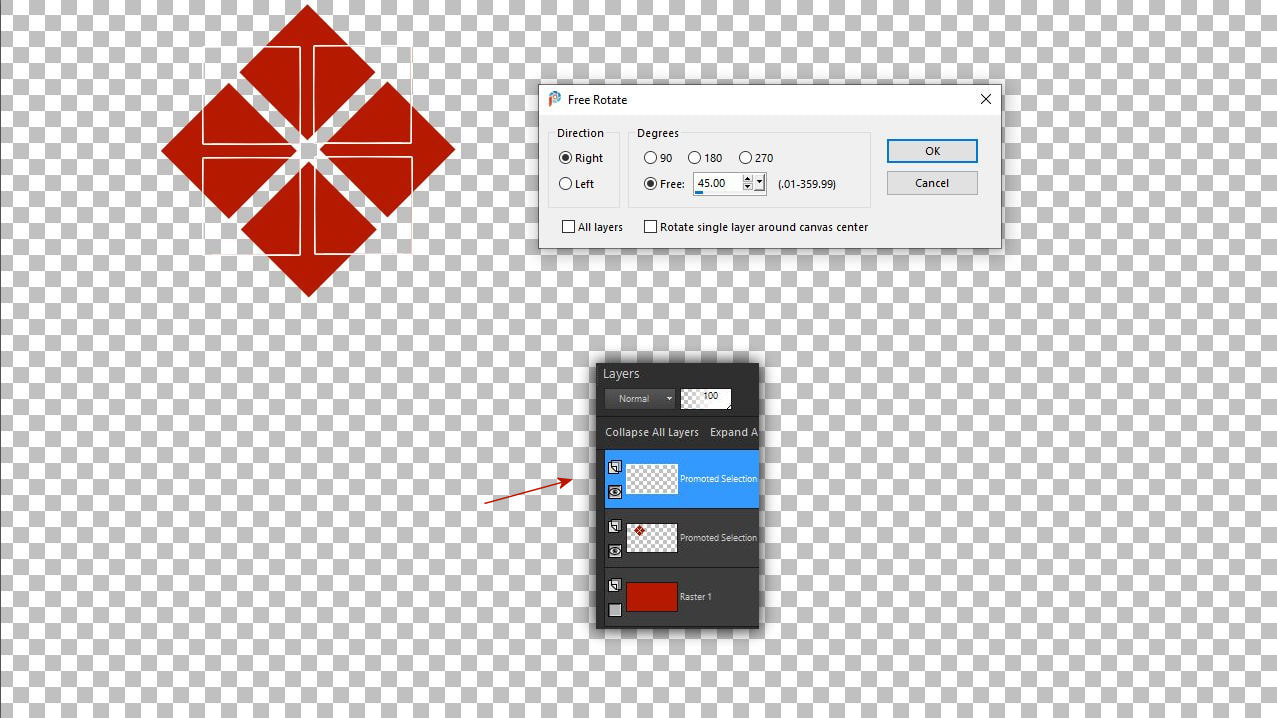
8. Nagyon fontos, hogy a hozzájuk tartozó keretet is át fordítsd 45 fokkal. Ha remekül dolgoztál akkor ezek majd tökéletesen fedni fogják egymást az átfordítás után.
It is very important that you also turn the corresponding frame by 45 degrees. If you did a great job, they will overlap perfectly after the translation.
9. Innetöl kezdödhet a kreatív munka vagyis a négy darab alap mozzaik csempécskéidet további duplikálással alakzatokba rakhatod ahogy az neked jó és tetszik. A mozgatásnál nagyon ügyelj arra, hogy a rések a mozaikok között azonosak legyenek!!!!
Itt van az a pont amikor el kell mentened a munkádat Psp formátumban is, hogy bármikor elö tudd azt venni és elmozgadhasd más alakzatokra is a mozaik csempéidet, hogy a leendö videódban minél sokrétübben tudd ezeket a maskokat használni!!!
Ha készen vagy egy alakzattal akkor add össze a mozaiklapok rétegeit.
From here you can start the creative work, i.e. you can put the four basic mosaic tiles into shapes as you like them by further duplicating them. When moving, make sure that the gaps between the mosaics are the same!!!! Here is the point when you have to save your work in Psp format so that you can take it at any time and move your mosaic tiles to other shapes so that you can use these masks as many times as possible in your future video!!! When you are ready with a shape, add the layers of mosaic tiles together.
10. Ne felejtsd el, hogy a fehér kis kereteket is a piros mozaikcsempékre kell igazítanod nagyon pontosan tehát azokat is meg kell dupláznod és a helyére kell, hogy kerüljenek nagyon pontosan !!!! Ezeket is add össze ha rendben vannak.
Don't forget that you have to align the white small frames to the red mosaic tiles very exactly, so you have to double them and they have to be in place very precisely!!!! Add these as well if they are in order.
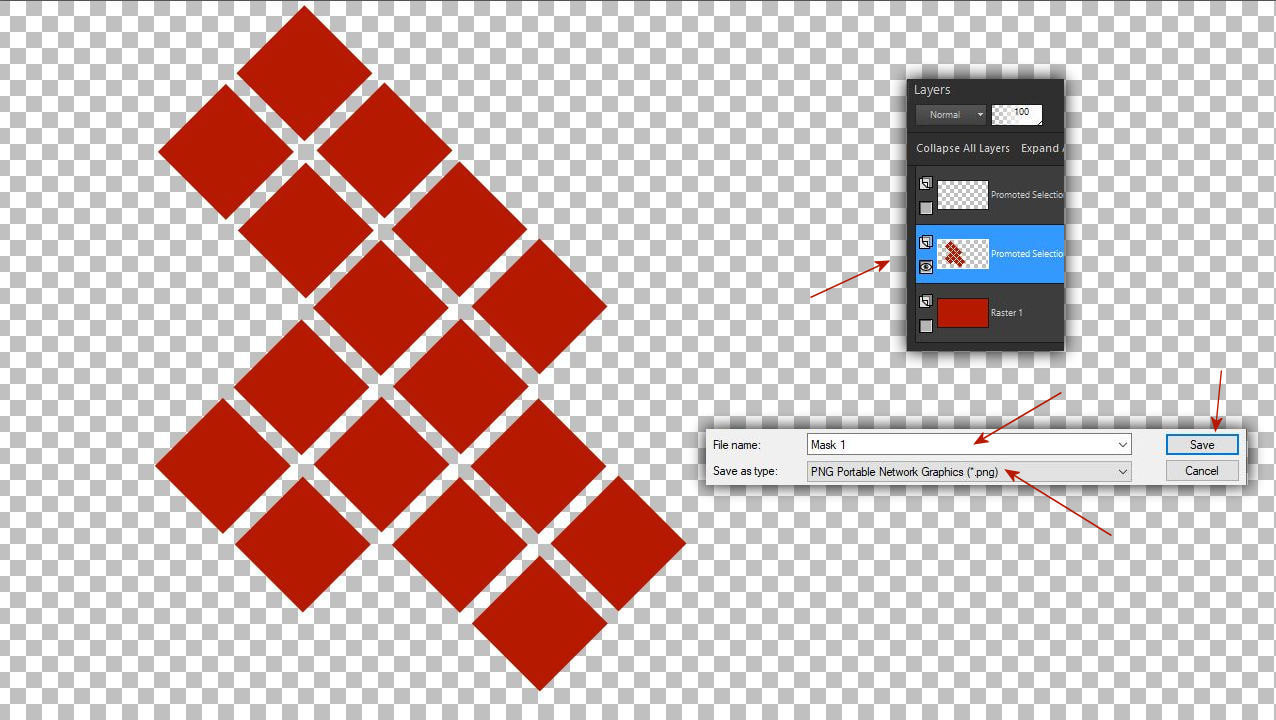
11. Amikor megint 3 réteged van akkor elöször manetsd el a piros maszkot png formátumban maszk 1-ként.
When you have 3 layers again, first save the red mask in png format as mask 1.
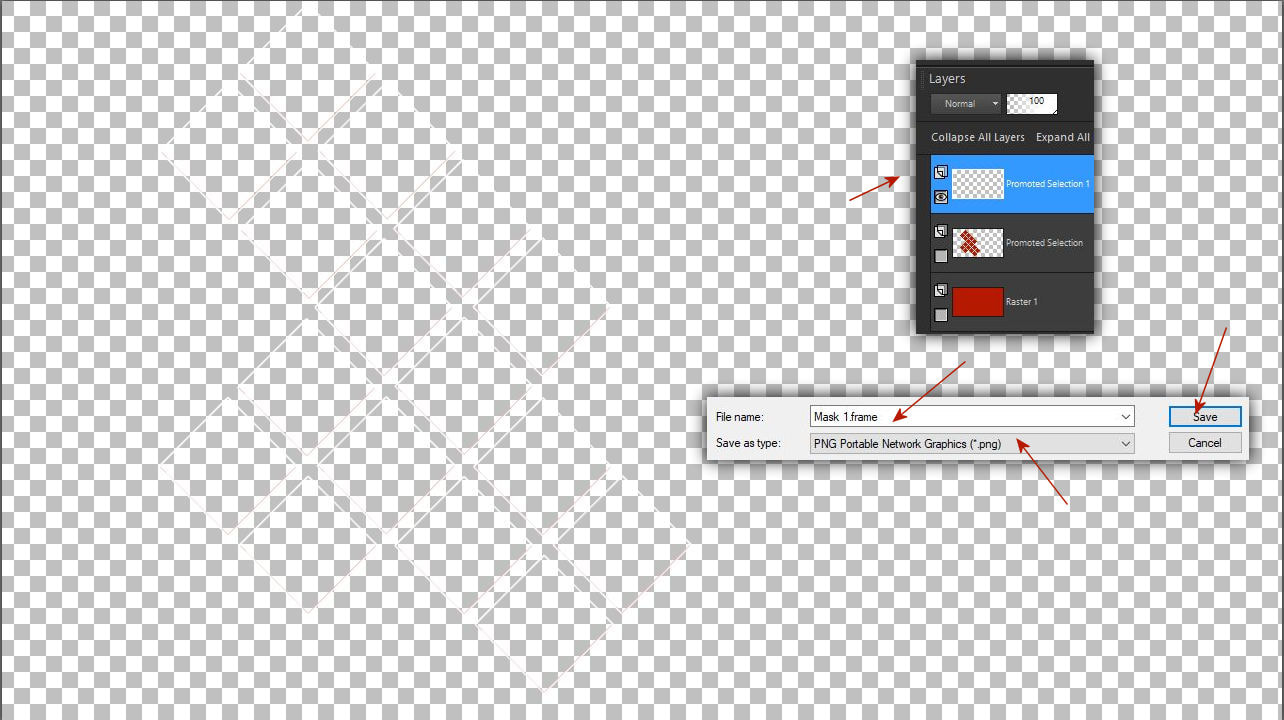
12. Majd mentsd el a kereteket külön Mask 1 frame néven png formátumban hiszen ez majd külön réteget képez a ProShow Producer programban. Ezért nagyon fontos a pontos munka, hiszen akkor a rétegek a ProShowban nem fedik majd egymást az effectálás során.
Then save the frames separately as Mask 1 frame in png format, as this will form a separate layer in the ProShow Producer program. Therefore, accurate work is very important, since then the layers in ProShow will not overlap each other during the effects.
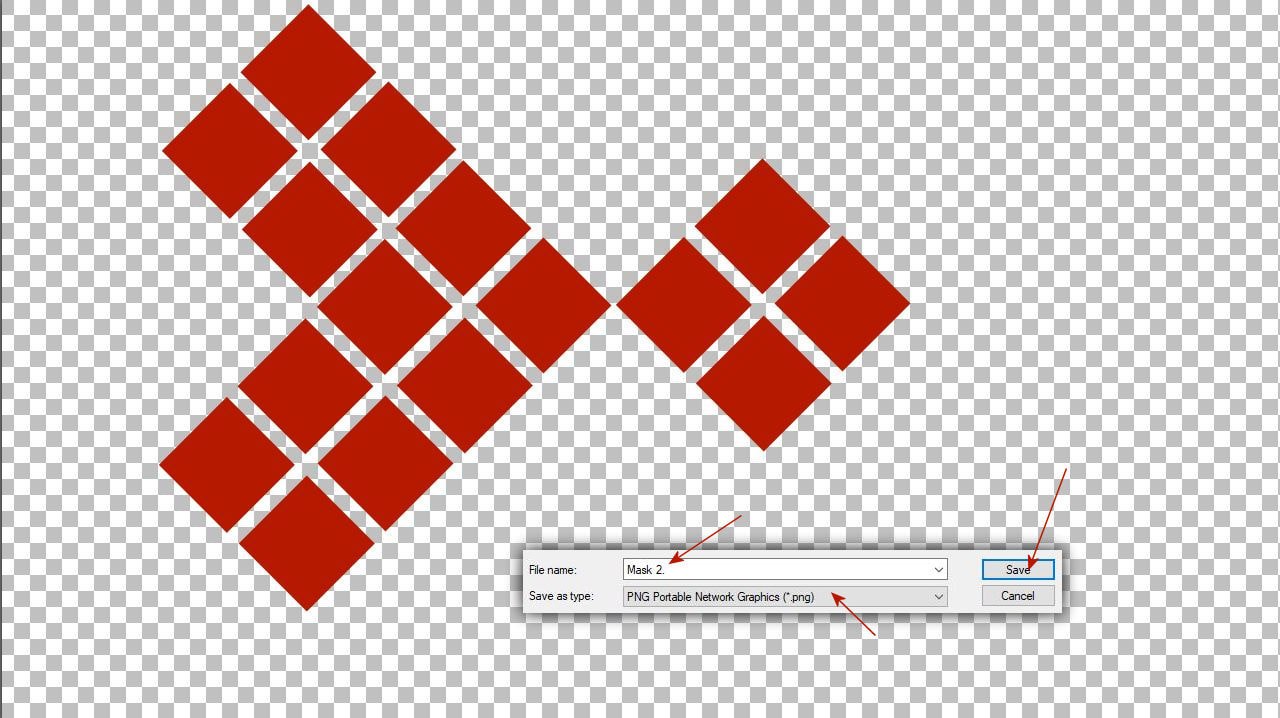
13. Ne feledd , most elöveheted a Psp formátumban lementett alapot és a négyzeteidet egy másik pozícióba helyezheted. Igy elkészítheted a Mask 2-öt amelyet szintén elmenthetsz png formátumban.
Remember, you can now import the base saved in Psp format and place your squares in another position. This way you can create Mask 2, which you can also save in png format.
14. Természetesen a keretet is át kell helyezned és azt is elmentheted a mask 2- höz Mask 2 frame-ként png. formátumban.
Of course, you also have to move the frame and you can also save it for mask 2 as Mask 2 frame png. format.
