
Mint minden egyedi videóhoz ehhez a különleges effecthez is sok elömunkálat kell a Corelban. Itt az elsö részben egy karácsonyi borítékot készítünk egy
Karácsonyi üdvözlet / Christmas Greetings videóhoz. A folytatást pedig ennek a legördülönek a második részében találjátok majd. Az ehhez készült csomagot a lap alján megtaláljátok a letöltéshez.
As with all unique videos, this special effect requires a lot of preliminary work in Corel. Here, in the first part, we make a Christmas envelope Christmas Greetings / Christmas Greetings for video. You will find the continuation in the second part of this drop-down. You can find the package for this at the bottom of the page for download.

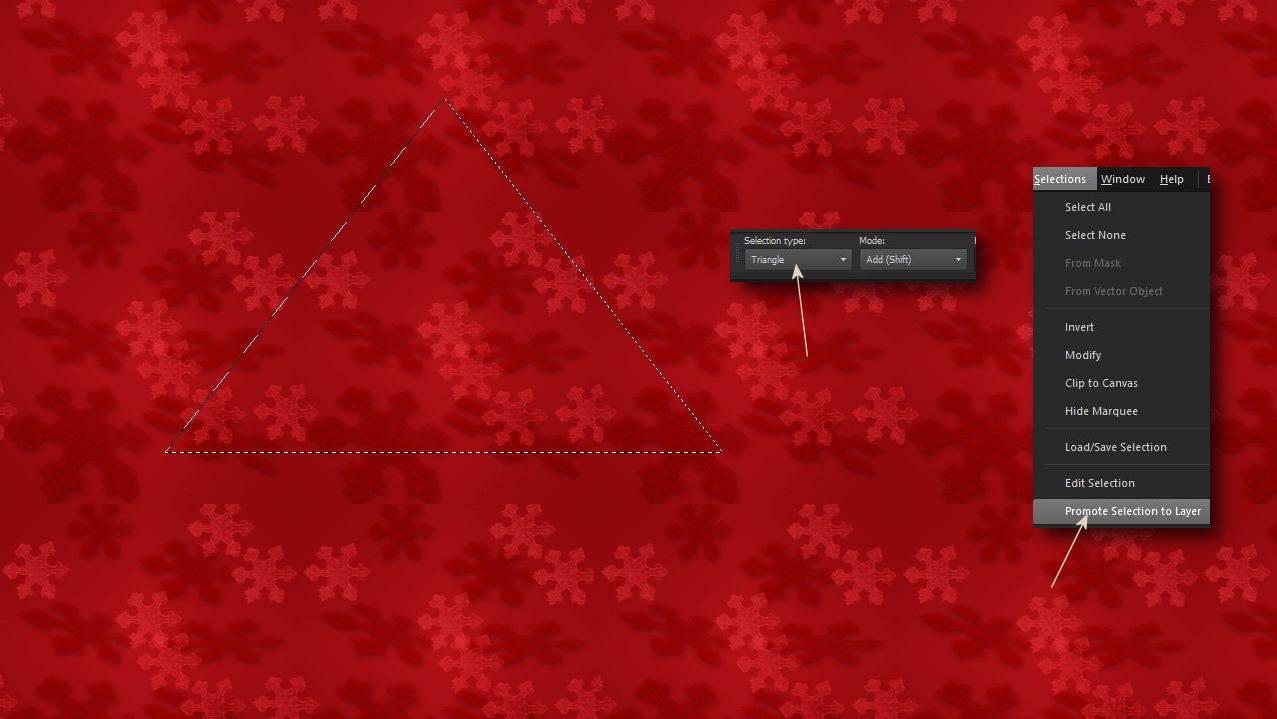
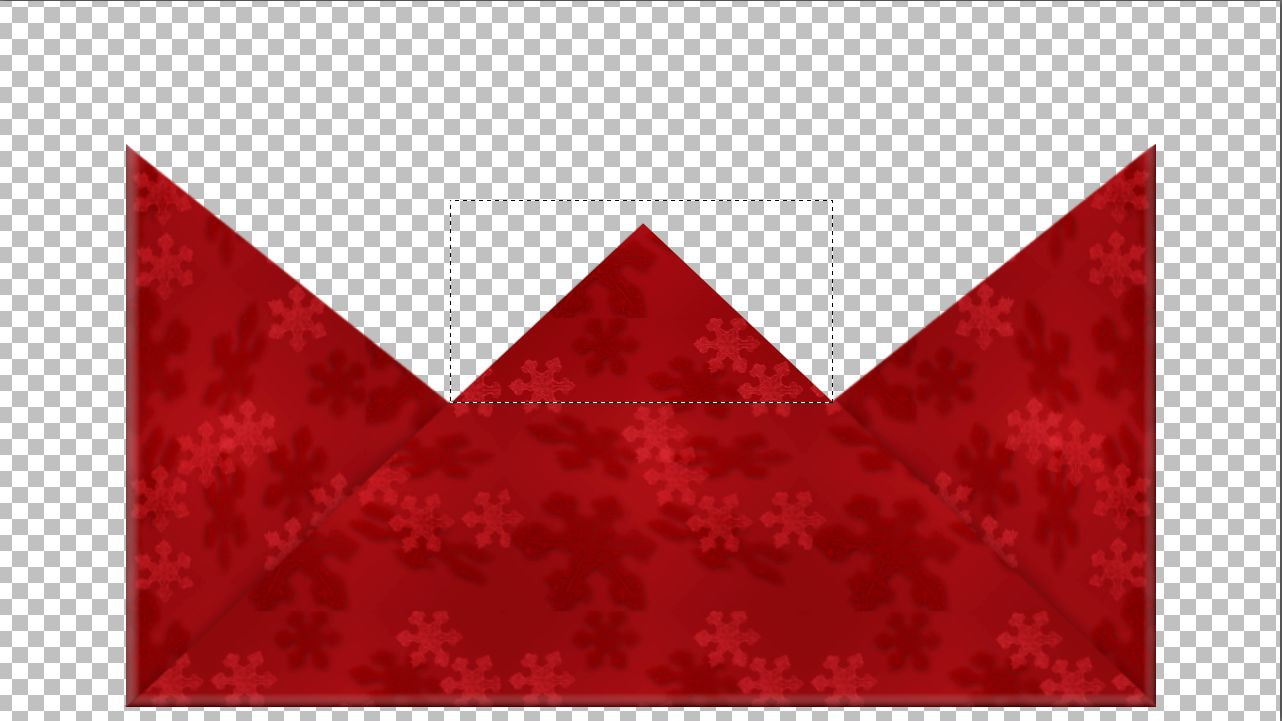
1. Hozzátok be a csomagból ezt a karácsonyi hátteret. A kijelölés eszköznél álljatok a triangle / háromszög-re. Jelöljetek ki kb. ekkora háromszöget amelyet itt a képn láttok és promótáljátok azt egy új rétegként.
Bring this Christmas background from the package. In the selection tool, click on the triangle. Select approx. triangle as big as you see in the picture and promote it as a new layer.
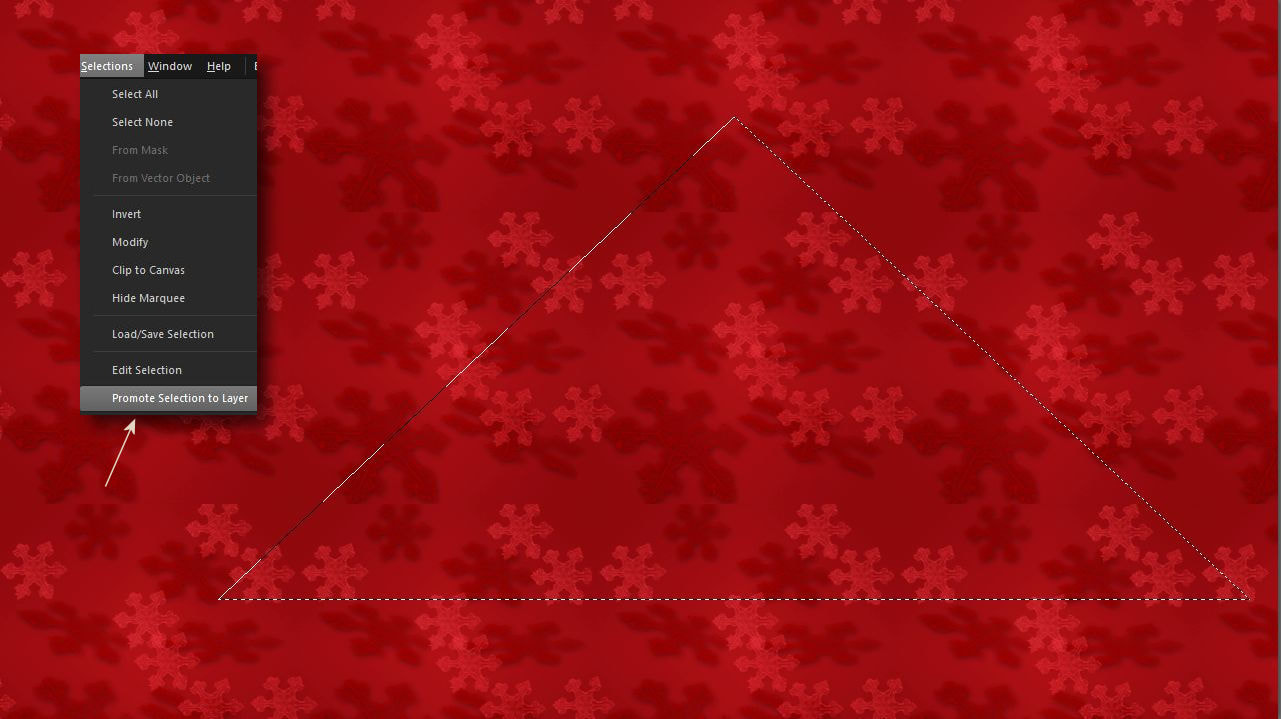
2. Aztán álljatok vissza erre a háttérre és most jelöljetek rajta ki egy nagyobb kb. ekkora háromszöget és promótáljátok azt is.
Then stand back on this background and now select a larger approx. such a big triangle and promote it too.
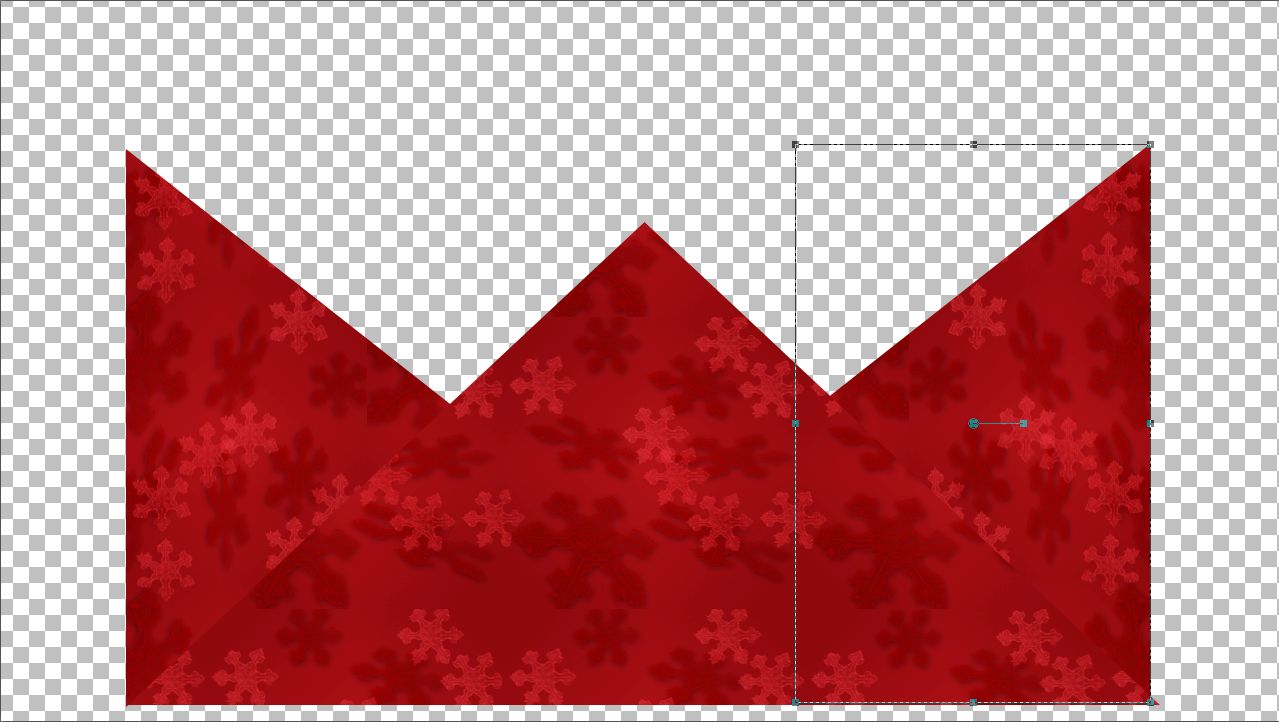
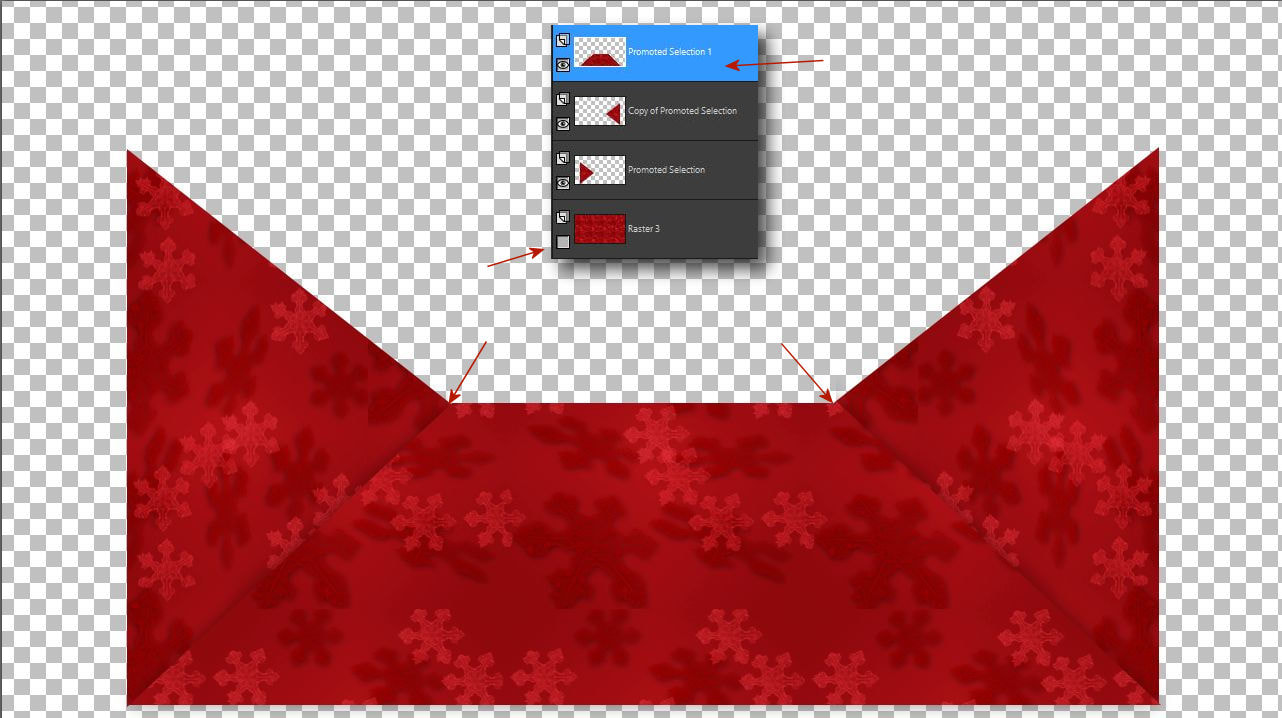
3. Kettözzétek meg a kis háromszög réteget és csukjátok be az alsó rétegszemet.
Mostmár 4 rétegednek kell lennie. Nagyon pontosan illesszétek a kis háromszöget a bal oldalra. Nagyon fontos, hogy a bal alsó sarokban tökéletes legyen az illesztés.
Double the small triangle layer and close the lower layer eye. You should now have 4 layers. Fit the small triangle very precisely on the left side. It is very important that the fit is perfect in the lower left corner.

4. Aztán tükrözzétek át horizontálisan a másik kis háromszöget és illesszétek a jobb oldalra a nagy háromszög alatt nagyon pontosan.
Then mirror the other small triangle horizontally and fit it on the right side under the big triangle very precisely.
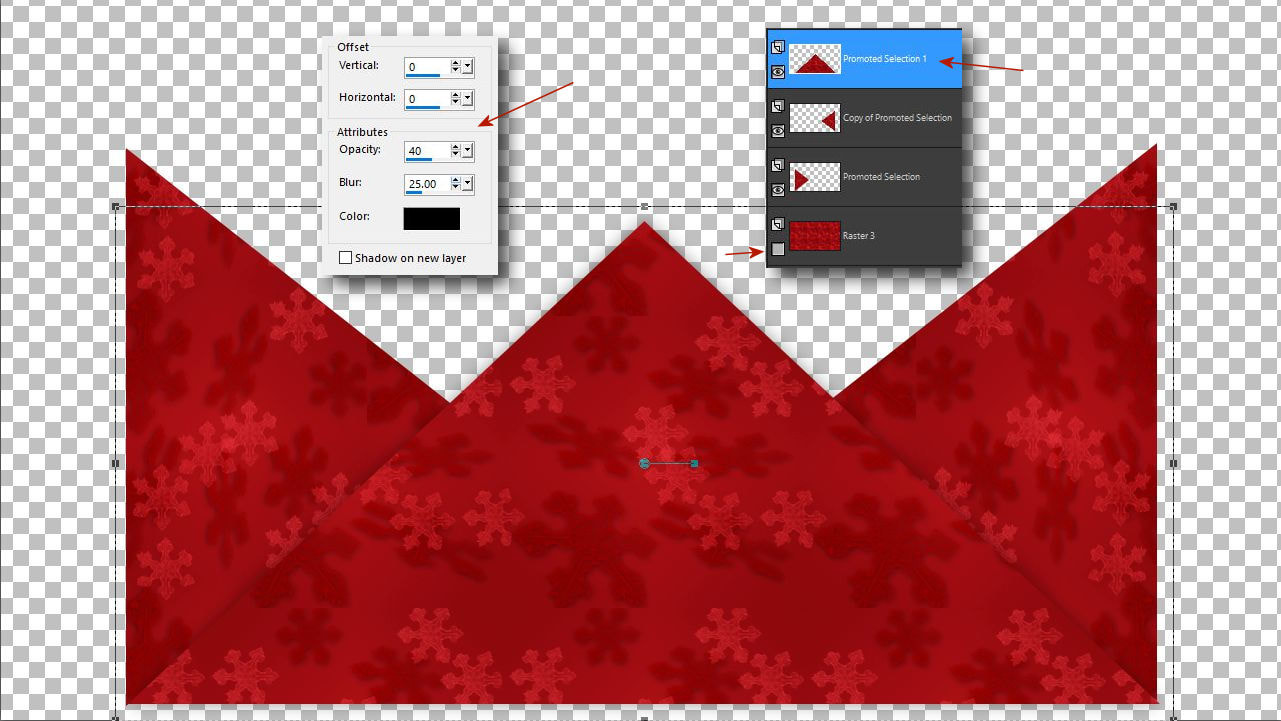
5. Álljatok a felsö nagy háromszög rétegre és nagyon finomat árnyékoljátok be azt.
Árnyék érték: 0,0,40,25 Adjátok össze a rétegeket.
Stand on the upper large triangle layer and shade it very gently. Shadow value: 0,0,40,25 Add the layers merge down.
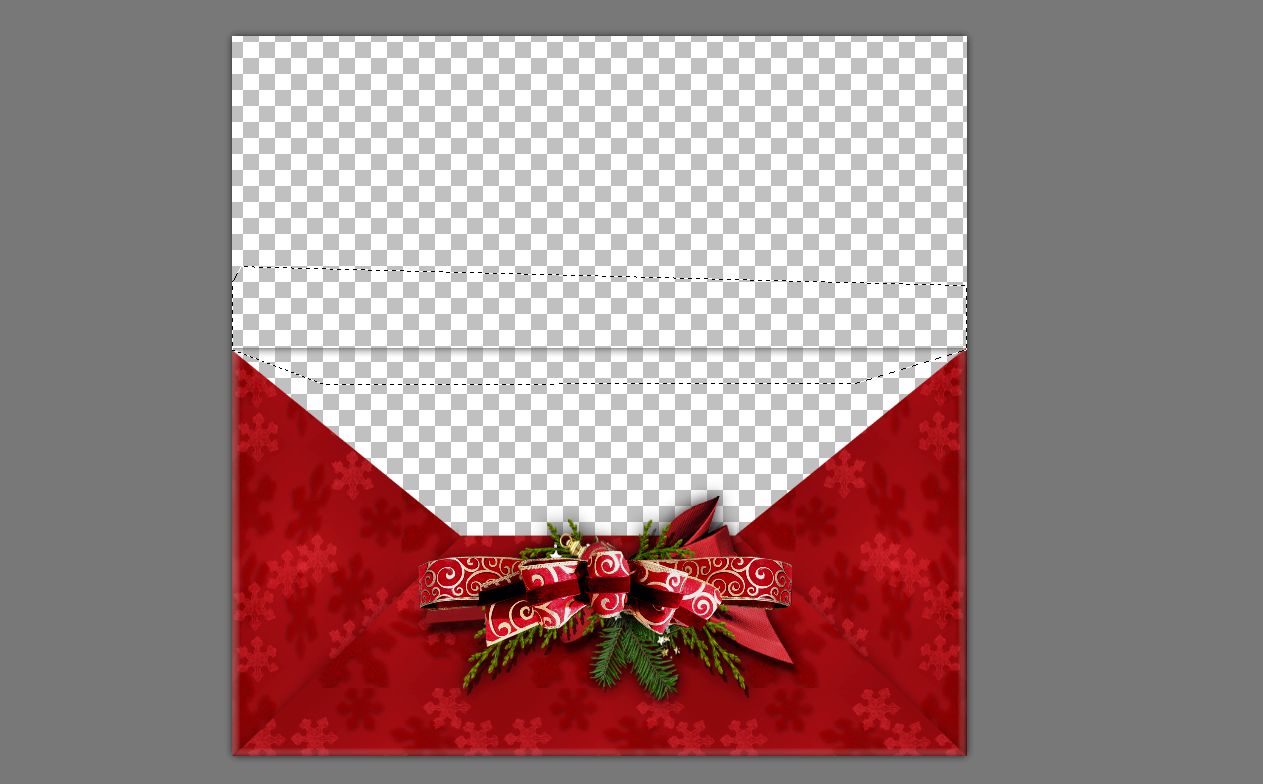
6. Csinálj egy nagyon pontos kijelölést saroktól sarokig a borítékod középsö csücskén és nyomd meg a klaviatúrádon a delete gombot.
Make a very precise selection from corner to corner on the middle tip of your envelope and press the delete button on your keyboard.
7. Ennek is nagyon pontosnak kell lennie!! Ha úgy látod, hogy a sarkok rendben vannak csak akkor menj tovább.
It also has to be very accurate!! If you see that the corners are in order, only then continue.
8. Most nagyon pontosan jelöld körbe ezt a piros borítékrészt és vágd ki azt.
Now very precisely mark around this red envelope part and cut it out.
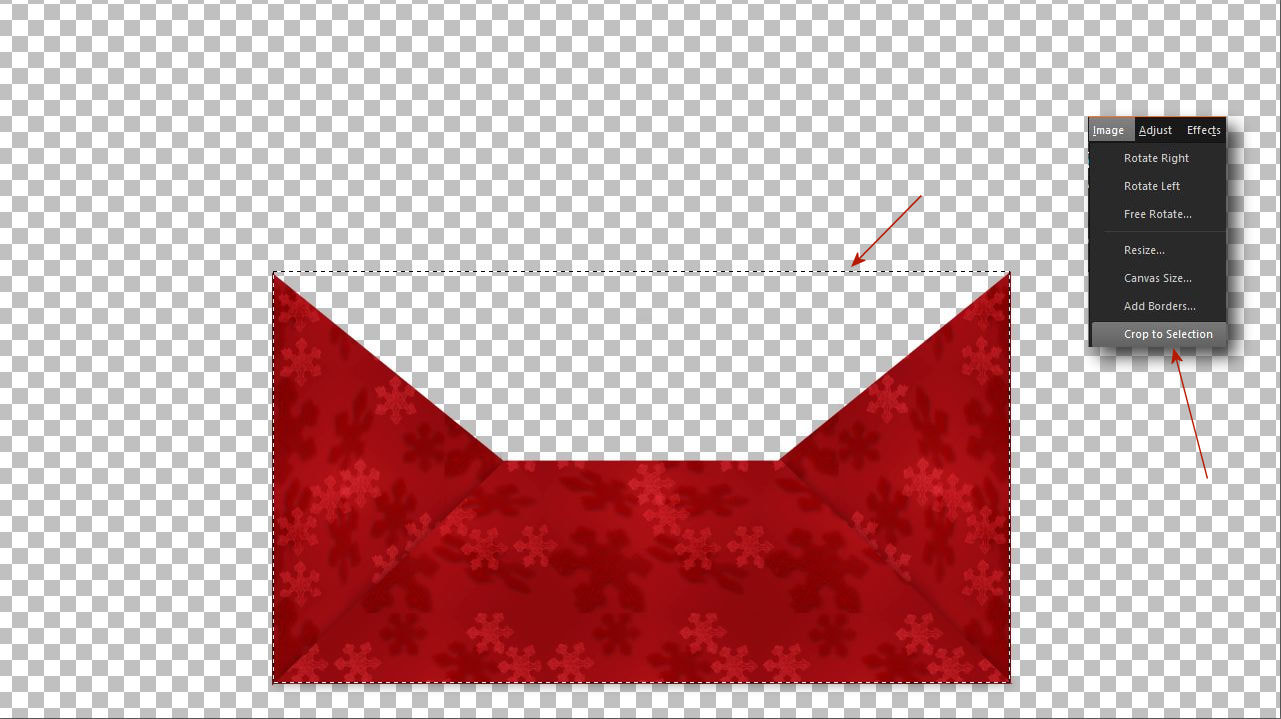
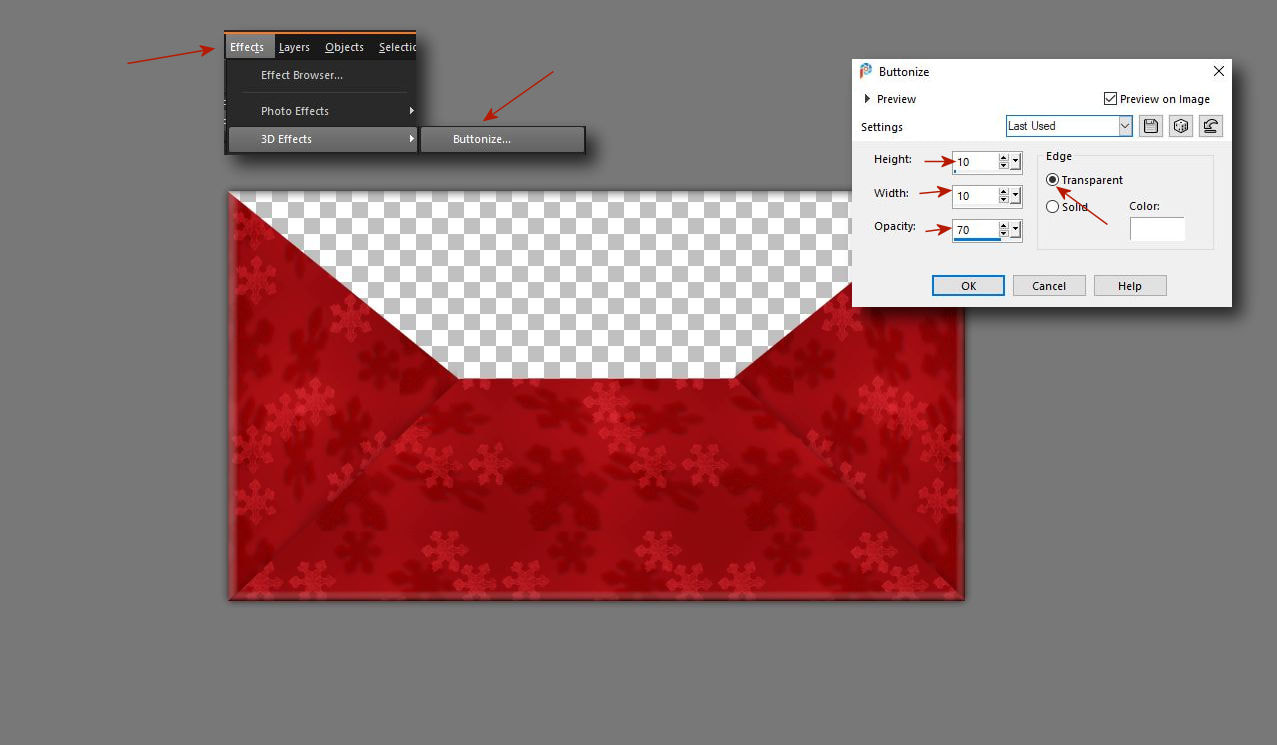
9. A borítékunk éleit meg kell kicsit változtatnunk életszerüvé kell tennünk.
Menj az Image menüre és válszd a Buttonize menüt.
Állítsd be az értékeket és ok.zd le.
We need to change the edges of our envelope a little, we need to make them lifelike. Go to the Image menu and select the Buttonize menu. Set the values and close.
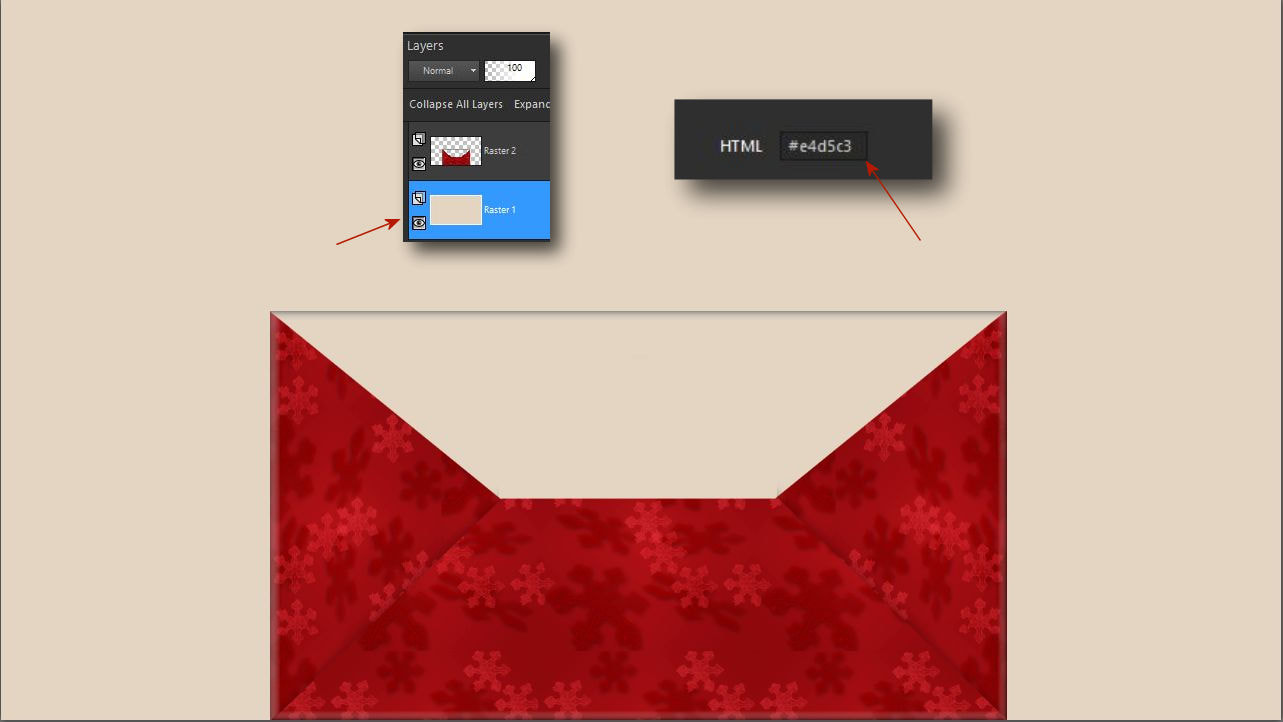
10. Nyissatok egy új lapot és öntsétek ki ezzel a szép baige színnel.
Színkód: e4d5c3.
Vigyétek be a png borítékotokat a lapra és kicsit nyomjátok össze, majd vigyétek le
a lap aljára.
Open a new page and pour out this beautiful beige color. Color code: e4d5c3. Place your png envelope on the page and press it a little, then move it to the bottom of the page.
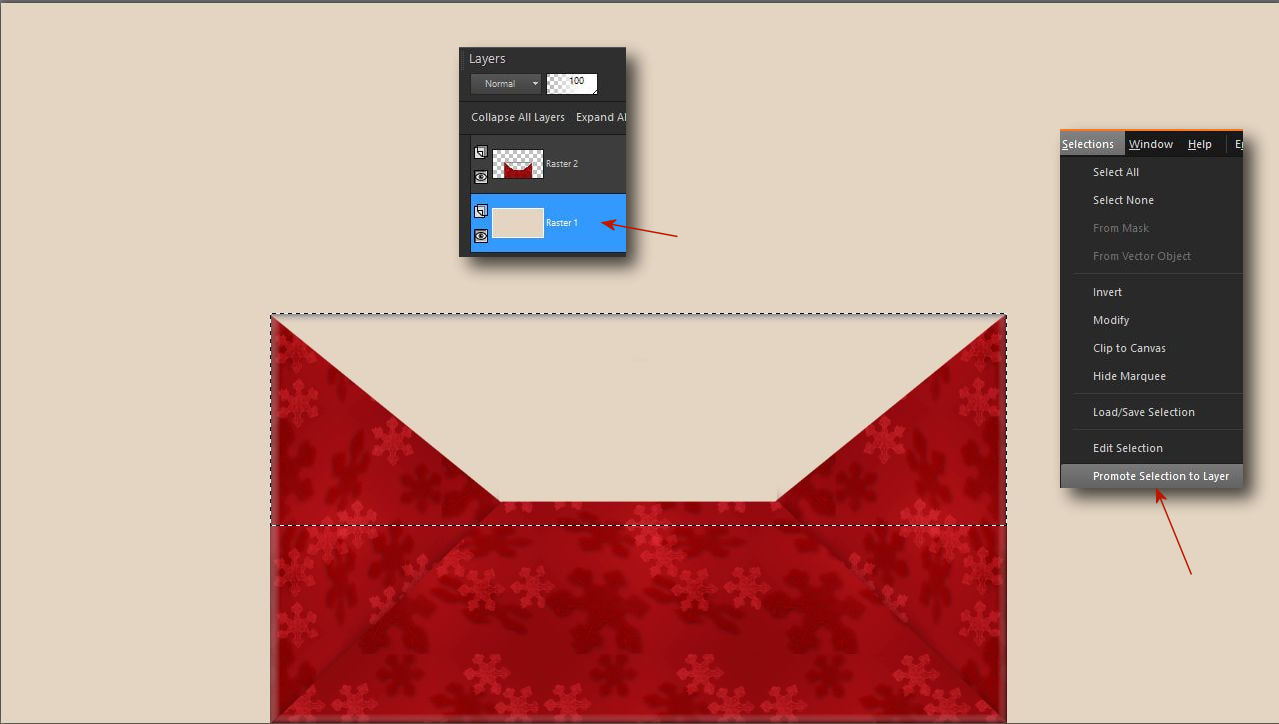
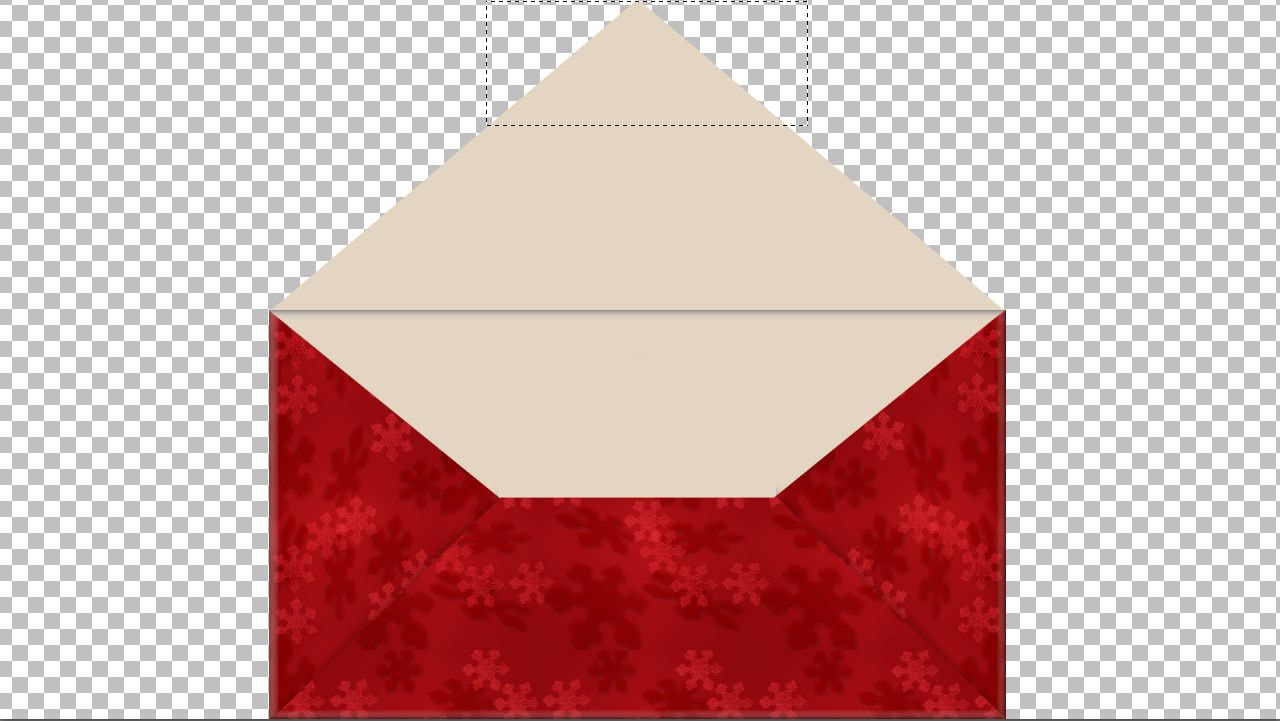
11. A baige alapon csináljatok egy ilyen kijelölést és promótáljátok azt.
Make such a selection on the beige base and promote it.
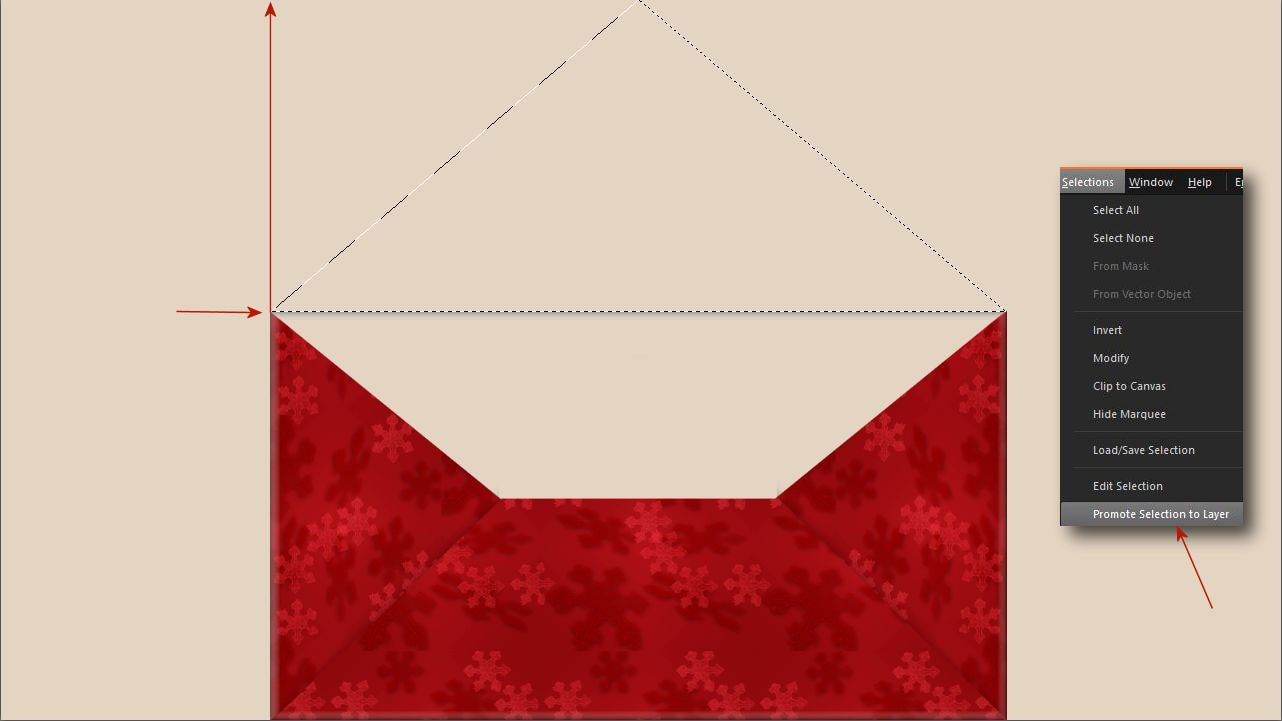
12. Álljatok vissza a baige alapra és most megint egy háromszöget kell jelölnötök. Ez a müvelet az egyik legnehezebb elöfordulhat az is, hogy többször kell megpróbálnotok hogy teljesen pontos legyen. Mint az látható ennek a háromszögnek pontosan a borítékod bal felsö sarkától a jobb felsöig kell lennie. Ehhez vonalzó segítség kell. Elöször tegyétek az egereteket a boríték bal felsö sarkához és figyeld meg a Corel vonalzón pontosan hogy látjátok a jelet. Ugyenezt a helyet kell megtalálnod a képed legfelsö szélén mielött kijelölsz. Ugyanis ennek a háromszögnek a kijelölését onnan legfentröl ugyanarról a pontról kell elindítanod. Akkor tudod csak a borítékodhoz pontosan elvégezni ezt a kijelést. Addig próbálkozz amíg nem sikerül!!! Ne menj tovább ha nem jó, mert ezt nem lehet méretre igazítani késöbb sem a pick tool-al. Ha kész promótáld ezt is.
Stand back on the beige base and now you have to mark a triangle again. This operation is one of the most difficult, and you may have to try several times to be completely accurate. As you can see, this triangle should be exactly from the upper left corner to the upper right corner of your envelope. This requires the help of a ruler. First, place your mouse at the top left corner of the envelope and observe exactly how you see the mark on the Corel ruler. You need to find the same place on the top edge of your image before selecting. Because you have to start the selection of this triangle from the same point at the top. Then you can only make this mark exactly for your envelope. Try until you fail!!! Don't go any further if it's not good, because you can't adjust it to size later with the pick tool either. If you're ready, promote this too.
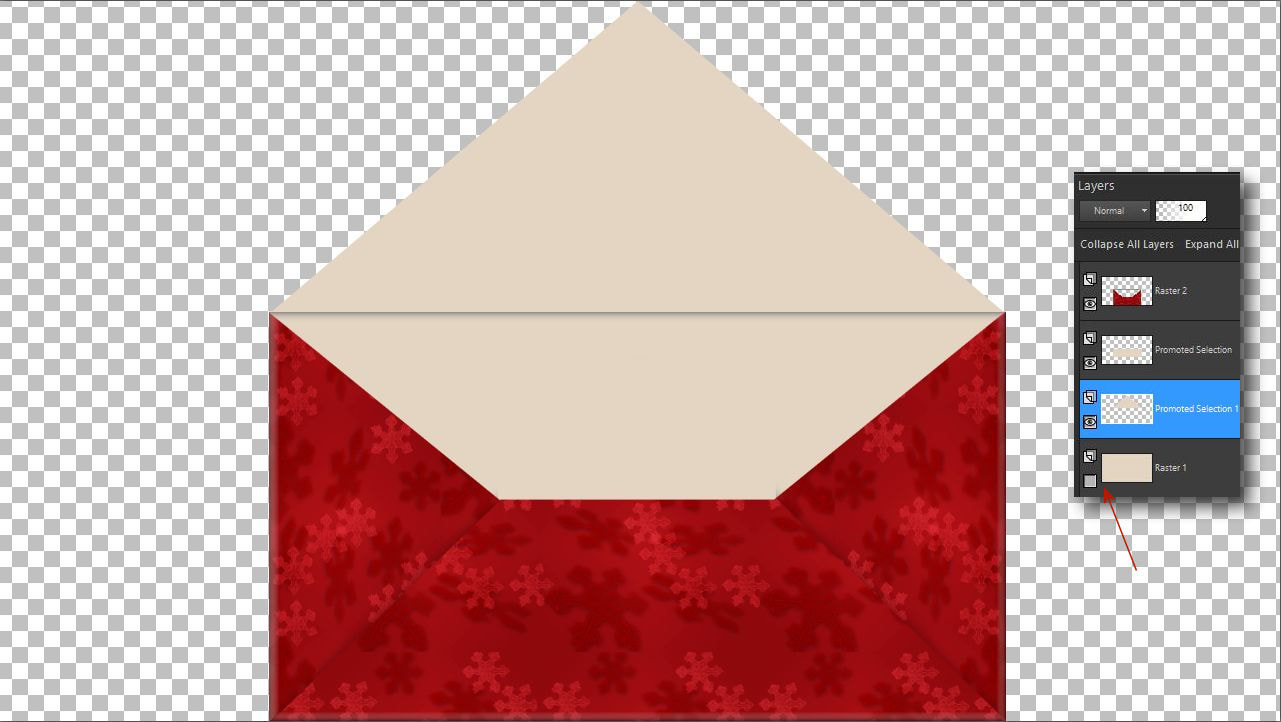
13. Ha becsukod az alap rétegszemet ezt kell látnod! Mindennek nagyon pontosan kell illeszkednie!!! Ezen a ponton mégegy nagyon fontos dolog van.
El kell mentened ezt az állapotot Psp formátumban mert késöbb szükséged lesz rá egy müvelethez!!
If you close the basic layer eye, this is what you should see! Everything has to fit very precisely!!! At this point there is one more very important thing. You must save this state in Psp format because you will need it later for an operation!!
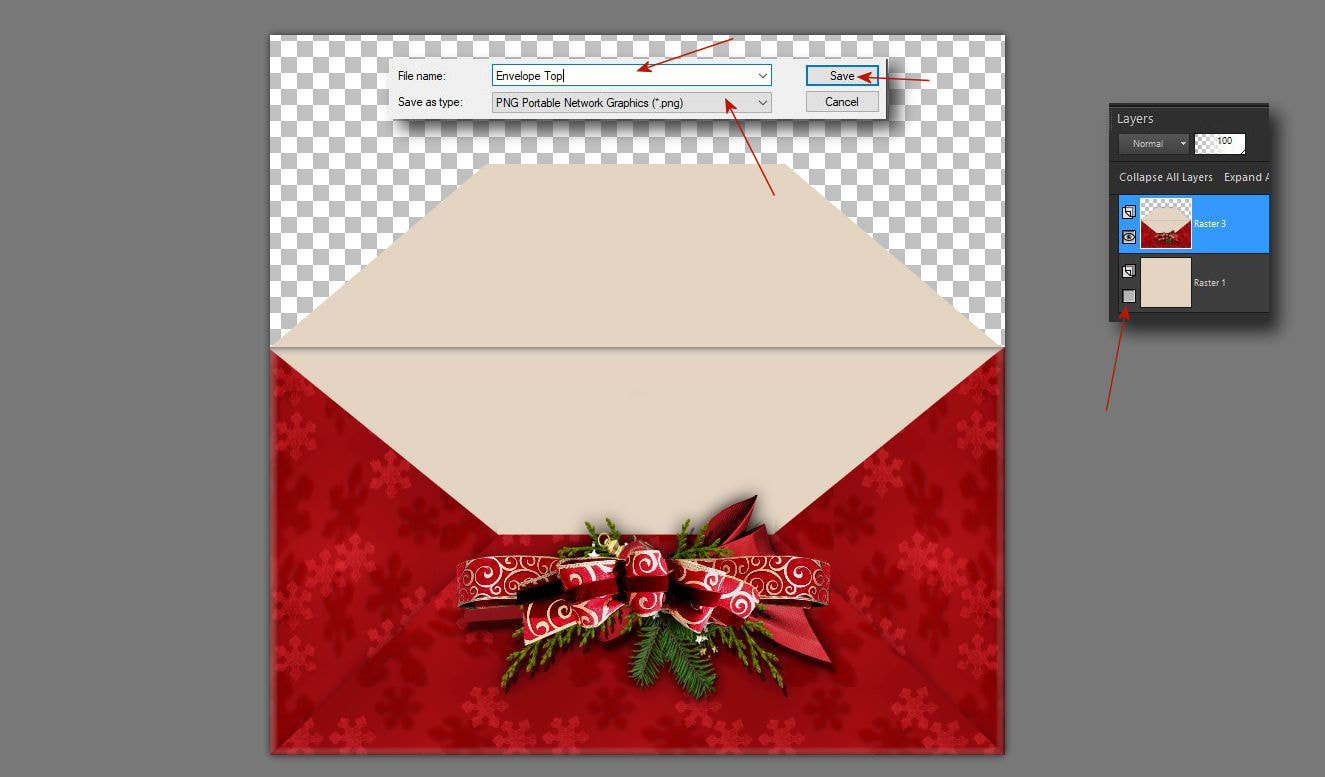
14. Az elmentés után tovább dolgozuk a lapon. Most a borítékod tetején lévö háromszög rétegen csinállj egy ilyen kijelölést és nyomd meg a klaviatórádon a delete gombot. Vagyis levágjuk a boríték felsö csücskét.
After saving, we continue to work on the page. Now make such a selection on the triangle layer on top of your envelope and press the delete button on your keyboard. In other words, we cut off the upper edge of the envelope.
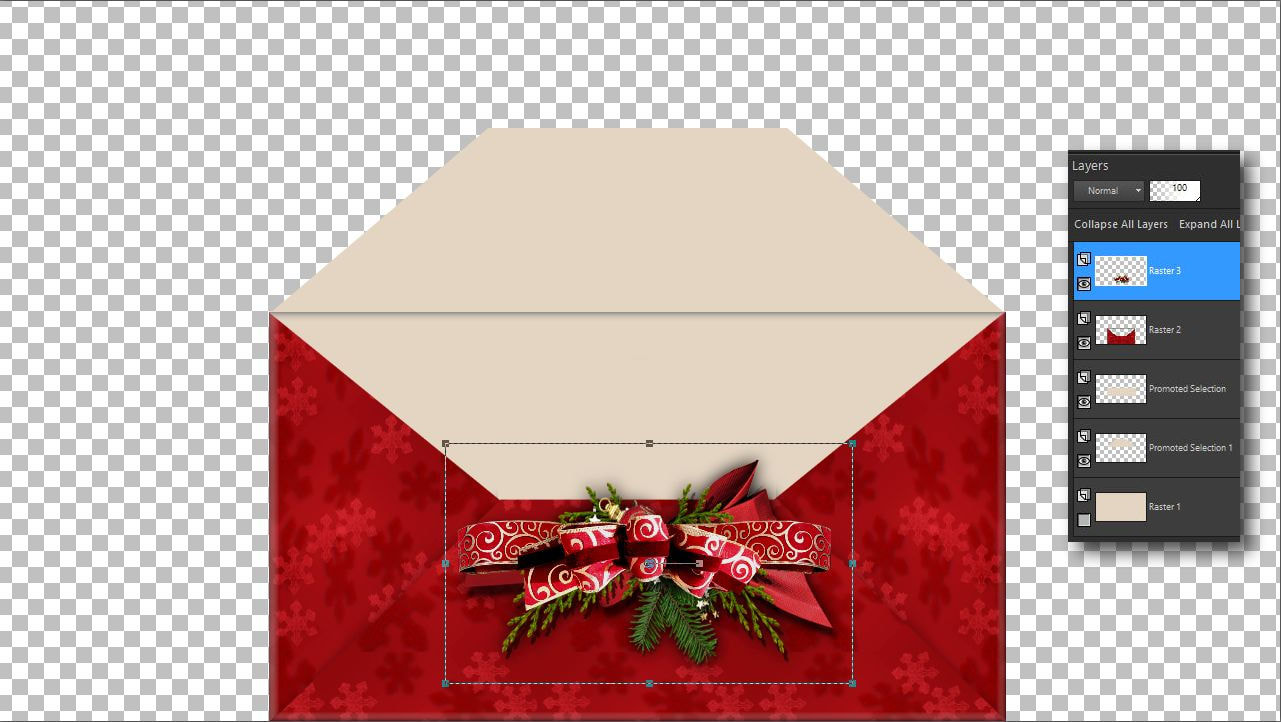
15. Helyezd el a csomagból a boríték dekort is új rétegként. Mentsd felül a Psp képedet a késöbbiekre.
Place the envelope decor from the package as a new layer. Save your Psp image for later.
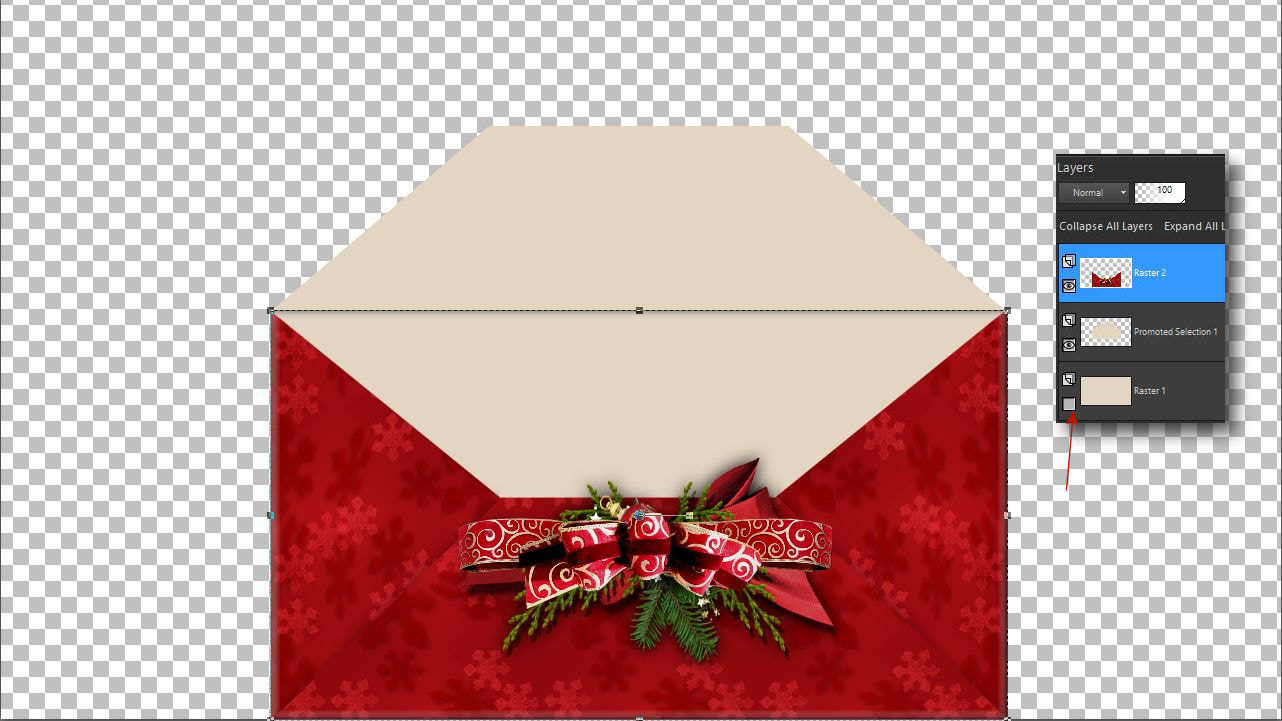
16. Még mindig a Psp rétegen dolgozunk. Most add össze a borítékod és annak a dkorációja réteget és utánna pedig a két baige színü réteget. Maradj a boríték rétegen.
We are still working on the Psp layer. Now add your envelope and its decoration layer and then the two beige layers. Stay on the envelope layer.
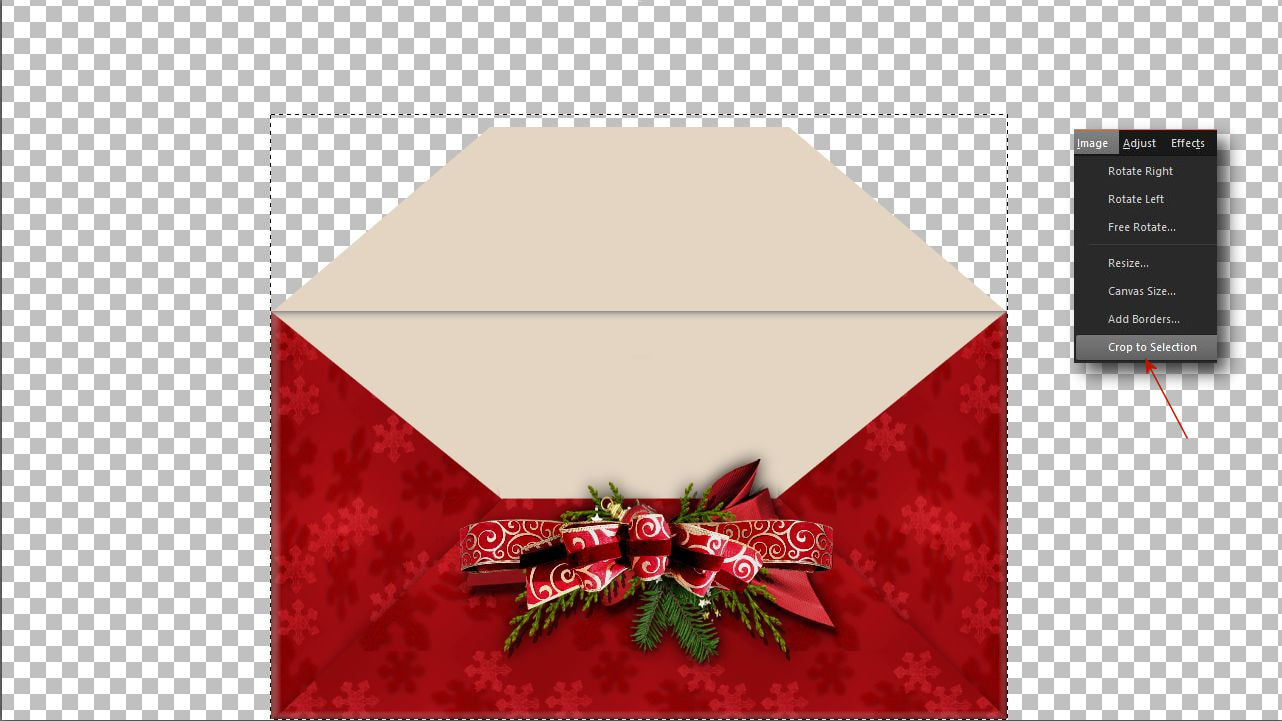
17. Igy ahogy van jelöld körbe pontosan a borítékodat és vágd ki azt.
Mark your envelope exactly as it is and cut it out.
18. Most a felsö régteg szeme legyen csak nyitva. Amikor a 9-es pontban a
buttonize menüben dolgoztunk a borítékunk felsöszélén is látható lett egy vékony
fekete csík. Ez a ProShow-ban való munkánál zavaró lenne. Ezért ezt most
a lasszóval jelöld körbe és töröld ki.
Now the eyes of the upper layer should be open. When we worked in the buttonize menu in point 9, a thin black stripe was visible on the opening of our envelope. This would be confusing when working in ProShow. Therefore, circle this with the lasso and delete it.
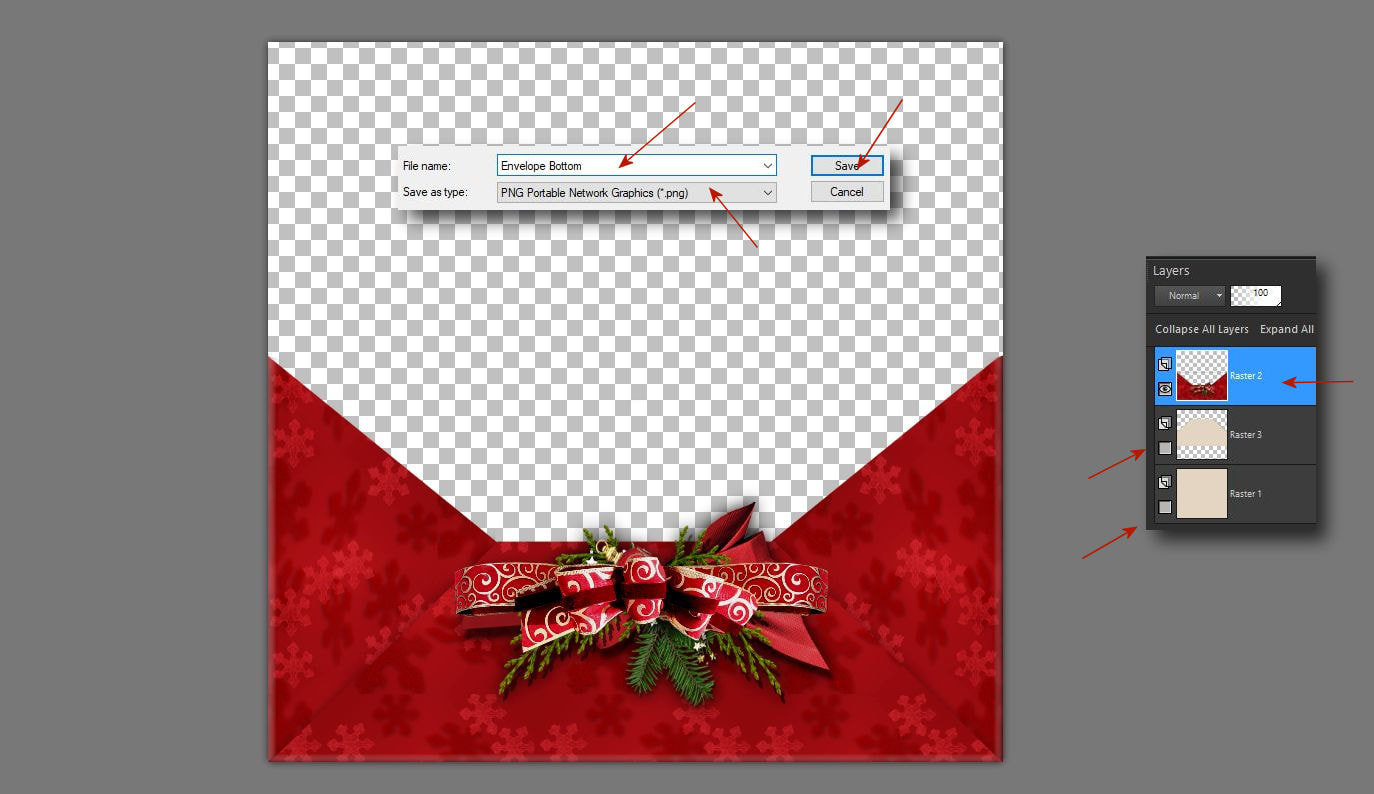
19. Ezt most mentsd el png formátumban úgy, hogy legyen becsukva a két alsó rétegszem.
Now save this in png format so that the two lower layers eye are closed.
20. Most vissza kell lépned addig, hogy ez a fekete csík ísmét látsszon és össze kell adnod az alsó réteggel és azzal együtt is mentsd el png formátumban.
Now you have to go back until this black stripe is visible again and merge it with the bottom layer and save it together in png format.
21. Majd rakd össze a csomagból az alapot és mentsd el háttérként a készülö videódhoz.
Then assemble the base from the package and save it as a background for your upcoming video.
Na ez most "férfi munka" volt, de hidd el megéri mert érdekes látványhoz használható a ProShow Producerhez. Töltsd le innen a csomagot.
Well, this was a "man's job", but believe me it's worth it because it can be used for interesting visuals with ProShow Producer. Download the package here.

| christmas_greetings_pack.rar |