
Itt folytatjuk a nagyító effect alkalmazását a ProShow Producer programban a Corelban végzett elö munkálatok után.
Here we continue the application of the magnifying effect in the ProShow Producer program after the preliminary work done in Corel.

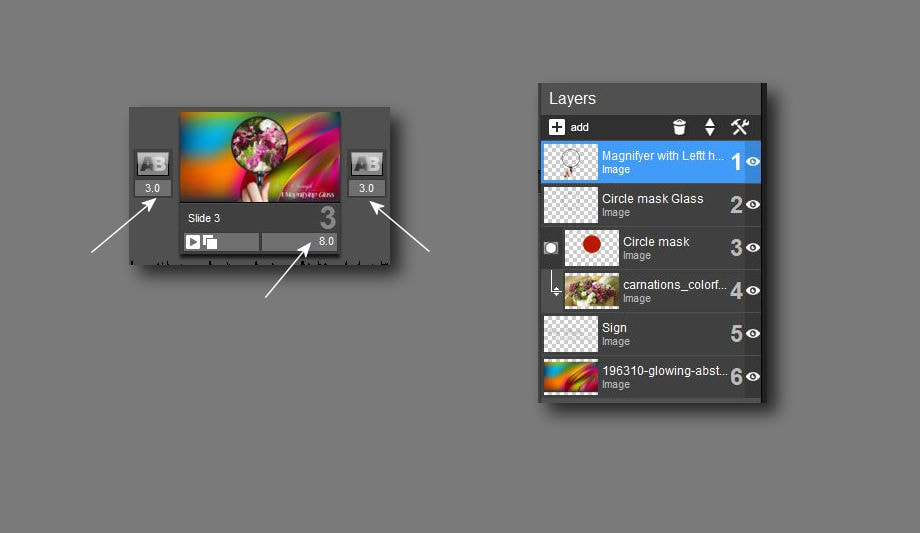
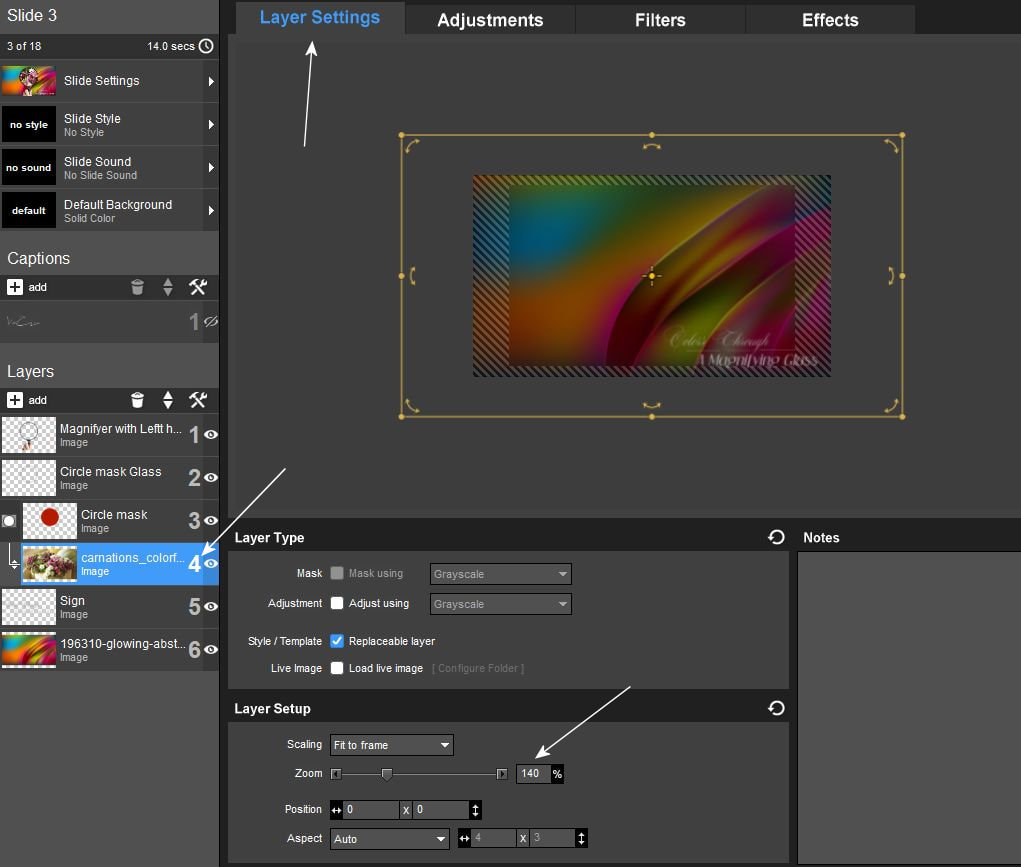
1. Amikor minden készen áll a videód témájához és a képeid is megvannak az intró csempék után a 3. csempéden kezdjük a munkát. Nagyon fontos az idö beállítás ezen a csempén. Tehát az elsö és a mögöttes transition csempére 3 mp-et állíts a köztes nagycsempén pedig min.8 mp.-et. Ezzel az effecttel olyan müveletet is megtanulunk , hogy a folyamat közepén megállítjuk a nagyítót és újraindítjuk azt, ehhez viszont hosszabb idönek kell a csempén lennie. A rétegeknek így kell elhelyezkednie a csempéden. A felsö rétegen kell lennie a nagyító keretednek amit elkészítettél a Corelban png formátumban. Vagy egy igazi nagyítót használsz. Ha ezt választod ( ezt a nagyítót itt alul megtalálod becsomagolva letöltésre) akkor az üvegedet és a maszkodat is ahhoz kell elkészítened ugyanolyan méretben!!! De használhatod a saját egyszerü keretedet is. A második rétegre az üvegedet kell betenni a harmadikon a maszkod van ennél a három objektumodnál nagyon fontos, hogy pontosan ugyanabban a pozícióban legyen mindhárom a progidban. A negyedik rétegedre egy képet kell majd tenned összkötve a maszkoddal. Nekem itt a feliratom a mintavidimhez van az 5. rétegen de zt a réteget akár ki is hagyhatod vagy más elemt tehetsz be helyette ez töled függ. A hátterem a 6.rétegen van. Tehát ezekkel a rétegekkel dolgozunk a videónkban végig.
The time setting on this tile is very important. So, set 3 seconds on the first and the following transition tile, and min. 8 seconds on the intermediate large tile. With this effect, we also learn how to stop the magnifier in the middle of the process and restart it, but for this you need to spend a longer time on the tile. This is how the layers should be positioned on the tile. On the top layer should be your magnifying frame that you made in Corel in png format. Or you use a real magnifying glass. If you choose this (you can find this magnifier packaged for download below) then you have to make your glass and mask in the same size!!!
Put your layers together as you see in the picture. I also have a subtitle on the 5th layer in my video.
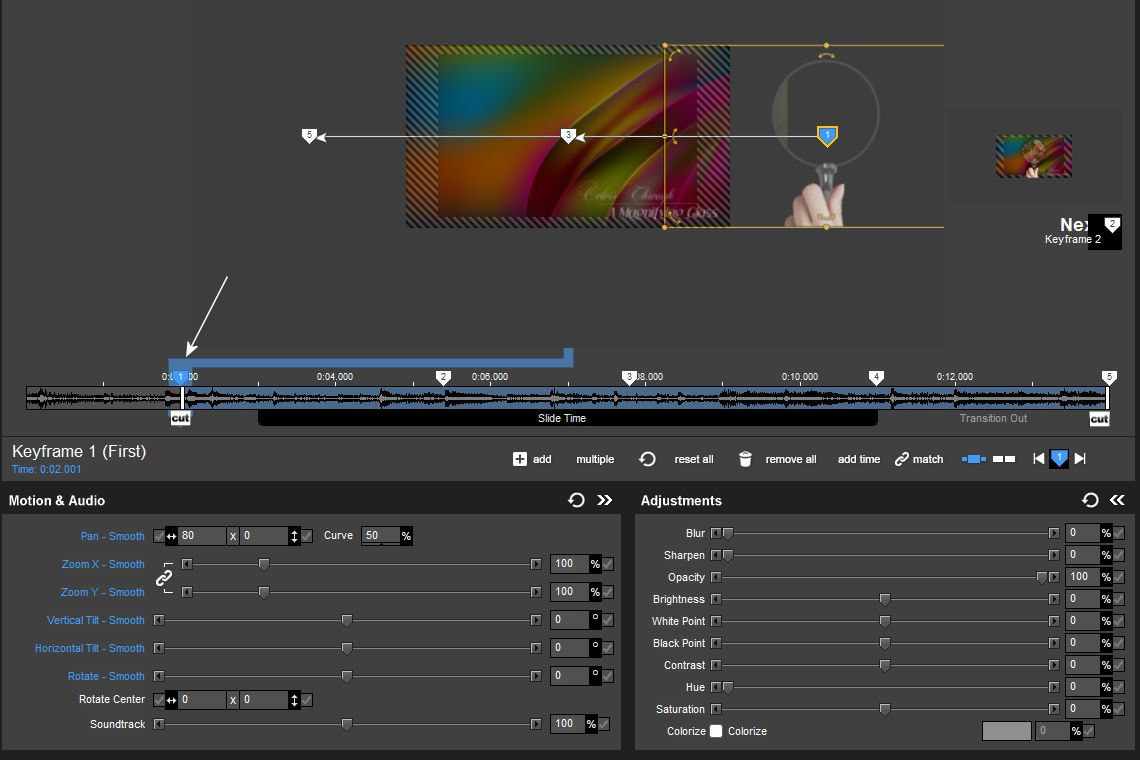
2. Az összes müveletünkben a nagyító mozgása a legfontosabb a videónkban. Ahhoz, hogy ez jól mozogjon az effectben több keyframe pontot kell elhelyeznünk a fekete aktív lécre. Kattints a lécre és helyezz el 3 db. keyframe pontot kb. oda ahogy azt itt a képen látod. Ezeknek a pontos helyét késöbb meghatározzuk itt alul a folyamatban. Amikor egyszer a felsö rétegen ezt a mozgást jól elkészítetted, akkor teljesen ugyanezt kell majd az üveg és a maszk rétegen is megcsinálni. Ha valami nem pont ugyanúgy készül akkor ez a három réteg nem tud pontosan együtt mozogni a vididben.
Tehát most figyelmesen kell dolgoznod!!!! Én ehhez a vidihez jobbról balra mozgatom a nagyítómat, középen megállítom és újra elindítom, hogy az kimenjen a képböl. Ezt jól kell látnod ezért a bal alsó sarokban levö zoom csúszkát húzd le kissebb értékre, hogy jól lásd a képernyödön kivüli teret is. aztán kattints az 5. ös keyframe pontra és húzd át a baloldalra, csináld meg a mozgást. Itt azt látod, hogy az 1.es keyframe pont a kiindulási hely a nagyítónak a jobboldalról és az 5-ös keyframe pont a mozgás vége.
In all our operations, the movement of the magnifier is the most important in our video. In order for this to move well in the effect, we need to place several keyframe points on the black active bar. Click on the bar and place 3 of them. keyframe point approx. as you see in the picture. The exact location of these will be determined later in the process. Once you have done this movement well on the upper layer, you will have to do exactly the same on the glass and mask layers. If something is not made exactly the same, then these three layers cannot move exactly together in the video. So now you have to work carefully!!!! For this video, I move my magnifying glass from right to left, stop it in the middle and start it again so that it goes out of the picture. You need to see this clearly, so drag the zoom slider in the lower left corner to a smaller value so that you can clearly see the space outside your screen. then click on the 5th keyframe point and drag it to the left, make the movement. Here you can see that keyframe 1 is the starting point of the zoom from the right and keyframe 5 is the end of the movement.

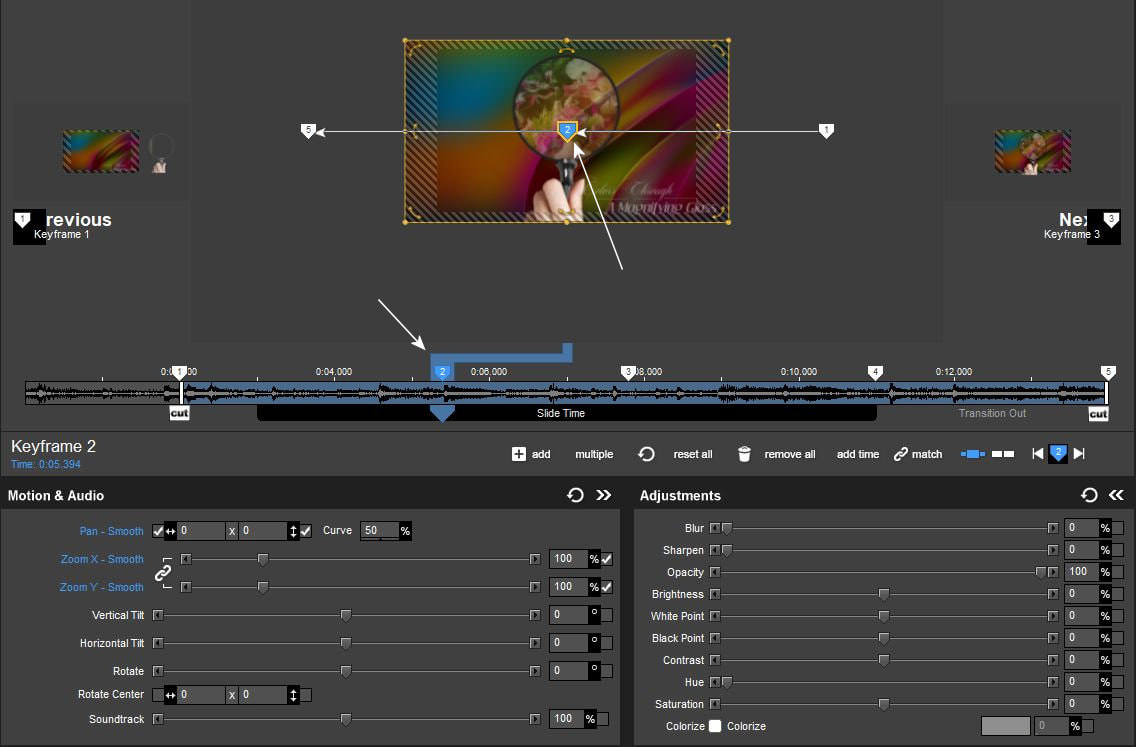
3. Most a 2.-es keyframe pontodat felül húzd középre ídáig kell elsö lépésben a nagyítódnak jönnie.
Now drag your 2nd keyframe point to the middle, the first step should be your magnifier.
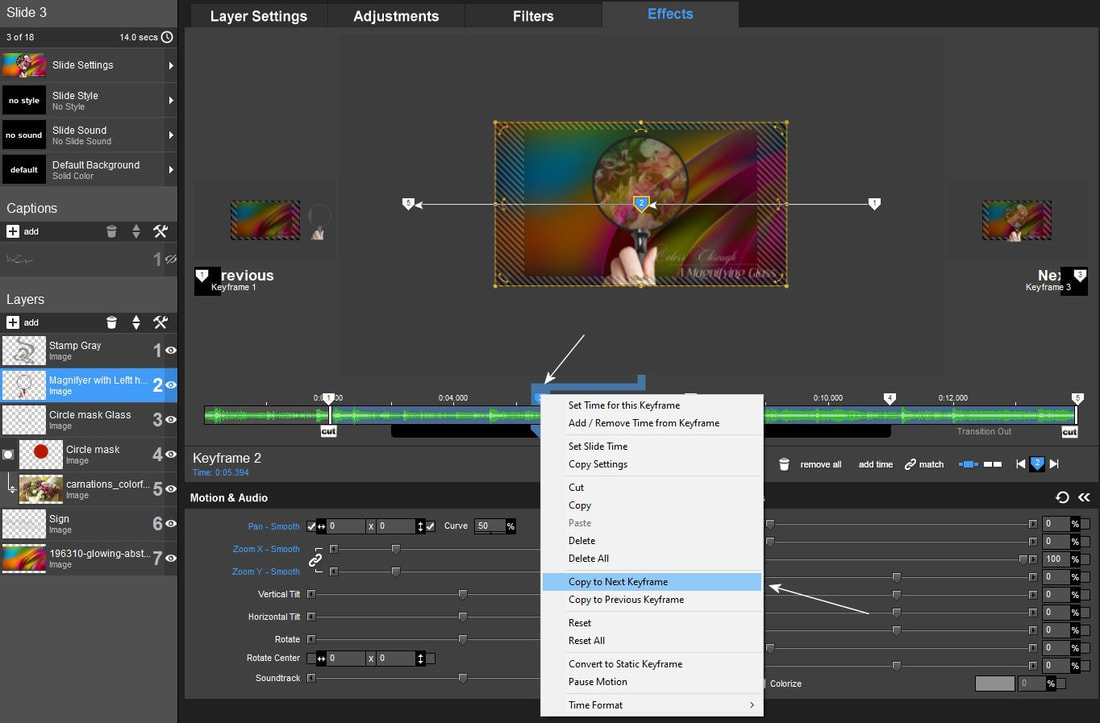
4. Ahhoz, hogy meg is álljon néhány másodpercre át kell másolnod az effect tulajdonságot a 2-es pontról a 3.-as pontra. De itt most nem a copy and paste módszert kell alkalmazni. Katt a 2-es keyframe pontra a lécen a jobb füllel és válaszd a Copy to next keyframe menüpontot és már az összes jellemzö a 3-as keyframe ponton is van.
In order for it to stop for a few seconds, you need to copy the effect property from point 2 to point 3. But the copy and paste method should not be used here. Click on keyframe point 2 on the bar with the right tab and select the Copy to next keyframe menu item and all the features are already on keyframe point 3.
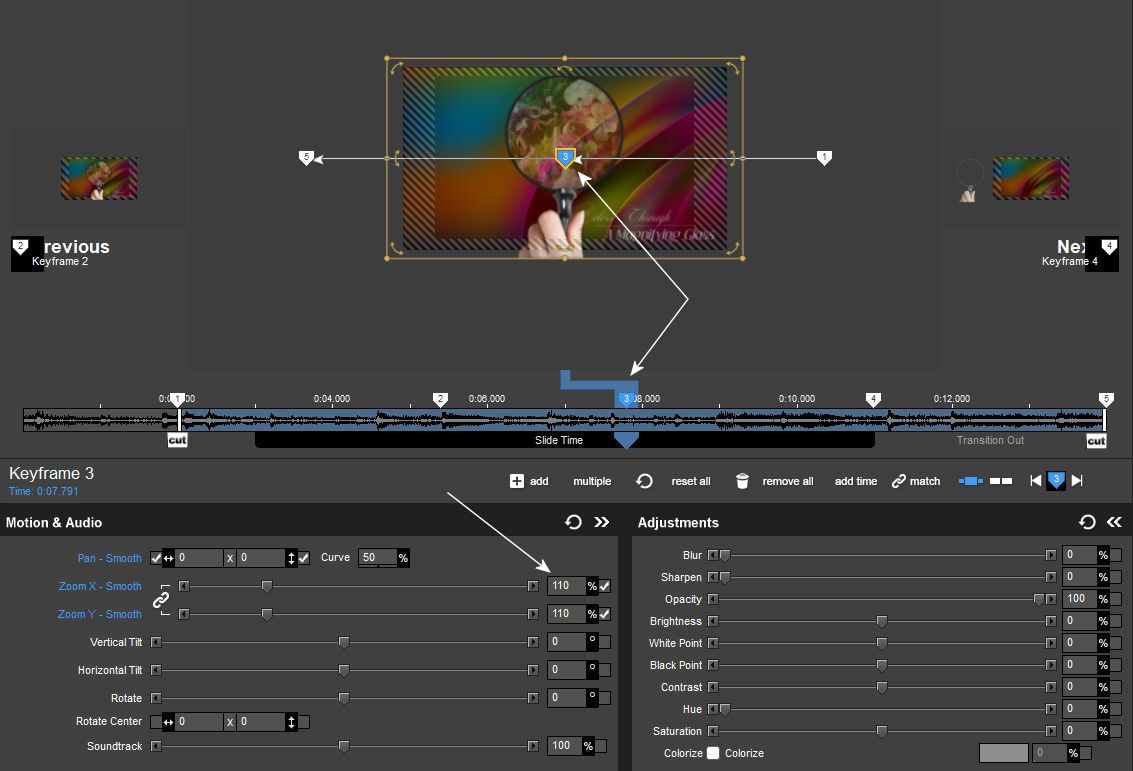
5. Hogy ne legyen a mozgásunk unalmas egy kicsit meg variáljuk ezen a ponton. Azt itt látjuk már, hogy a 3.-as keyframe pont teljesen középen van fedi a 2-est. Itt most állítsd a zoom-ot 110-re hogy a nagyítónk itt középen kicsit növekedjen is.
So that our movement is not boring, we will vary it a little at this point. Here we can already see that the 3rd keyframe is completely in the middle, covering the 2nd. Here, now set the zoom to 110 so that our magnifying glass here in the middle grows a little.
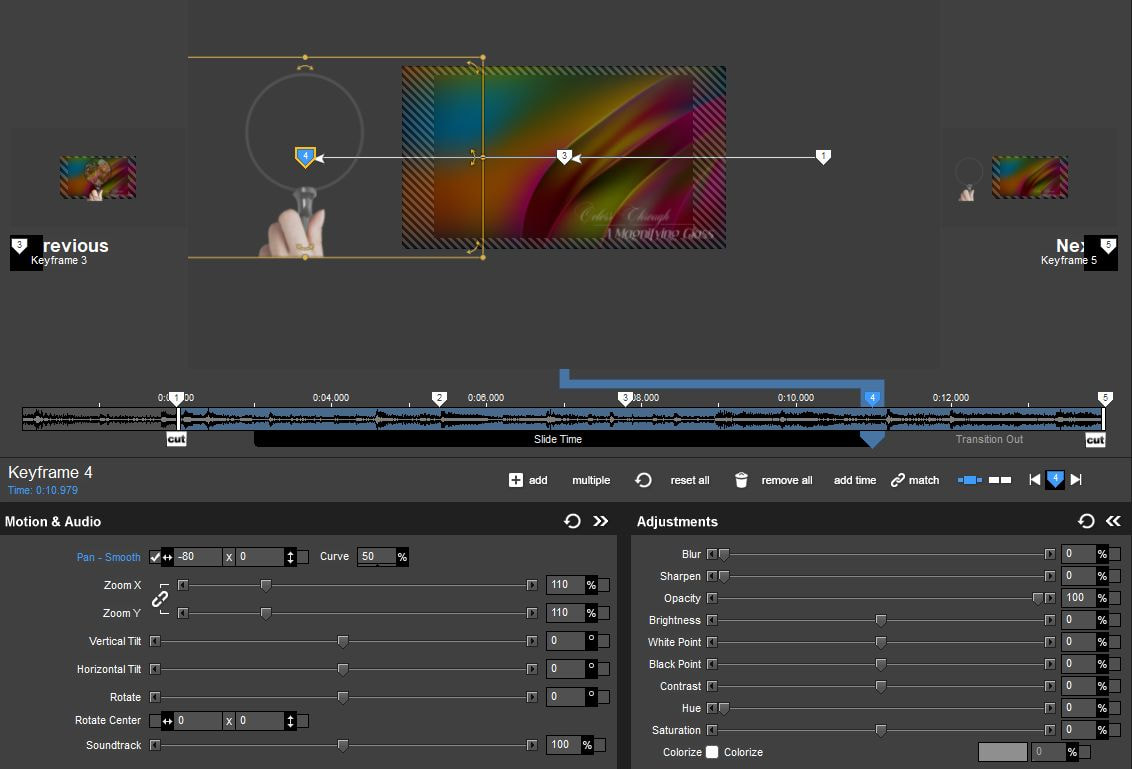
6. Ugyanezt meg kell csinálnod a 4-es keyframe ponton is. Tehát itt most a hagyományos módon klikk a 4-es pontra és copy.
You have to do the same at keyframe point 4. So here, in the traditional way, click on point 4 and copy.
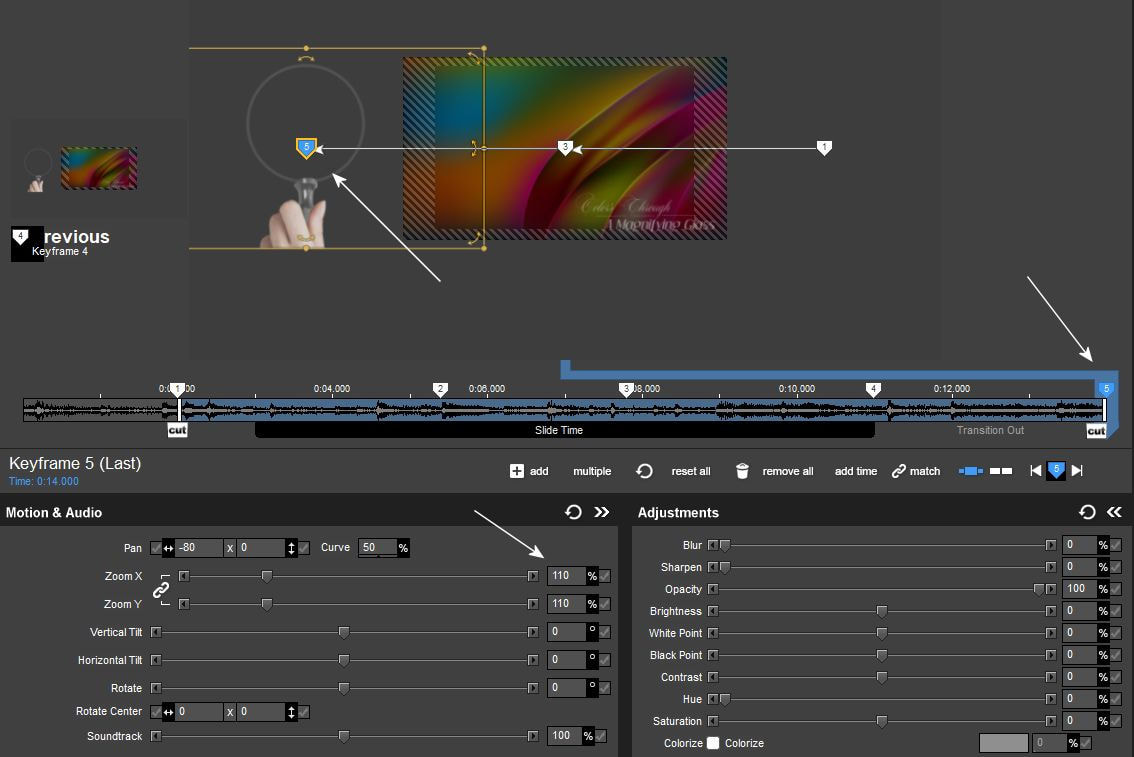
7. Paste az 5-ös keyframe pontra így az adat oda is átkerült.
Paste to keyframe point 5 so the data has been transferred there as well.
8. Elöször helyezd el a másik két rétegeden is ( a nagyító üveg és a maszk rétegen ) a keyframe pontokat. Majd végezd el ugyanezeket a lépéseket a 2-es ponttól idáig mindegyik rétegen.
First, place the keyframe points on your other two layers (on the magnifying glass and the mask layer). Then do the same steps from point 2 on each layer.
9. Mivel nem lehetséges az hogy nagyon pontosan helyezd el a keyframe pontokat mindhárom rétegen ahhoz , hogy ezt teljesen pontosan oldjuk meg a Keyframe Editorban kell dolgoznunk. Tehát most nyisd ki a keyframe editorodat és a felsö 3 rétegen kell pontosítanunk azokat az értékeket amely a pontos helyét jelöli a keyframe pontoknak. Ezt manuálisan az egérrel való huzogatással szinte lehetetlen megoldani.
Since it is not possible to place the keyframe points very precisely on all three layers, in order to solve this completely accurately, we have to work in the Keyframe Editor. So now open your keyframe editor and on the top 3 layers we need to specify the values that mark the exact location of the keyframe points. It is almost impossible to solve this manually by dragging with the mouse.
10. Erre való a baloldalon található ablakban levö Set Time. Itt azt látod, hogy
az 1-es rétegünknek az összes keyframe pontja milyen értékü távolságra van állítva. Csináld meg minden keyframe pontnak a pontos helyét az elsö rétegeden az értékeket amit be kell írnod a leugró kis ablakba itt látod nagyban oldalt minden keyframe ponthoz. Figyelem! Ezeket az értékeket a 2-es és a 3-as réteghez is be kell írnod!!!
Tehát ugyanígy csak a következö rétegre állsz és beírod minden keyframe pontra a megfelelö értéket. Ez egy jó kis gyakorlásnak is megfelel, hogy elkezd többet használni a keyframe editort is.
This is what the Set Time in the window on the left is for. Here you can see how far all the keyframe points of our layer 1 are set. Make the exact location of each keyframe point on your first layer, the values you have to enter in the small window that pops up, here you can see a large page for each keyframe point. Attention! You must enter these values for layers 2 and 3!!! So, in the same way, you only go to the next layer and enter the appropriate value for each keyframe point. This also corresponds to a good bit of practice, so that you start using the keyframe editor more.

11. Elérkeztünk a képrétegünkhöz. Azt is megvariáljuk egy kicsit ehhez a csuda klassz effecthez. A Layer Settingsben állítsd a képed zoom-ját 140 %-ra
We have reached our image layer. We will also change it a little for this amazingly cool effect. In the Layer Settings, set the zoom of your image to 140%
12. Amikor az effectre mész az 1-es keyframe ponton ugyanezt kell látnod.
When you go to the effect, you should see the same thing at keyframe point 1.
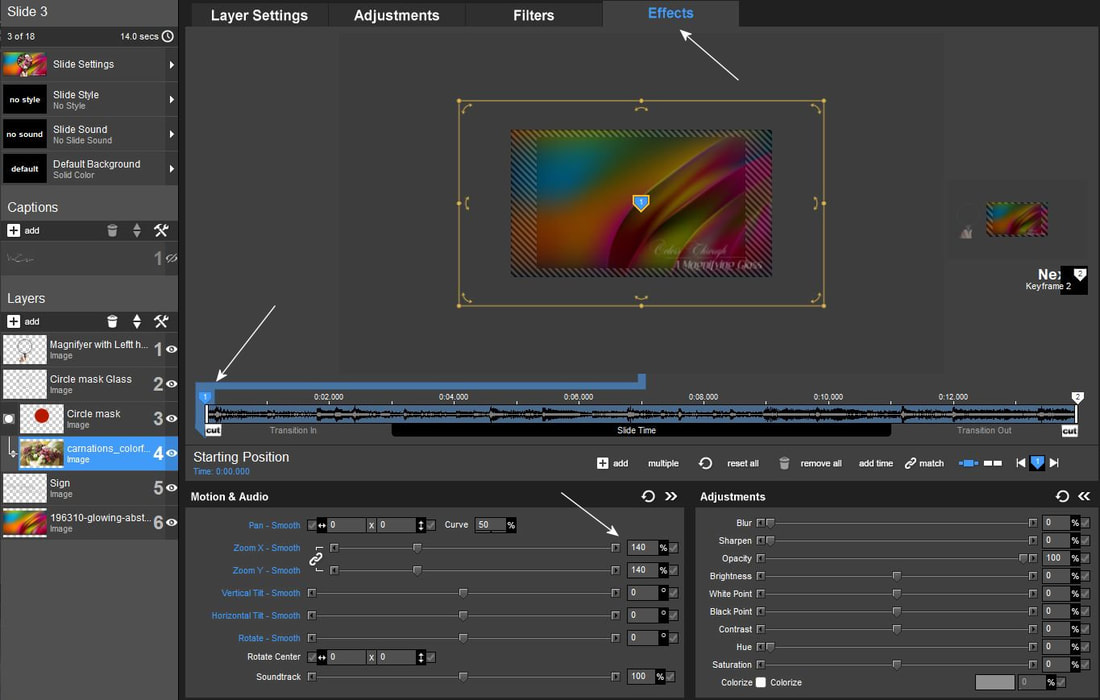
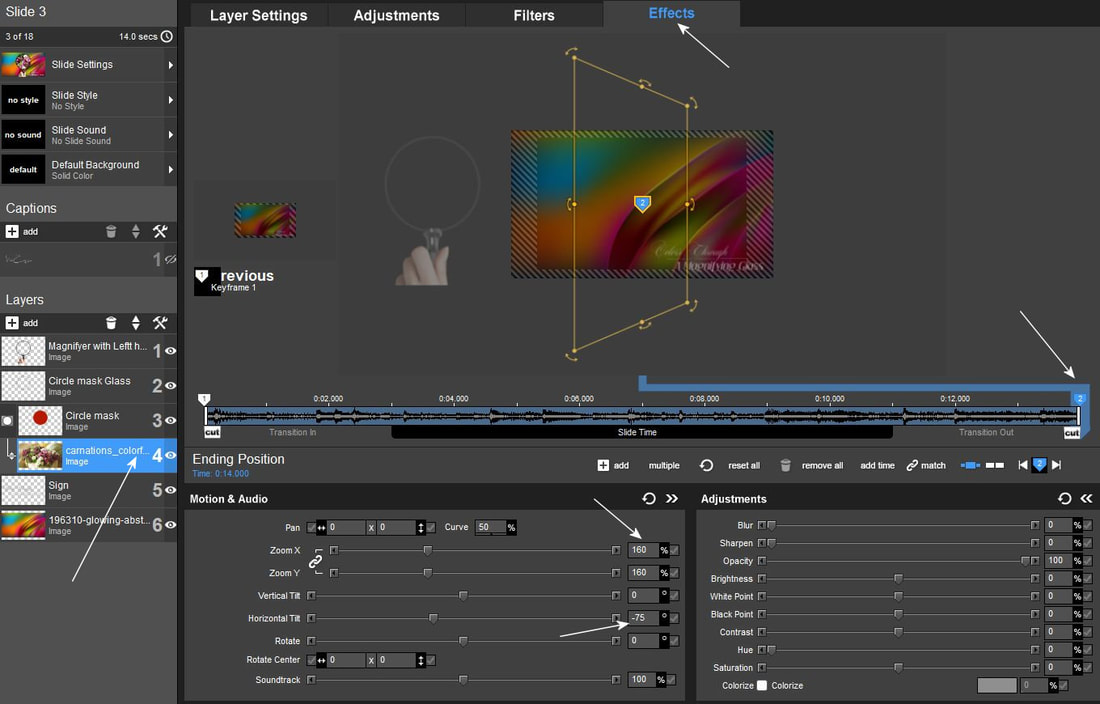
12. Katt a 2-es keyframe pontra ott viszont végezd el a következö beállítást.
Click on keyframe point 2 and make the following settings there.
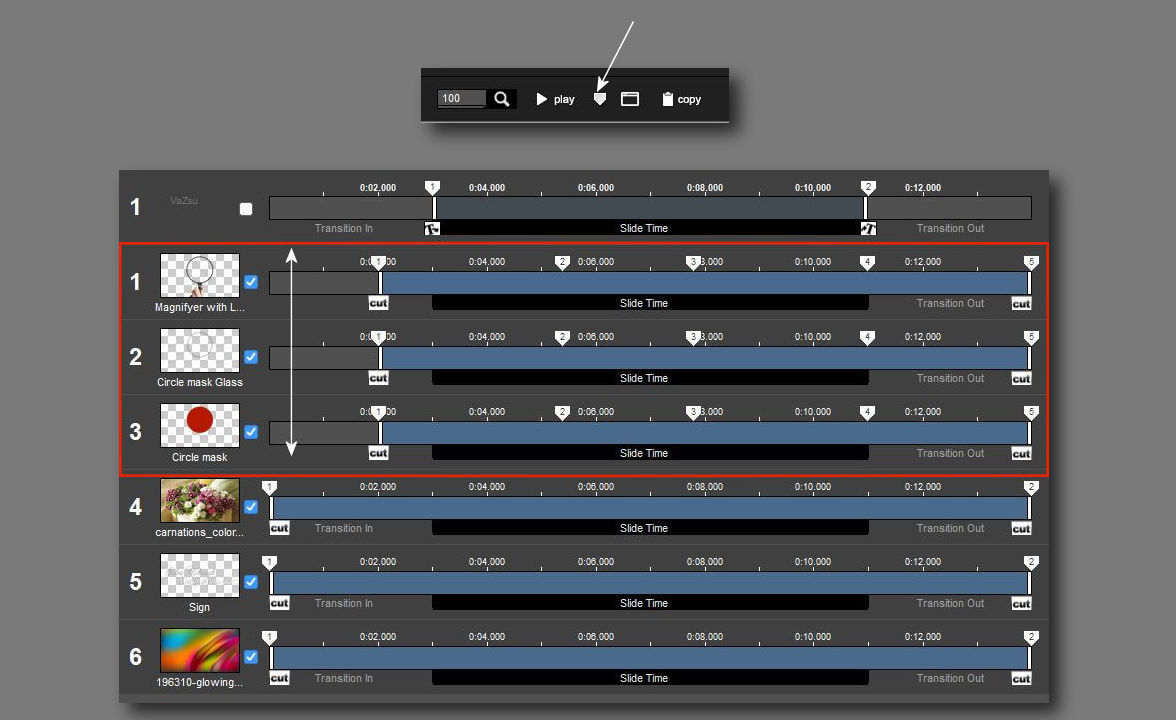
13. Amikor készen vagy ezzel a csempéddel és mivel sokat dolgoztál vele a videódhoz semmi mást nem kell tenned, mint ezt a csemét átmásolod a következö csempére és az Adjusmentben kicseréled a maszkos képed és esetleg a hátteret ha akarod, de futhat a vidid ugyanazon a háttéren is. Igy folytatod a másolást és ezt a folyamatot addíg amíg a választott zenéd hosszához nem igazítod az intrókkal együtt az egész videódat.
When you're done with this tile and since you've worked a lot with it, you don't have to do anything else for your video, other than copy this tile to the next tile and change your mask image and possibly the background in Adjustment, if you want, but your video can also run on the same background. This is how you continue copying and this process until you adjust your entire video, including the intros, to the length of your chosen music.
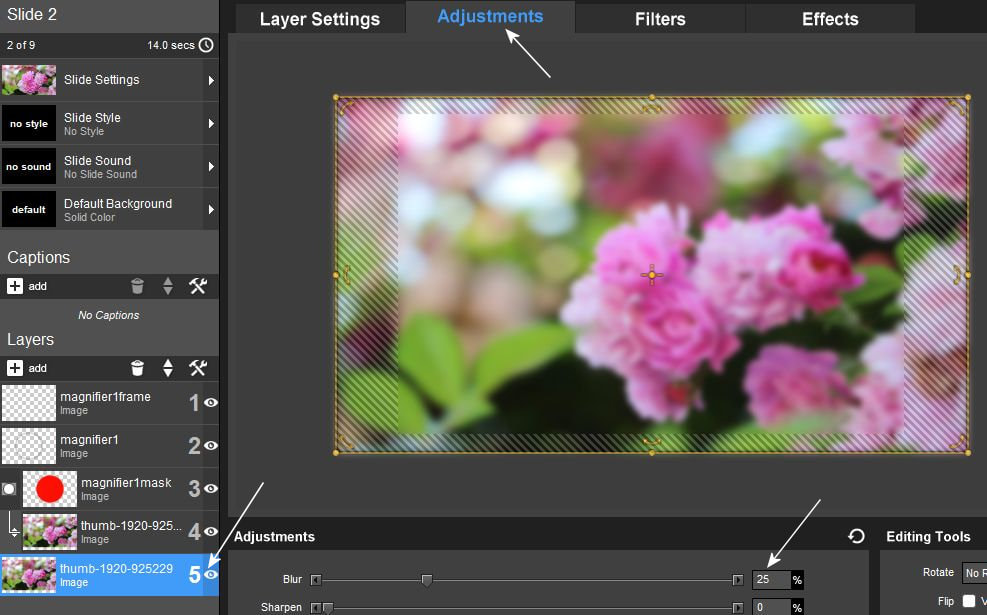
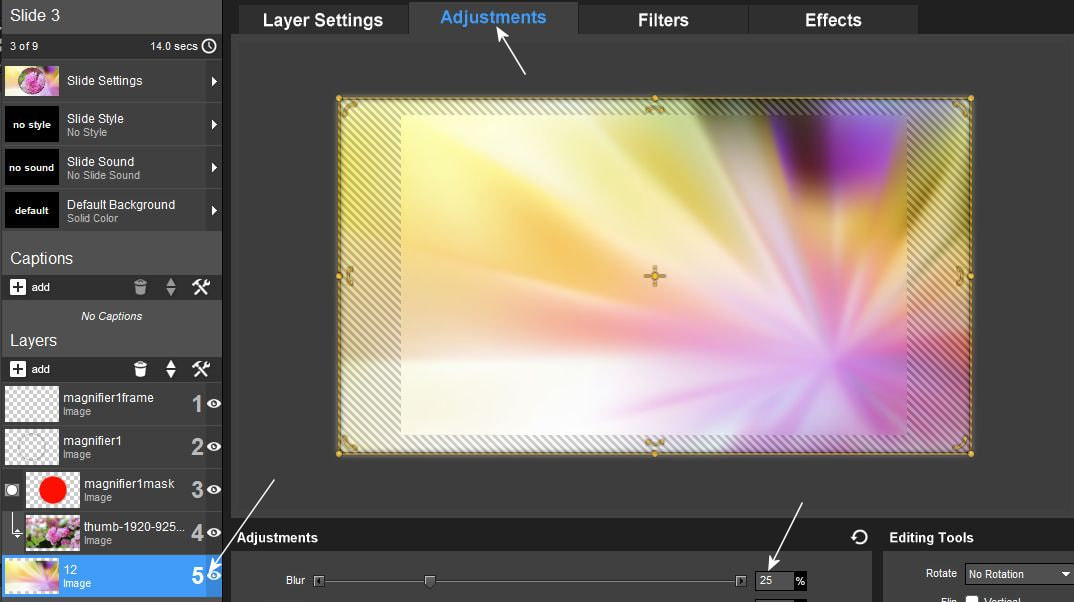
14. Itt egy variációt láthattok ehhez az effecthez amelyet a saját videódban alkalmazhatsz amennyiben ezt szeretnéd. Vagyis a hátteredhez ugyanazt a képet használod mint a maszkos képed. Ilyenkor a remek hatás kialakításához semmi mást nem kell tenned mint az azonos háttérképed blur-ját az Adjustment menüben 25%-ra teszed.
Here you can see a variation of this effect that you can use in your own video if you want. In other words, you use the same image as your mask image for your background. In this case, to create a great effect, you don't have to do anything other than set the blur of your background image to 25% in the Adjustment menu.
15. Itt egy másik megoldás ehhez az effecthez ha valamilyen másik hátteret teszel be és annak a blur-ját teszed 25 %-ra. Mindegyik megoldással szép hatást tudsz elérni. De azzal is ha nem blúrozol egy passzoló hátteret egyáltalán. Ez a te döntésed ki kell próbálgatnod akár cserélgetni is a háttered amíg a látvány neked tetszö módon létre nem jön.
Here is another solution for this effect if you insert some other background and set its blur to 25%. You can achieve a nice effect with each solution. But even if you don't blur a matching background at all. This is your decision, you have to try and even change your background until the view is created the way you like it.
Ha valaki a nagyítót akarja használni itt a csomagban megtalálja azt de ne feledd, hogy a Corelban ehhez a mérethez kell megcsinálnod a maszkot és az üvegezést is.
If someone wants to use the magnifying glass, they can find it here in the package, but remember that in Corel you have to make the mask and glass for this size as well.
| magnifyer_with_leftt_hand.rar |