Ebben a bemutatóban a Collage Effect ( kollázs effect ) készítésével ismerkedünk meg. Ezzel egyidejüleg egy másik keretezési módszert is megtanulunk egy teljesen külön rétegen. A Collage effecttel is igen különleges látványú videót tudunk készíteni.
In this presentation, we will learn about the creation of the Collage Effect. At the same time, we learn another framing method on a completely separate layer. With the Collage effect, we can also create a very special looking video.

Elöször válassz magadnak témát. Keress képeket 1280 x 720-as méretben és már neki is láthatsz a szerkesztésnek.
First, choose a topic for yourself. Search for images in 1280 x 720 size and you can already see them for editing.
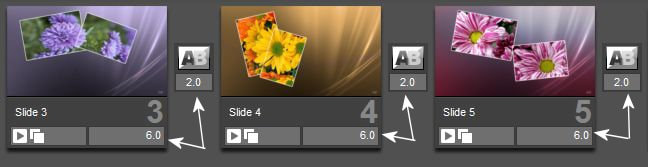
1. A csempéidet ehhez a vidihez ílyen másodpercekre állítsd be.
Set the time of your tiles as you see in the picture.
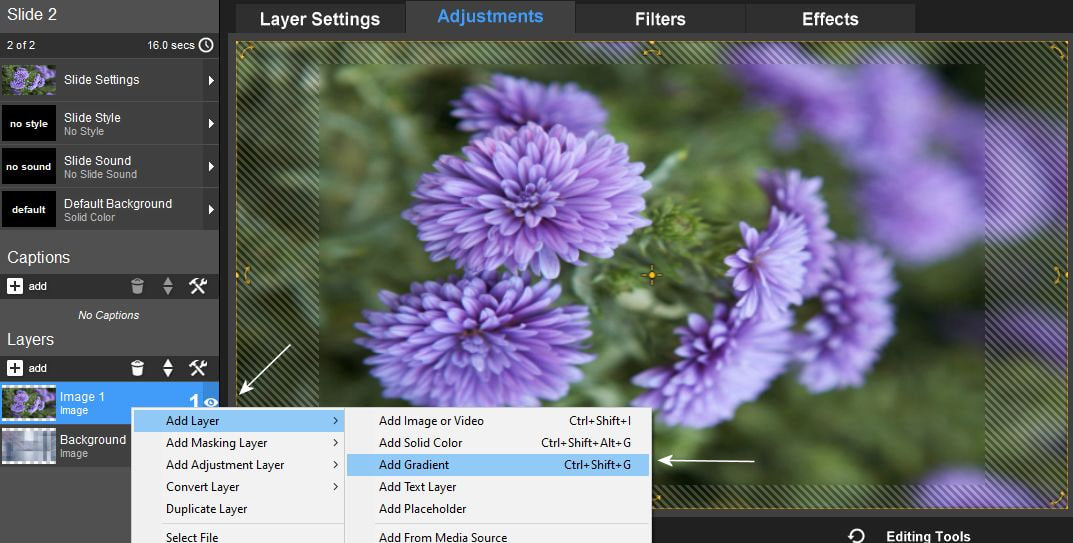
2. Vigyél be az elsö csempére egy backgroundot és egy képet rétegként. Adj hozzá egy gradient réteget.
Add a background and an image as a layer to the first tile. Add a gradient layer.
3. Amikor kinyílik a gradient akkor a hátsó pontját is fehér színüre kell tenni. Vagyis katt a color kockára.
When the gradient opens, its rear point must also be set to white. Click on the color cube.
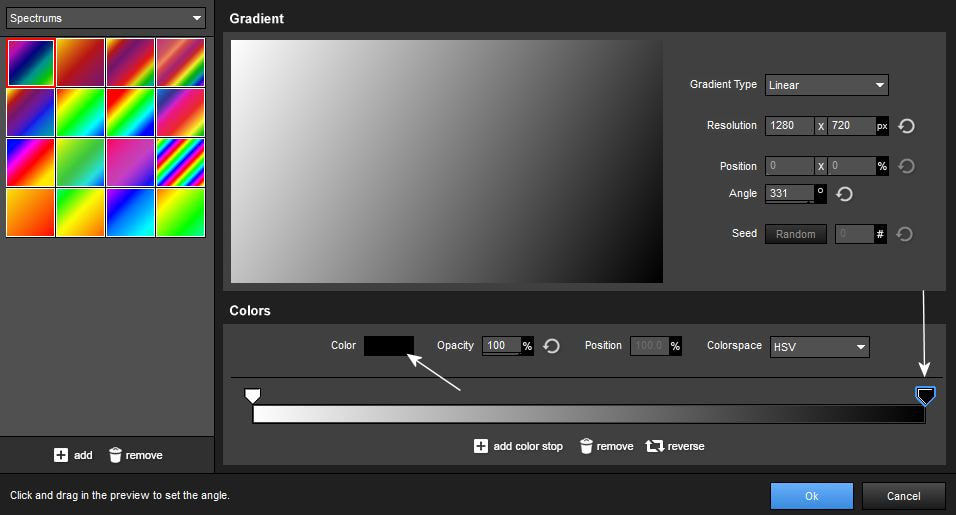
4. A legördülö kis ablakban állj a fehér színre és apply.
In the small drop-down window, select white and apply.

5. Amikor mindkét oldal fehér akkor a méretet állítsd át 300 x 200-ra.
When both sides are white, change the size to 300 x 200.

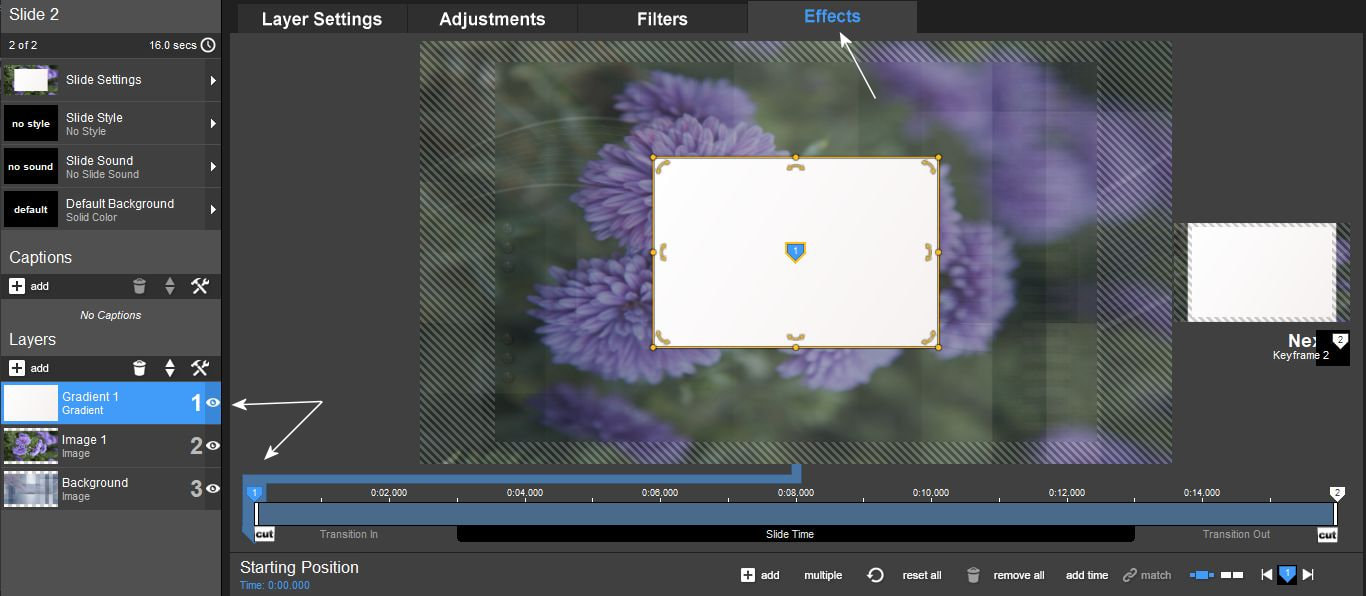
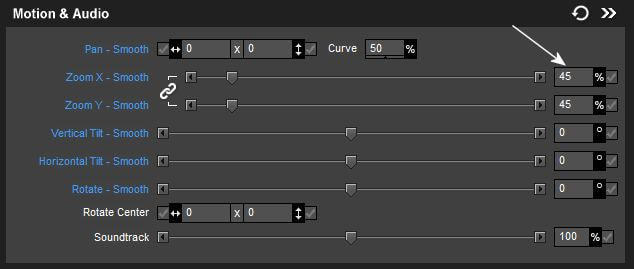
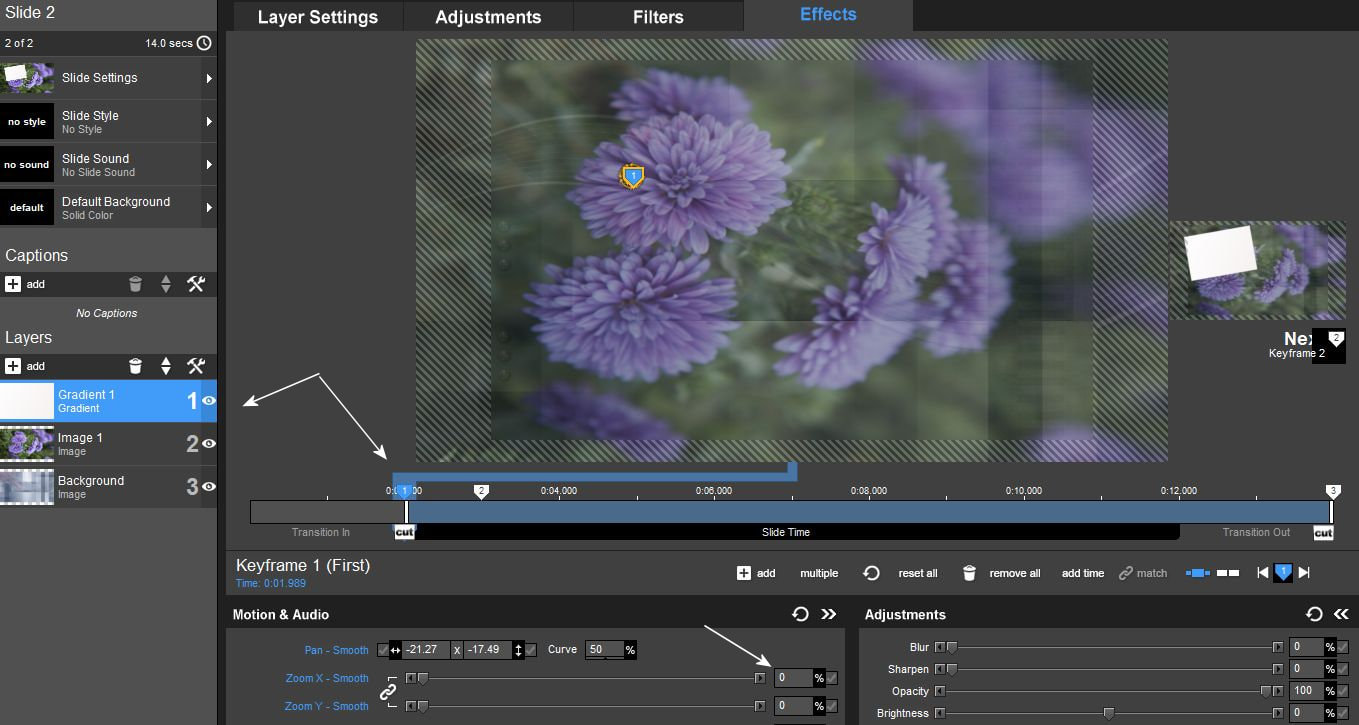
6. Ez a réteg akkor a képréteged közepére kerül. Menj az effect menüre. Az 1-es keyframe ponton a zoom-ot állítsd 45-re.
This layer will then be placed in the middle of your image layer. Go to the effects menu. At keyframe point 1, set the zoom to 45.
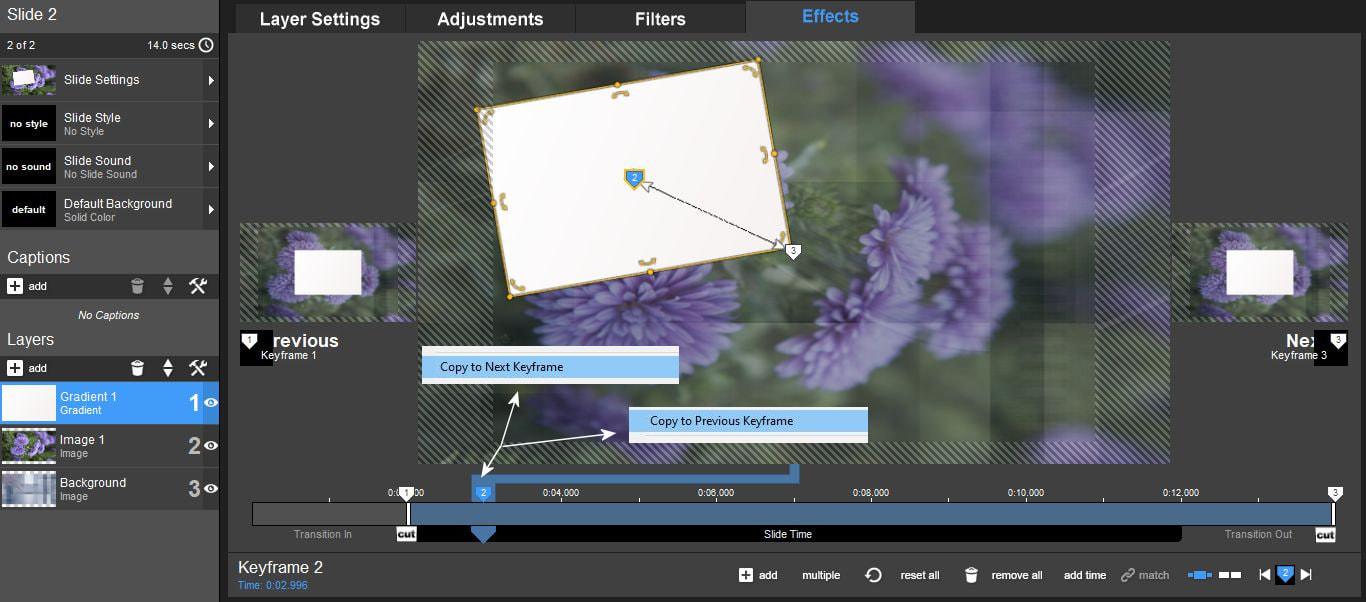
7. Húzd be az 1-es keyframe pontot a feket léc kezdetéhez. Tegyél be egy 2-es keyframe pontot oda ahogy azt itt a képen látod. Majd fogd meg azt és vidd el a képernyöd bal felsö része felé és el is fordíthatod. A pozíció így magától alakul ki.
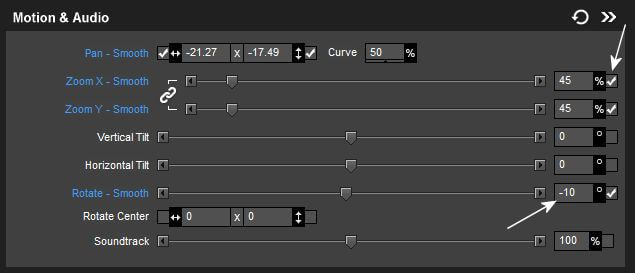
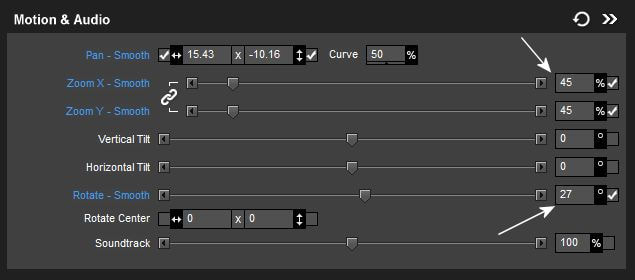
De az alsó képen látható értékeket is beütheted ahogy neked jó. Majd a 2-es keyframe pontot mind az 1-es és mind a 3-as keyframe pontra át kell másolnod.
Drag keyframe point 1 to the start of the black bar. Insert a 2nd keyframe point there as you see it in the picture. Then grab it and move it towards the upper left part of your screen and you can also turn it around. The position thus develops by itself. But you can also enter the values shown in the bottom picture as you like. Then you have to copy keyframe point 2 to both keyframe points 1 and 3.
8. Ezután állj vissza az 1-es keyframe pontra és a zoom-ot tedd nullára.
Then go back to keyframe point 1 and set the zoom to zero.
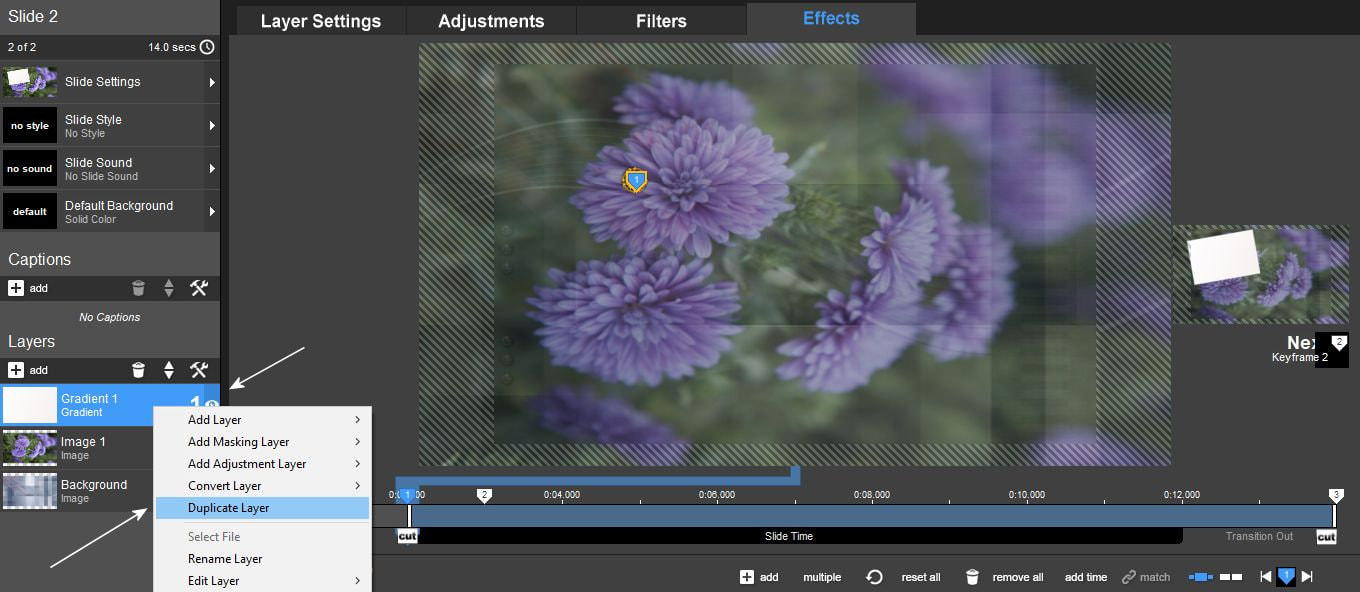
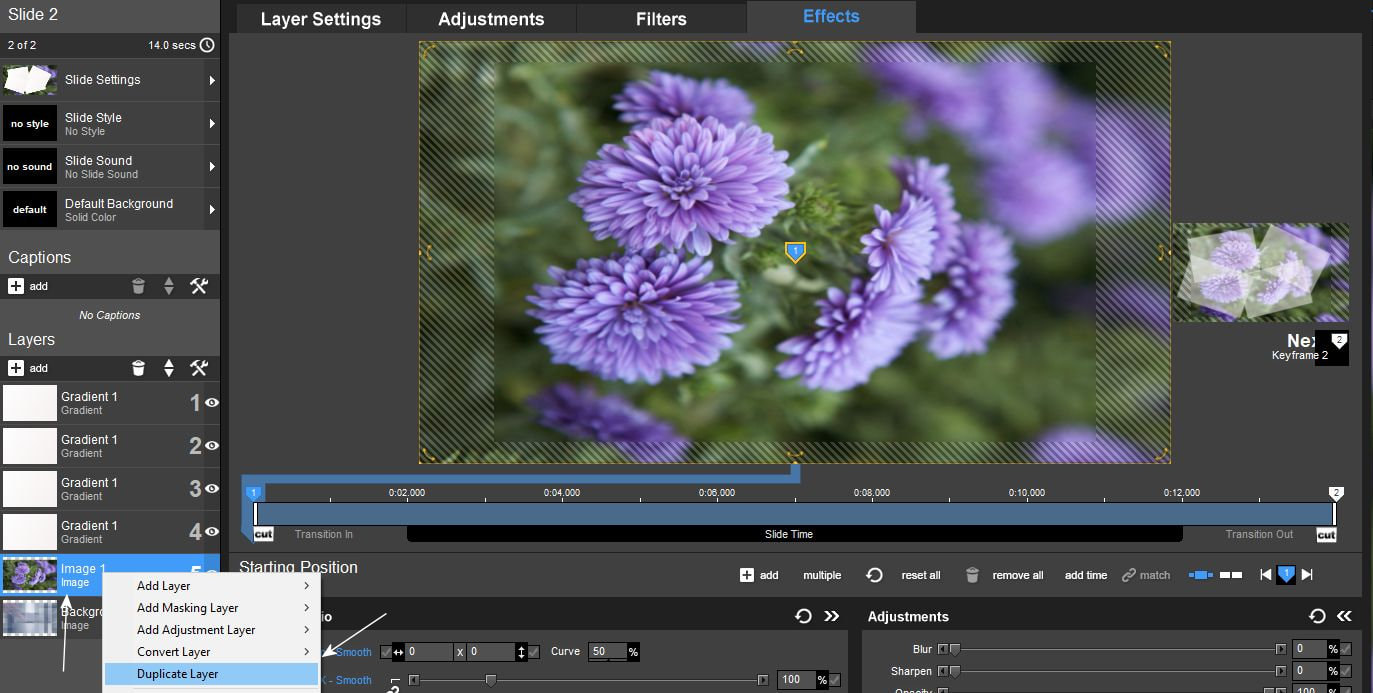
9. Duplázd meg ezt a fehér felsö réteget.
Duplicate this white top layer.
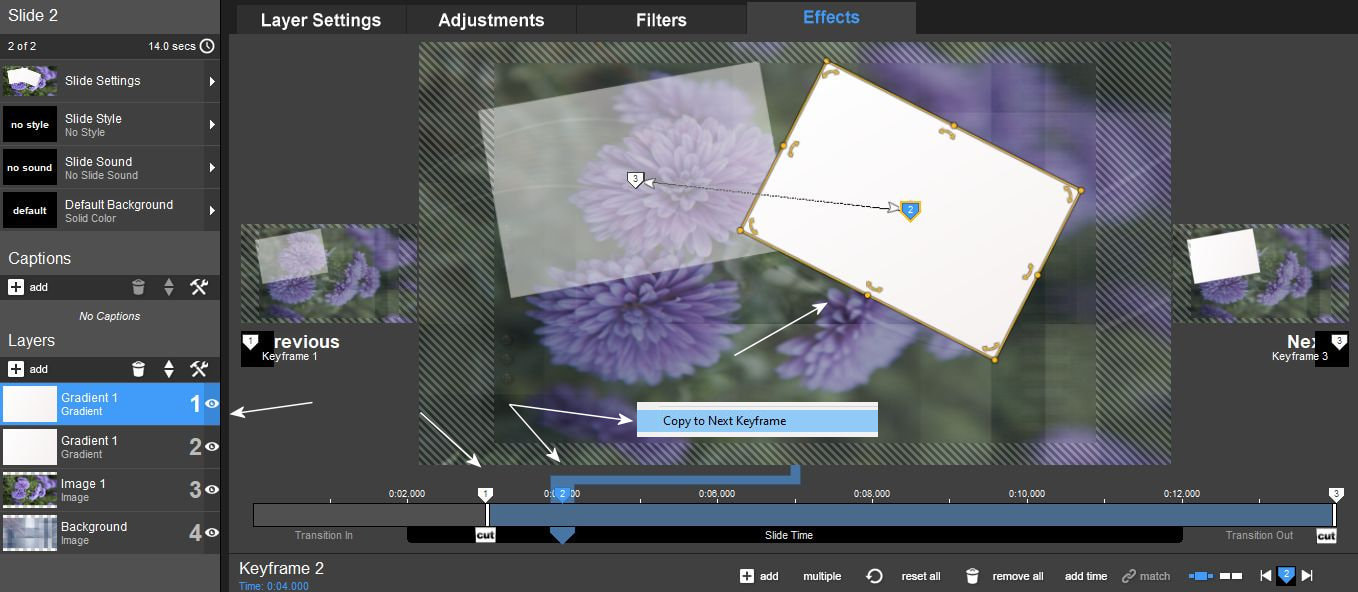
10. Most ezt a réteget állítsd be pozícióba és elforgatásba. De a keyframe pontokat is hátrébb kell vinned. Az 1-est kb. oda ahol az elöbb a 2-es volt és a kettest pedig kb. ugyanolyan távolságra mint az elözö rétegen volt. Ezeket a pontokat majd késöbb pontos értékekre tesszük a keyframe editorban. Itt már csak a kettes keyframe pontot másoljuk a hármasra.
Now set this layer to position and rotation. But you also have to move the keyframe points further back. The 1st approx. to where the number 2 was before and the two approx. at the same distance as it was on the previous layer. We will later set these points to exact values in the keyframe editor. Here we only copy the second keyframe point to the third one.
11. Ismételd meg a fenti müveletet még kétszer, hogy 4 fehér réteged legyen és ahogy szeretnéd úgy forgasd és mozgasd el öket a képernyödön, és a keyframe pontokat se felejtsd el mindig hátrébb vinni a fekete lécen.
Repeat the above operation twice more so that you have 4 white layers and rotate and move them as you wish on your screen, and don't forget to always move the keyframe points back on the black bar.

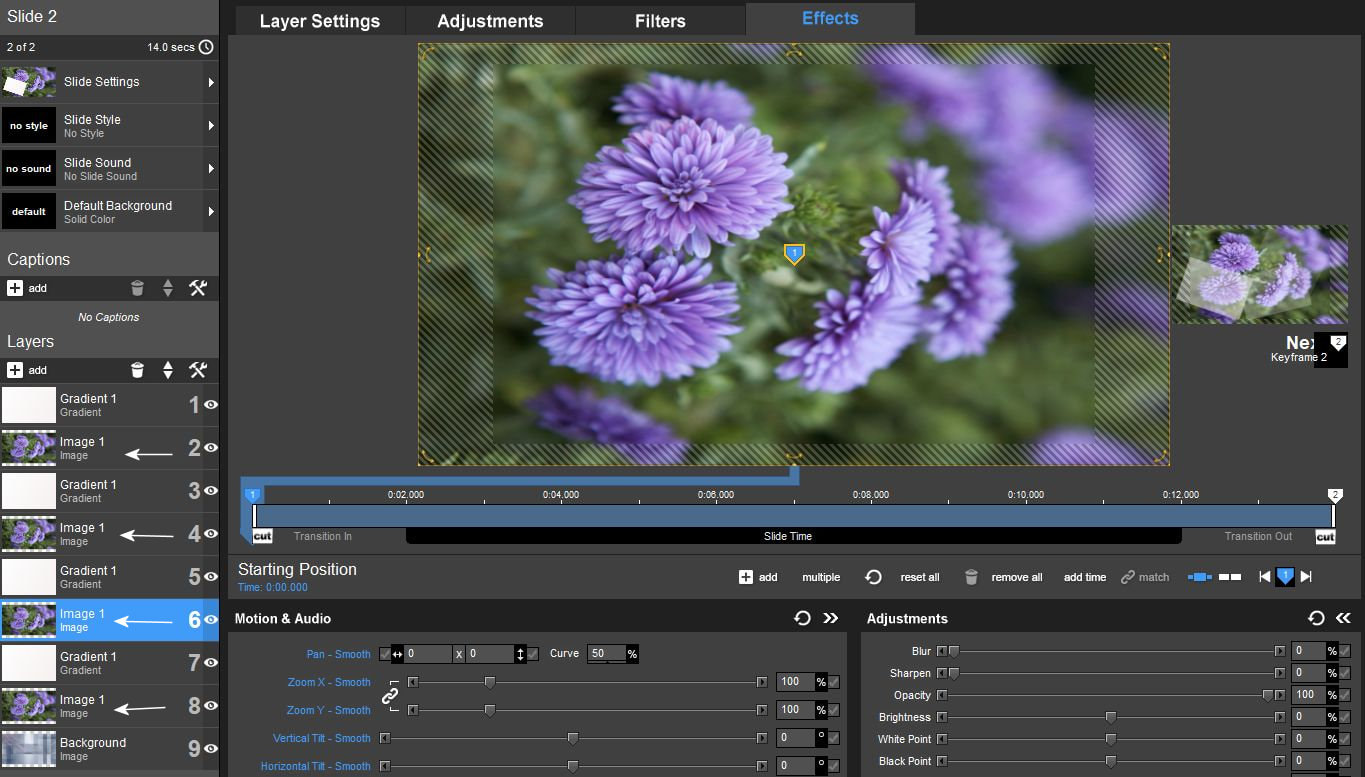
12. Amikor készen vagy akkor duplázd meg a képrétegedet háromszor.
When you're done, double your image layer three times.
13. Helyezd el a megduplázott képrétegeidet úgy , ahogy itt a képen látod.
Place your doubled image layers as you see in the image here.
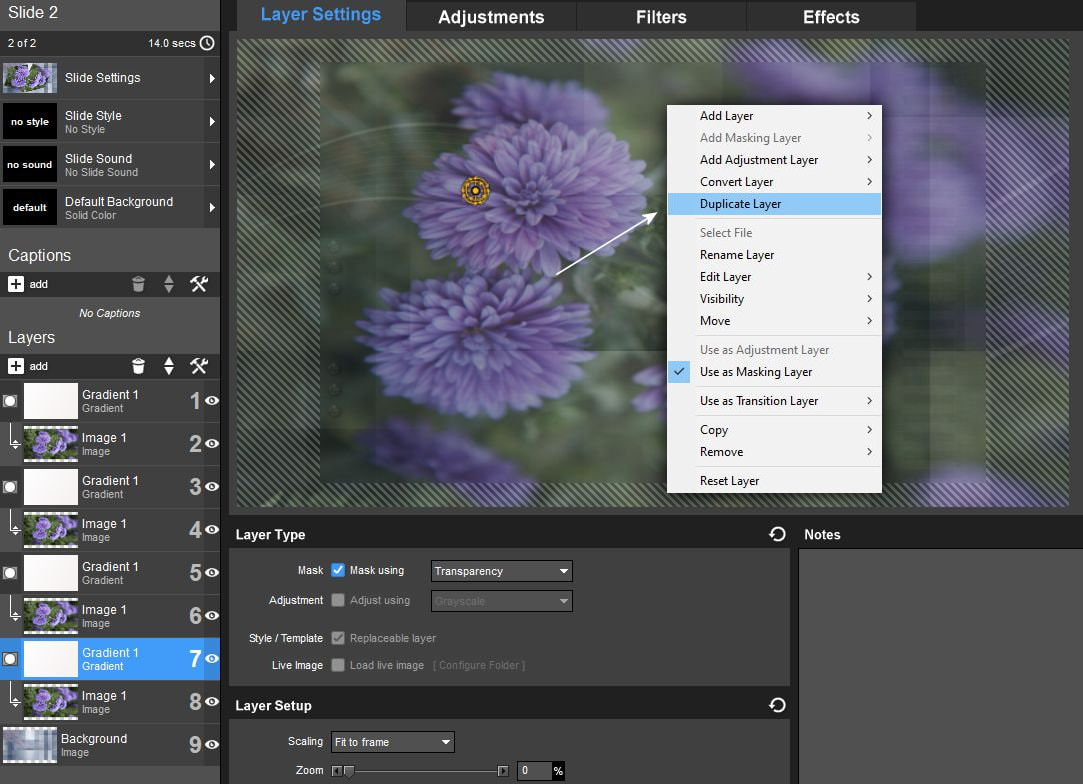
14. Állj a képek feletti fehér rétegekre és mindegyiken végezd el ezt a müveletet.
Tegyél pipát a mask using kis négyzetbe , nyisd le a kis fület a grayscale végén, és állj a Transparency menüre.
Stand on the white layers above the images and perform this operation on all of them. Put a tick in the mask using small box, open the small tab at the end of the grayscale and go to the Transparency menu.

15. Most az összes fehér réteget duplázd meg úgy hogy rájuk állsz.
Now duplicate all the white layers by standing on them.
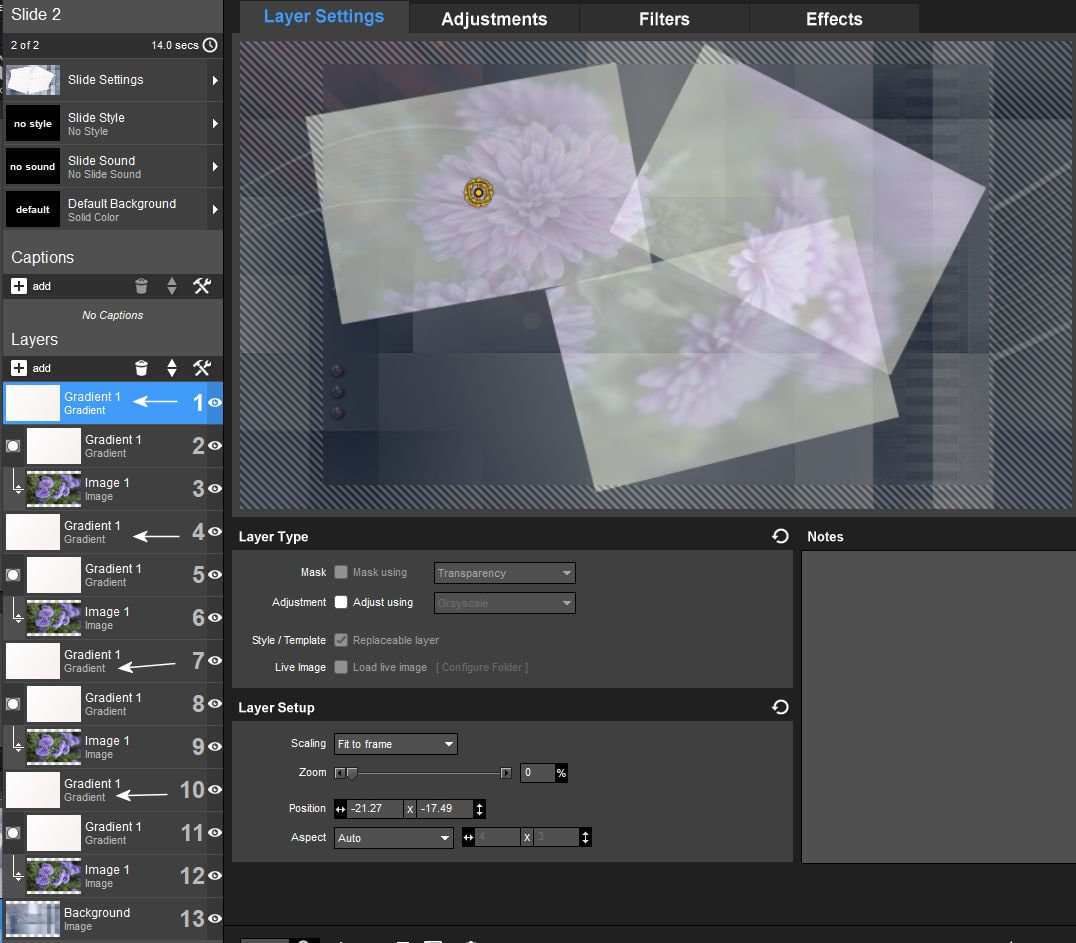
16. Ha jól dolgoztál akkor a rétegeidet így látod. Csak akkor menj tovább ha nálad is így néznek ki a rétegek.
If you worked well, this is how you see your layers. Only continue if the layers look like this for you too.
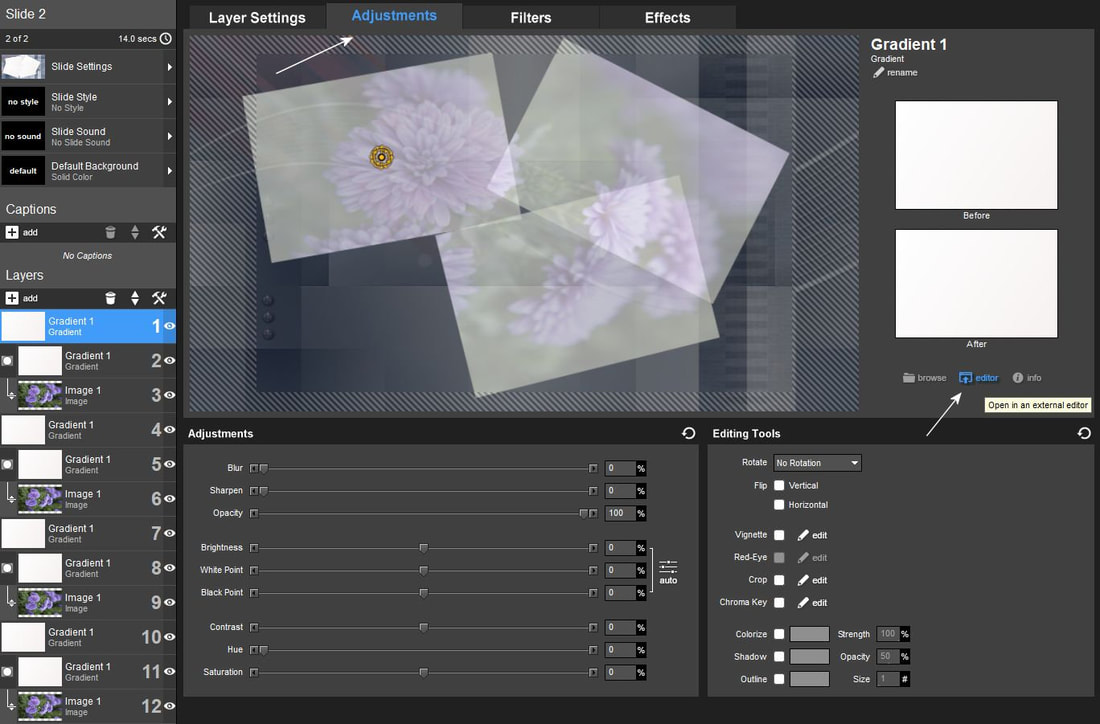
17. Most a megduplázott fehér rétegeken kezdünk dolgozni. Ezt a több lépéses müveletet szintén mindegyik rétegen el kell majd végezned!!!!
Tehát állj a felsö rétegre és menj az Adjustment menüpontra.
Katt a jobboldalon levö editor kék feliratra.
Now we start working on the doubled white layers. You will also have to perform this multi-step operation on each layer!!!! So stand on the top layer and go to the Adjustment menu item. Click on the blue editor on the right.
18. Amikor feljön a gradient alapunk, akkor az elsö pontjára állva az opacity kockát tedd nullára.
When our gradient base appears, set the opacity cube to zero by standing on its first point.
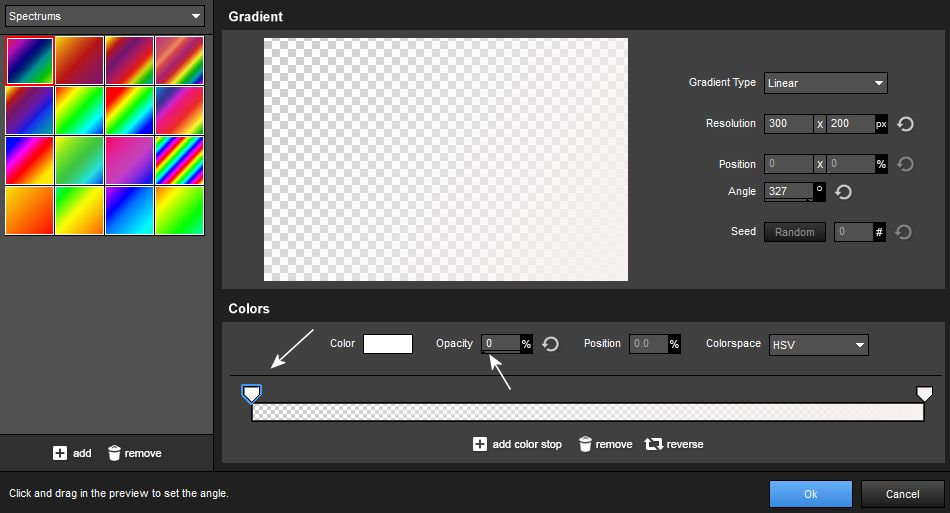
19. Ugyanezt csináld meg a hátsó pontján is.
Do the same at the back point.

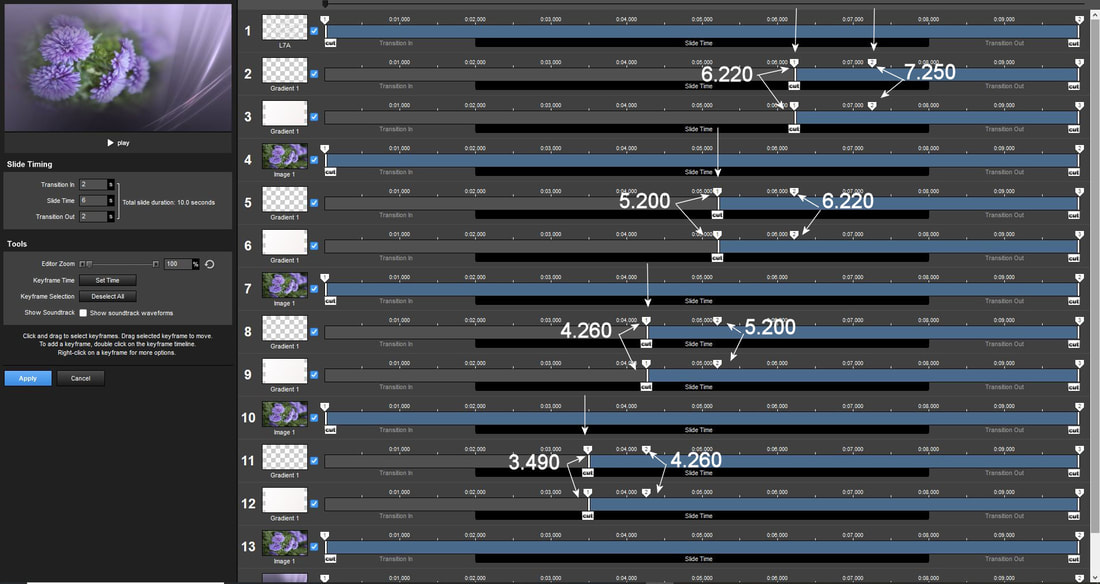
20. Ha mindegyik duplikált fehér rétegen végeztél a fenti müvelettel, mostmár kinyithatod a keyframe editort és a Set Time segítségével ezekre az értékekre teheted a keyframe pontokat a megfelelö rétegeken. Elvileg neked is 14 rétegnek kell lennie. Ennél a müveletnél figyelmesen dolgozz!!!!
If you have completed the above operation on all duplicated white layers, you can now open the keyframe editor and use Set Time to set the keyframe points on the proper layers to these values. In principle, you should also have 14 layers. Work carefully during this operation!!!!
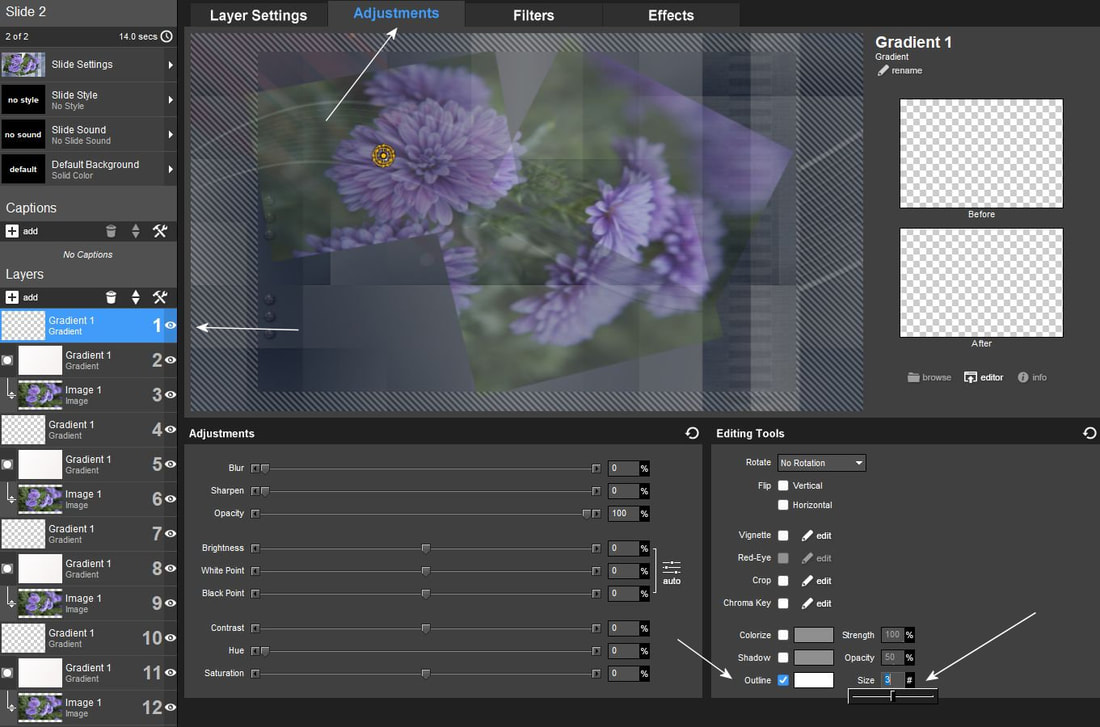
21. Utolsó müveletként Be is tudjuk keretezni a képdarabokat színtén a mostmár áttetszö rétegeinken. ( Réteg 1, Réteg 4, Réteg 7. Réteg 10. )
Adjustment - Outline - 3
Ha minden rendben csak akkor másold ezt a csempét tovább , hogy folytasd a vidivet egy képcserével. De ha mindegyik csempén csak így jelennek meg a képeid az nagyon unalmas lesz tehát igyekezz máshova helyezni és forgatni öket.
As a final step, we can frame the image pieces in color on our now transparent layers. ( Layer 1, Layer 4, Layer 7. Layer 10. ) Adjustment - Outline - 3 If everything is fine, only then copy this tile to continue your video with an image exchange. But if your images only appear like this on each tile, it will be very boring, so try to place and rotate them elsewhere.